
How to Burn Blu-ray Disc on Windows & Mac For Free
Guide to Burning Blu-ray Discs with Built-in Tools and Popular Software


Blu-ray remains a reliable choice for archiving high definition content, even as optical discs have become less common. A single BD-R holds 25 GB—about five times a standard single layer DVD—so it works well for movies, concerts, camera masters, and ISO files with clean video and audio.
I did not start burning discs for nostalgia. I wanted tidy storage and an offline copy of a 1080p short film plus a few live concerts in lossless audio. After I wrote them to BD-R and dropped a disc into the living room player, seeing my own menu on the TV felt like a small "physical release."
This guide walks through Blu-ray burning on Windows and macOS, from preparation to the actual burn, using both built in options and popular tools. You can create and store HD content on Blu-ray without guesswork.
Things to Prepare Before Burning Blu-ray Discs
A short checklist saves time and wasted media. For consistent quality on Windows and Mac, have the right media, software, and hardware ready.
- Windows PC or Mac: Confirm your system meets the requirements for the burner and software.
- Blank Blu-ray Disc: Choose media that matches your goal: BD-R or BD-RE (25 GB), BD-R DL (50 GB), BD-XL (100 GB or more), or Ultra HD rated if needed.
- Internal or External Blu-ray Burner: A drive that explicitly supports Blu-ray writing.
- Blu-ray Burning Software: For data discs or Blu-ray Video with menus and chapters.
- Videos to Burn: Organize sources into a clean folder before you start.
From my own setup, I keep one BD-RE rewritable disc for test burns, label spindles clearly, and plug an external burner into a powered USB hub.
How to Burn Blu-ray Disc with DVDFab Blu-ray Creator
DVDFab Blu-ray Creator converts common video formats (MP4, MKV, AVI, MOV, and more) into a Blu-ray disc or save as an ISO/folder with optional menus and subtitles. It focuses on consistent authoring and playback while keeping the workflow straightforward.
Key features:
- High quality output at 1080p or 720p with audio options like DTS-HD and TrueHD.
- Menu templates that can pull artwork, cast, and a synopsis.
- Good compatibility with standalone players, consoles, and many media players.
- Faster conversion speeds with GPU acceleration.
- Burn to various disc formats (BD-25, BD-50) as well as AVCHD DVDs (BD-5 and BD-9)
Steps to burn Blu-ray using DVDFab Blu-ray Creator
Step 1. Download and Install DVDFab Blu-ray Creator
- Download and install DVDFab 13 on Windows or macOS.
- Open the app and go to Creator.
- Choose Blu-ray Creator under Creator Mode.
- Add videos with the “+” button or by dragging files into the window.
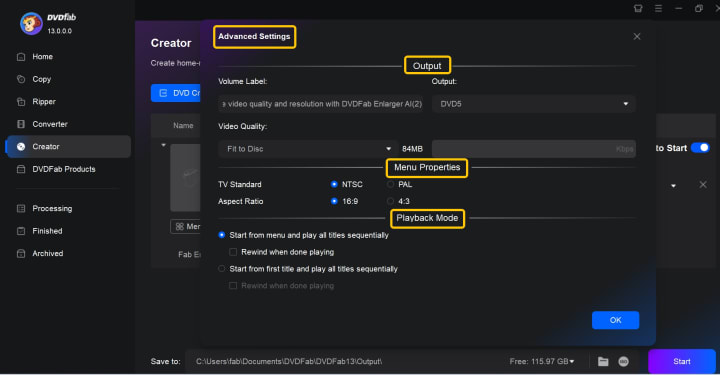
Step 2. Customize the Blu-ray Output
- Click Advanced Settings to set disc size (BD-25 or BD-50) and quality.
- Open Menu Settings and video editor to adjust menu templates, crop clips, add subtitles, and more.
In my projects I add chapter markers every five to ten minutes for easier navigation and keep subtitles as soft subs when I plan to share the disc. On a mid range laptop, GPU acceleration cut a few minutes off a one hour timeline.
Step 3. Choose the Directory and Burn
Select a physical burner drive to write a disc for standalone players, or choose ISO or Folder if you prefer to author first and burn later. Once everything is set, click Start to burn.
Burning Blu-ray Discs with a Free Tool: ImgBurn
If you want more control on Windows, ImgBurn is a lightweight option. It writes from BIN, IMG, or ISO and supports BD-R and BD-RE including dual layer. ImgBurn also has customization options for the burning process, like creating bootable Blu-ray discs, adjusting burning speed, and verifying disk after burn. These options give you a tailored and stable Blu-ray burning experience for both standard and advanced needs.
Key features:
- Free to use with Unicode file name support.
- Clear Build, Write, and Verify flow for reliable results.
- Wide image format support (BIN, CUE, IMG, ISO, MDS, NRG, PDI).
- UDF 2.5 or 2.6 settings for Blu-ray compatibility.
- When you already have a compliant BDMV or BDAV folder, you can build and write it directly.
Limitations:
- No macOS and Linux version.
- Lack a modern menu editor.
- The interface feels dated.
- Some historical installers bundled third party components
How to burn a Blu-ray for free with ImgBurn?
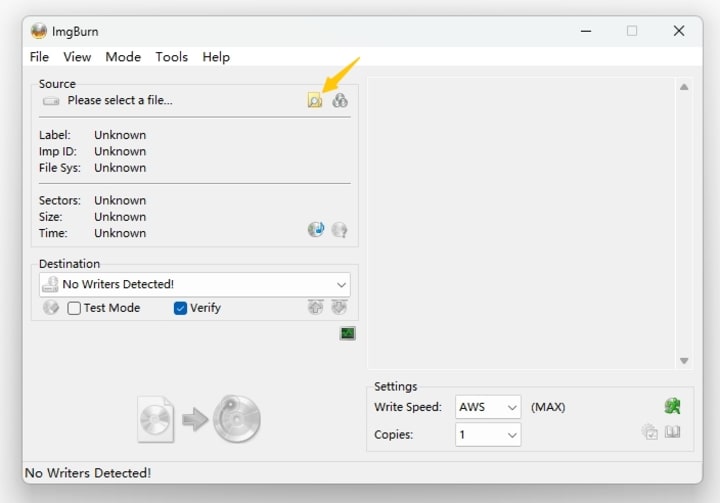
Step 1. Download and install ImgBurn, then open it and select "Write image file to disc."
Step 2. Place a blank Blu-ray disc in your burner, then click Browse to select your ISO or IMG file. You can also use Build to create an image from a folder.
Step 3. Choose a suitable burning speed, confirm the destination drive, and set the file system to UDF 2.5 or 2.6 for Blu-ray compatibility.
Step 4. Click Write to begin burning and run Verify afterward to ensure the disc is fully readable.
Burn Blu-ray Disc on Windows for Free Using File Explorer
If you do not want extra software, Windows File Explorer can write data to BD-R or BD-RE. It is convenient for backups but not for authored Blu-ray Video menus.
Limitations:
- No menu authoring or chapters.
- Designed for data discs, so video authoring is limited.
- Some systems struggle with 50 GB BD-R DL or very large transfers.
- Errors like 0x80071AC3 can appear during long writes.
Steps to Burn a Data Blu-ray with Windows File Explorer
Step 1. Place a blank Blu-ray disc into your burner. When prompted, choose "Burn files to disc."
Step 2. Enter a disc title and choose either "Like a USB flash drive" (for drag and drop but less compatible) or "With a CD/DVD player" (for wider compatibility). Windows will format the disc.
Step 3. Open the disc in File Explorer and drag or copy the videos and files you want to burn.
Step 4. When you have added everything, go to Drive Tools > Eject to finalize and safely remove the disc.
How to Burn a Blu-ray Disc on macOS for Free Using Disk Utility
macOS includes Disk Utility, which can burn data images to Blu-ray when you connect a compatible external burner. It is convenient for data discs, but it is not a full authoring tool for Blu-ray Video menus. macOS also does not include native playback for commercial Blu-ray Video; third party software is required.
Limitations:
- No native menu authoring for Blu-ray Video.
- Some users see occasional failures; power delivery, cables, and media quality matter.
- For playback of commercial discs you need extra software and compatible hardware.
Steps to Burn a Blu-ray with Disk Utility on macOS
Step 1. Connect a Blu-ray burner, insert a blank disc, and open Disk Utility from Applications > Utilities.
Step 2. From the menu, select File > New > Disk Image from Folder, then pick the folder with the files you want to burn. Save the image as .cdr or .iso.
Step 3. In Disk Utility, drag the saved image into the sidebar if needed, right click it, and choose Burn to Disc.
Step 4. Confirm the settings, let the burn finish, and eject the disc once the process is done.
Conclusion
Burning Blu-ray discs on Windows and macOS is easier than it seems once you have the right setup.
If you are deciding how to burn a Blu-ray disc, start with a clear idea of your purpose—backup, playback, or sharing—and then follow the method that fits best. From built-in options to third party tools such as DVDFab Blu-ray Creator and ImgBurn, there is a method for every use case.
About the Creator
Diana
I’m a passionate Blu-ray collector who loves preserving the magic of physical media. Every now and then, I enjoy burning precious family videos onto discs, keeping memories alive in a tangible way.
How to Hire a Mobile App Developer in St. Louis 2026
The regional tech landscape has shifted significantly. The decision to hire a mobile app developer in St. Louis 2026 is now a strategic choice. St. Louis has evolved from a traditional manufacturing hub. It is now a center for agtech and geospatial technology. Financial services also drive the local economy forward.
By Del Rosario2 days ago in 01


Comments
There are no comments for this story
Be the first to respond and start the conversation.