
Bye-bye PowerPoint. Hello Marp!
Could this free Markdown-based tool replace PowerPoint? Yes, but there’s a catch.


Do you find PowerPoint annoying? Me too. It can be laggy at times and has an overwhelming number of options. If you’re in the market for something simpler, today’s your lucky day. Marp might be the right tool to save you time and nerves.
It’s a Visual Studio Code extension based on Markdown, and lets you create presentations that can be exported as PPTX, PDF, and HTML. Today you’ll learn the basics and create your first presentation.
Don’t feel like reading? Watch my video instead:
How to install Marp
You should already have Visual Studio Code installed. It’s a code editor that lets you write anything from readme files to machine learning models. You won’t write code today — if you don’t count Markdown as code, which you shouldn’t.
Once in Visual Studio Code, click on the Extensions tab and search for Marp:
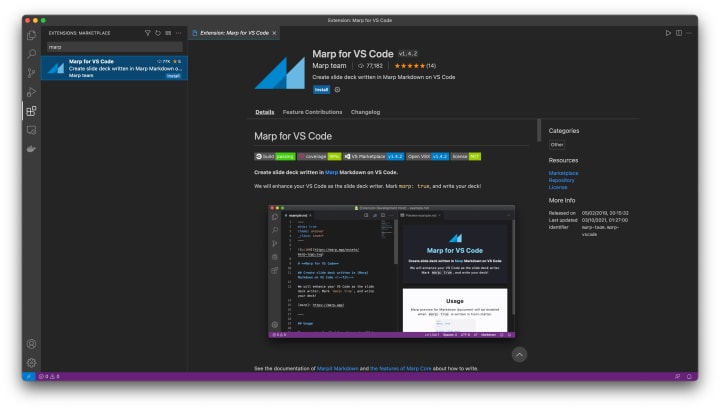
Hit the Install button and you’ll be good to go after a couple of seconds. Then create a folder anywhere on your machine and open it in VSCode.
I’ve named mine marp_slideshow and created a slideshow.md file inside. Feel free to change the names per your liking.
And that’s it — you’re now ready to create your first slide.
Marp: Create your first slides
Do you have the slideshow.md file open? Good. Proceed with the boilerplate. You’ll have to specify you’re using Marp, because the Markdown document can’t know it by default:
Let’s also add an H1 tag below, just so there’s something to see on the screen:
You can now click on the Preview icon to see your presentation:

So far, so good. Leave the Preview window open — it will update automatically as you write.
You can also change the presentation theme:

I’m not the biggest fan of the yellow color, so I’ll show you how to change it a bit later.
You can press CTRL + SPACE to list all available properties. Two of these are author and size, so let’s tweak them:

You can see how we’ve moved from 16:9 to 4:3 aspect ratio, but it’s a personal preference thing.
Adding content
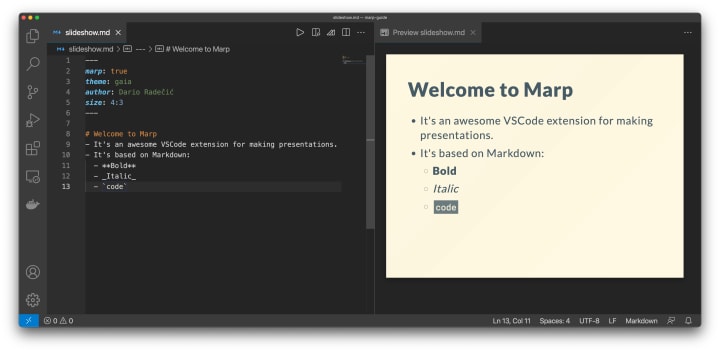
Next, let’s see how you can use Markdown to add content to your slides. The snippet below adds two bullet points. The second one has child elements, and each one is styled differently. These are here to show you how to bold, italicize, and preformat your text:
Easy, right? Here’s how everything should look by now:
You can create a new slide by typing ---.
Let’s add an image to the second slide. I’ve found one showing a neural network on Wikimedia Commons, but you’re free to use any other.
The following snippet adds heading, bullet point, and the image to the slide:
Here’s how it should look like:

Let’s keep things simple today, so we’ll stop here with the content. Next, I’ll show you how to customize the style of your presentation.
Marp: Style your presentation
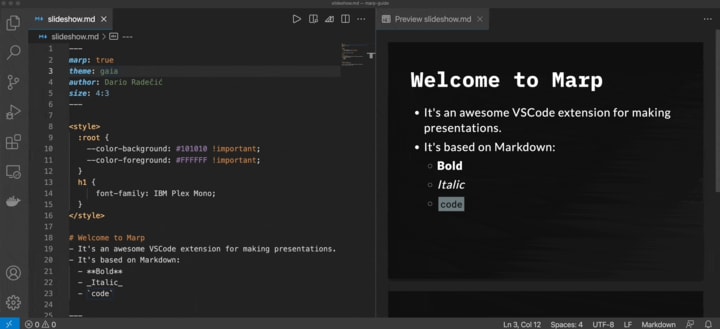
You can customize MARP presentations by adding stylesheets, but it will require basic CSS knowledge. You’ll want to go back to the start of the document and open up the CSS Style tag:
You can then customize the colors by editing the CSS variables. For example, here’s how to change the text and background color:
Your presentation will suddenly get a dark theme:

You can also change the fonts. For example, the snippet below sets all Heading 1 elements to a monospace font:

This one is a custom font, so go with Courier New if you don’t have it installed. You can style any other element to your liking — the only limiting factor is your CSS knowledge.
Finally, I want to show you how to export the presentation.
Marp: Export your presentation
You can save your presentation as a PowerPoint document, PDF file, or HTML. The PNG and JPG options do exist, but they will only export the first slide.
Here’s how to get started with exporting:
I’ll save it both as a PDF and as a Powerpoint presentation document.
Let’s open the PDF now to verify the export was successful:

Everything looks good, so let’s check the PPTX next:

The PowerPoint document opens up, but there’s nothing you can do to the slides. You can’t modify text or images, so this could be a potential dealbreaker.
And that’s just enough for today. Let’s wrap things up next.
The verdict
To summarize, Marp looks like a viable PowerPoint alternative to me, because writing and editing Markdown documents is easy, and it doesn’t overwhelm you with options. Don’t get me wrong, there’s nothing wrong with having options, but most of what I do with slideshows is relatively simple.
I almost never add animations and transitions to the presentation, and I always save it as a PDF document. PDFs are just easier to share and open, as you don’t need to launch a resource-heavy app. Besides, PowerPoint can sometimes be laggy, and that’s just another I don’t want to deal with.
If you need all the capabilities Powerpoint has to offer, then MARP might be too basic for you.
About the Creator
Dario Radečić
Data Scientist & Top Tech Writer | YouTube: www.youtube.com/c/BetterDataScience
Keep reading
More stories from Dario Radečić and writers in 01 and other communities.
Top 3 Reasons Why I’m NOT Buying The New M1 Pro/Max MacBook as a Data Scientist
Disclaimer: I’ve written this article from a data scientist’s perspective. I don’t care for 8K video rendering, or having a gazillion tracks in Logic Pro. I own a 2020 M1 MacBook Pro and do most of the heavy-lifting on remote GPU machines, so have that in mind while reading the article.
By Dario Radečić4 years ago in 01
5 Legitimate Crypto Recovery Companies
The cryptocurrency landscape in 2025 continues to evolve, with over $3.7 billion lost to scams, hacks, and fraud in 2024 alone, according to Chainalysis reports. While blockchain’s immutable nature makes reversal impossible, specialized recovery firms leverage forensic tracing, legal action, and law enforcement collaboration to retrieve stolen digital assets. This guide profiles five legitimate, established players in the crypto recovery space—not as endorsements, but as verified options with transparent operations, documented methodologies, and publicly reported outcomes. Success in recovery depends on timing, chain transparency, and jurisdictional cooperation. No firm guarantees results, and self-reported success rates should be viewed critically.
By Garry Oneal7 days ago in 01
When the Shelter Closes
Across the street from my house, a man slept under a tree, his dog by his side. My first, naive thought: he must be traveling through. But he kept coming back, often sleeping there during the day. Then it hit me—that person might not have a home.
By Bride of Sound5 days ago in Humans


Comments
There are no comments for this story
Be the first to respond and start the conversation.