
Get Decked
A Guide to Building Your Own Outdoor Oasis
Get Decked: A Guide to Building Your Own Outdoor Oasis
Imagine stepping outside to a cozy space that invites relaxation, encourages family time, and provides a quiet area to star gaze at night. Late last summer, when I was quoted $10,000 to build a deck in front of my house, I was shocked. I quickly declined the quote and took responsibility for creating it myself. This choice saved me time and money and also provided me with unique options not offered by a professional contractor. I had the freedom to design the deck exactly as I wanted. Now, I have an outdoor space to enjoy my morning coffee, relax with family and friends, and enjoy quiet moments at night. In this article, I will instruct you on how to build your very own deck with individual choices tailored to your wants and needs.
There are various online resources for choosing a design and layout of a deck. However, I drew my own. You must decide what deck size to build and where to construct it. My deck is eight feet by eight feet, two feet off the ground, with a thirty-six-inch handrail. Several factors go into deciding on the best location for your deck. Consider the purpose, ground conditions, how much sunlight you want, accessibility, and privacy. I built my deck on the east side of the house, just outside the front door. I wanted privacy, not facing a public road, and to enjoy the morning sunshine. The landscape is most level on the east side, and I also wanted to ensure easy access from inside or outside the house. Once you’ve made these determinations, you must select the required materials and tools for the job.
In deciding on materials and tools, you must consider cost, maintenance, durability, and aesthetic appeal. Natural wood is less expensive but will need to be weather-treated. Composite materials cost more but will not require special treatment to protect against rain or sunlight. I chose pressure-treated lumber, and although it costs more than natural lumber, it requires less maintenance and will last longer. My decision to forego composite material was based on the elevated cost and the tools I already had. Due to physical strength limitations, I used a rechargeable battery-operated impact driver and circular saw so I could use screws versus a hammer and nails. I think of screws as the superheroes of the outdoors. They are rust-resistant and ready to face the elements, while nails might just throw in the towel at the first sign of rain. Additionally, if you ever have to make changes, screws are easy to remove. If you want your deck to be the star of the front or backyard show, go for the screws. They’re the fasteners who know how to hold it together—literally! Once you’ve chosen the proper materials and tools, you should head to the nearest lumber and hardware store.
I live in a place so rural that my nearest lumber store is a road trip away. It’s just me, the cows, and a whole lot of wide-open spaces. When I need supplies, I only want to make one trip to town. At the lumber store, I selected pre-cut lumber and also grabbed a level, speed square, shovel, and tape measure. I got tired of playing hide-and-seek with my husband’s tools. It was like a treasure hunt in our garage, except the treasure was always buried under a mountain of random stuff, and the map was written in his secret code. Choosing pre-cut lumber in the lengths I needed for my deck reduced the number of times I used the circular saw. It’s like the DIY version of fast food—quick, easy, and no chance of me accidentally turning my project into a modern art piece that resembles a jigsaw puzzle gone wrong. For the handrails, I bought pre-made with the balusters already installed. Again, this was my choice, but you can cut and sand your own if you prefer. It really is about personal touch. Buying pre-fabricated might be more expensive, but cutting and sanding your own allows customization to fit your style perfectly. Don’t forget to buy screws, concrete, and deck stain or water sealant if you use natural lumber. Once you buy all your materials and tools, head back home and prepare the location for your deck.
Save yourself the drama and potential for a costly mistake by calling 811 first. Think of it like sending out a friendly RSVP to all the underground utilities before you start an excavation party. You don’t want to be the person who accidentally turns their front or backyard into a scene from a disaster movie by hitting a gas or water line. A surprise geyser of water shooting up from the ground is not the preferred way of meeting the fire department for the first time. Once you are cleared to dig, grab your shovel and level--get to work! It will take time and patience to ensure the ground is level, but it will ultimately save you a headache. Since you will need holes for the four-by-four perimeter and internal supports, dig those at least one foot deep. Use your tape measure to make sure you are digging in the right spots. You do not want to finish digging holes only to realize you’ve created a cozy home for gophers instead of a solid post for your deck. I measured an eight-by-eight-foot area and dug at each corner and at the four-foot mark between the corners. This ensured I had enough support to hold the weight of the deck lumber. Once all the holes are dug, place an eight-foot post in each corner hole. Then cut two of the eight foot posts in half—making four, four foot posts. These half-posts are for the holes you dug between the corners. You might be wondering how to secure the posts in the ground. Do you remember the concrete you bought? It’s time to make a fancy smoothie—except instead of a delicious drink, you end up with a heavy, gray mixture that’ll probably make your arms feel like jelly.
Follow the instructions on each bag of concrete by mixing the dry ingredients like a mad scientist and then add water. It’s a race against time to get that thick sludge in the holes before it starts setting faster than your friend can finish a Netflix series. Make sure you do not spill it anywhere except the holes, or you will have hardened patches of cement everywhere! After your cement mixture is ready, stand the four by four posts upright in the center of the hole, and pour about two gallons in each. You will need to use your level to ensure the posts are in the correct position. Using the dirt you dug out of the holes, fill the rest of the empty space up to ground level. If you have a tamper, tamp the mixture and dirt as compact as possible. If no tamper is available, use your feet (with boots on) to stomp the ground around the posts. Channel your inner giant, doing a dance that would make any disco floor proud while hoping your neighbors don’t think you’ve lost your mind. After you have danced on all the areas, you must wait at least twenty-four hours for the concrete to set.
In the twenty-four hours it takes for cement to set around those posts, you’ve got a golden opportunity for some neighborhood shenanigans. You could host a Concrete Watching Party! Invite friends over to contemplate the wonders of hardening cement. Have them bring snacks and drinks because nothing says excitement like staring at a bunch of posts! You could make it into a lottery game by bidding on which post will set first or which post is actually level when complete. Just make sure to enjoy the next twenty-four hours before the real work begins.
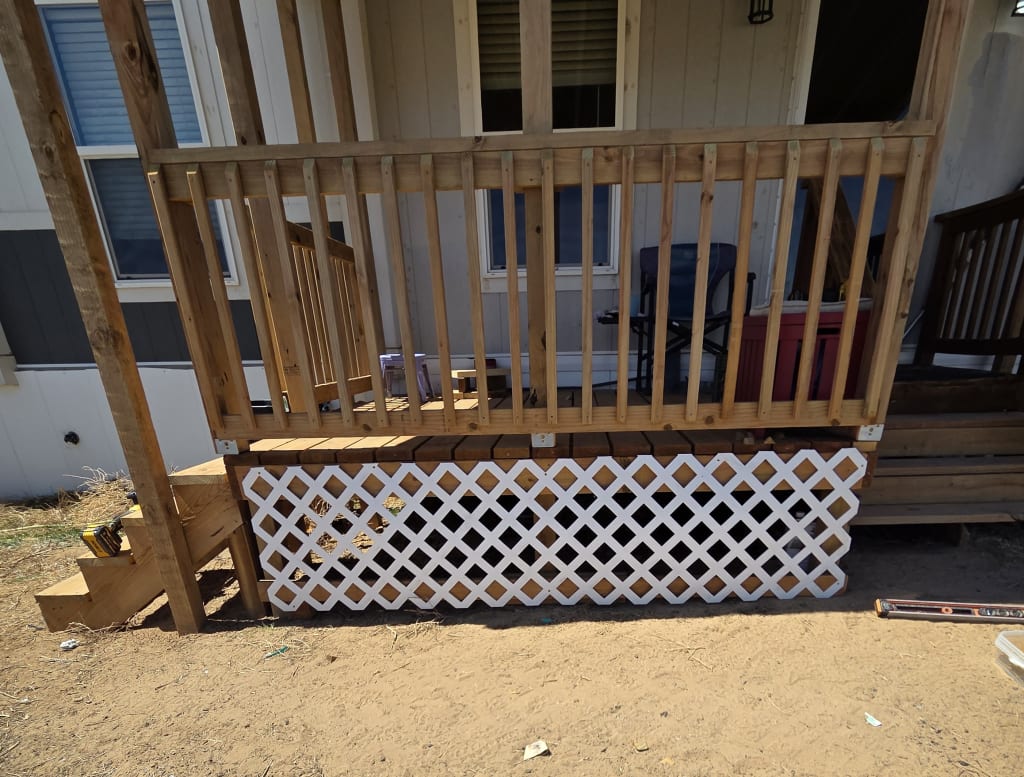
Your posts are now set, and the framing must be built, preferably by you, since it won’t build itself. Lay your framing lumber (2x6s would be the best) in an eight-by-eight square and attach with screws at each corner. I used four screws per corner. Unless you possess superhuman strength, you may need help lifting the square to attach it with screws onto the posts. This is where you discover whether or not your original measurement for the post holes was correct. Once the square is installed, you will have a base on which to lay your decking lumber. When laying the decking lumber, decide on the spacing between each board. It is a personal preference on the exact spacing, but ensure they are all equal. I found a ¾ inch socket to use between each board to obtain my preferred spacing. After all your deck boards are laid and attached with screws on each end, you are ready to install the pre-fabricated handrails. Attach them to the corner posts around the perimeter of your deck.
As long as you follow my instructions, you should have a functional deck. However, there are a few finishing touches to make it look better. I sanded all my deck boards and handrails. Think of sanding like a gentle massage, helping those boards shed their splintery past and embrace a smooth, sleek future. Don’t get too carried away, or you will be replacing all your hard work or ending up with a lot of sawdust in your hair. After I completed sanding, I applied weather sealant to all exposed wood. I wanted to make sure it was protected against rain and sunlight. Now, stand back and admire your work. Invite your friends over. Post to social media. Great job, well done!
There is a unique satisfaction that comes from building a deck on my own. It is a feeling that wraps around me like the warm sun on a summer day. Each deck board I lay, and every screw I attach is a testament to my hard work and determination. I attribute my distinct abilities and continued motivation to God. He used me as the subject matter expert for this project by guiding my insights and experiences to create a beautiful and functional space that will last years. Ecclesiastes 3:12-13 says, “I know that there is no good in them, but for a man to rejoice, and to do good in his life. And also that every man should eat and drink, and enjoy the good of all his labour, it is the gift of God” (The Holy Bible: King James Version, 1953). As I stepped back to admire my deck creation, a sense of accomplishment washed over me. With my bare hands, I transformed raw materials into a fantastic space for relaxation and connection.
About the Creator
Audrey Webb
Audrey Webb is a retired Air Force vet, Mom of 3, & wife to her high school sweetheart. She has not published anything but wants to in the future. She earned a BS in Psych from CCU & a Diploma from Auguste Escoffier School of Culinary Arts.
Keep reading
More stories from writers in Writers and other communities.
A More Mindful Way to Connect: Inside Maude’s Approach to Intimate Wellness
The Rise of Mindful Intimate Wellness in Modern Culture The conversation around intimacy and personal wellness has changed significantly in recent years. Topics that were once considered private or uncomfortable are now being recognized as an essential part of overall well-being. This cultural shift reflects a broader understanding that emotional health, physical comfort, and personal connection are deeply connected.
By Abbasi Publisher5 days ago in Writers
Trouble at the Tea Leafing Café
The rain had started right around the time that Annie was buttering her second thick slice of homemade toast for breakfast, and hadn’t paused since. Not that anyone could tell. The windows of the café were fogged over, and with every seat filled with happy customers munching on fresh baked pastries or steaming bowls of the delicious soup of the day, it was hardly surprising. Annie looked around the room, finally taking a moment to breathe after the lunch time rush. Her old life already felt like a bad memory, a part of her history, always, but just that. History.
By Hannah Moore2 days ago in Fiction


Comments
There are no comments for this story
Be the first to respond and start the conversation.