
The RV Owner’s Guide to 22.5″ Wheel Simulators
Rolling in Style
Why Wheel Simulators Matter to Modern RVers :
Let’s face it: a $300,000 diesel pusher with rusty, pitted steel rims is like a tuxedo with flip‑flops. Wheel simulators—mirror‑polished stainless shells that snap over your factory wheels—instantly elevate curb appeal and protect the wheel from salt, sand, and UV damage. They’re lighter than full aluminum upgrades, cost a fraction of new rims, and can be installed in the time it takes to dump your tanks.
But selecting the right set isn’t as simple as grabbing anything labeled “22.5.” Lug counts, rim widths, and rear‑axle depth all come into play. Choose wrong and you’ll fight wobble, rattle, or a dreaded interstate fly‑off. Choose right and you’ll cruise I‑10 with confidence and shine.
Know Your Wheel Before You Buy :
Every simulator decision starts with three hard facts etched in steel: Wheel Diameter – Class A and Super C rigs ride on 22.5‑inch rims. Lug Count – You’ll see 6, 8, or 10 lug nuts depending on chassis brand. Bolt Circle – The invisible circle connecting lug centers; most RVs use 8.25 inches or 7.5 inches. Write those numbers down before you shop. They’re the DNA of proper fitment.
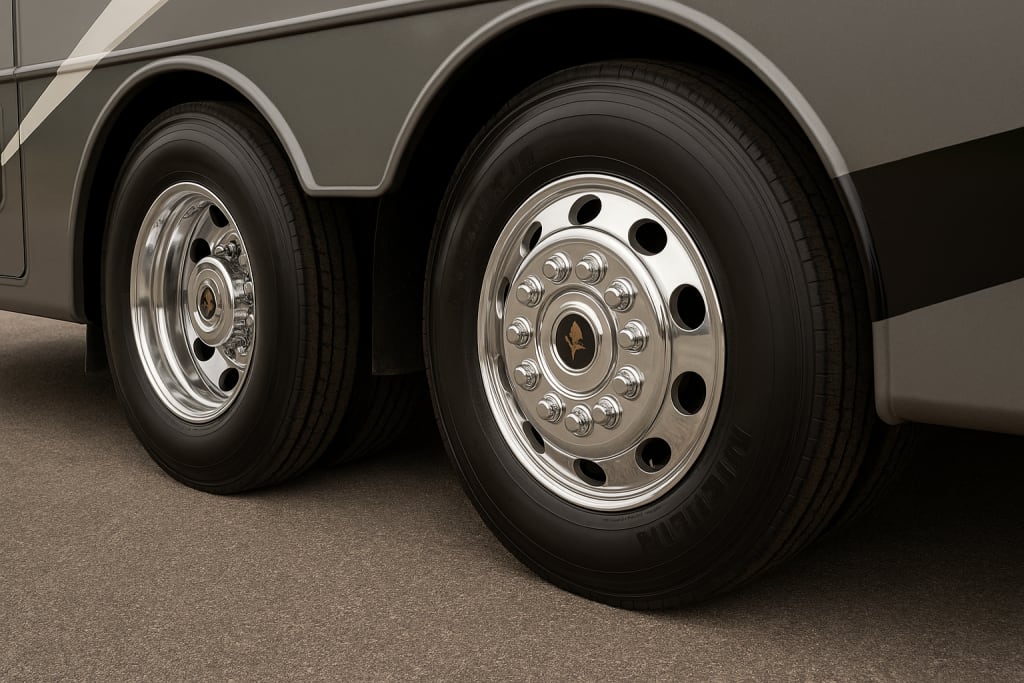
Anatomy of a Six‑Piece Simulator Set :
A 22.5‑inch simulator kit for RVs usually ships as six covers: Two steer‑axle covers – shallow dish, valve‑stem cut‑outs. Four deep‑rear covers – approx. 6 inches deep to clear duals. Ring mounts & security screws – the hardware heroes. Installer tool – star bit for anti‑theft screws. Resin center emblems – proof you bought Genuine Eagle Flight®. The deep rear pieces matter. Cheap four‑piece sets leave drive wheels exposed—it’s like waxing the front half of your coach and calling it done.
Universal Mount vs. Model‑Specific :
The Truth You’ll hear vendors claim “universal 22.5 wheel simulators.” The reality? Universal face designs hide any lug count, but the ring mount still has to match the wheel groove. Reliable brands, like Eagle Flight, publish an exhaustive wheel‑number list (see Section "Wheel‑Number Cheat Sheet for Popular RV Chassis"). If your stamp is on that list, universal really does mean universal—for 6, 8, or 10 lugs.
Steel, Aluminum, or Dayton? The Magnet Test :
Before checkout, perform the world’s fastest metallurgy exam: Grab any kitchen magnet. Stick it to your wheel. Sticks solid → Painted steel. You’re cleared for simulators. Slides or falls → Aluminum. Simulators won’t lock—look into stud‑pilot covers. Hits a spoke → Dayton spoke wheel. Not compatible. If you’re steel, proceed. If you’re aluminum, walk away. No simulator (yet) solves that mismatch.
Wheel‑Number Cheat Sheet for Popular RV Chassis :
Below are stamped numbers common to Freightliner, Spartan, and Prevost motor‑home platforms. Find yours between lug nuts or 1 inch inboard from rim edge (brake‑cleaner helps!). R93790 • 28828 • 29028 • 29169 • 29300 • 29846 • 50487 • 90262E • 90541E • 91048E • 28487 • 28440 • 27834 • 27766 • 27611 … (full 50‑number list available in the master guide)
Pro Tip: If your wheel number is missing, email a photo to [email protected]. The team replies within 24 hours with a thumbs‑up or an exact alternative.
Anti‑Theft Ring Mount Technology Explained :
Old‑school “clip‑ons” pop off faster than a campsite picnic table in a wind gust. The modern answer is ring mount retention: A stainless ring slips into the wheel’s circumference groove. A single tension nut expands the ring to grip the groove walls. The face cover aligns and screws into threaded inserts on the ring. Security head screws require the included star bit—thieves walk away. Road‑tests show ring‑mounted simulators stay tight through potholes, railroad crossings, and 100+ psi cold inflation cycles.
Step‑by‑Step DIY Installation (Campground Friendly) :
Time: 45 minutes | Tools: cordless driver, mild thread‑locker, torque wrench (18 ft‑lb) Clean & Inspect – Wire‑brush wheel groove; remove rust scale. Seat Ring – Insert ring, finger‑tighten tension nut until ring barely spins. Align Cover – Line valve‑stem slot; press face flush. Secure Screws – Dab thread‑locker; run the screws star‑pattern. Torque – Final pass at 18 ft‑lb. Spin wheel—zero wobble. Re‑Torque – After first 50 miles, give each screw a courtesy pull. Campground neighbors will think you hired a detail crew. Let them in on the secret or enjoy the envy—it’s your trip.
Maintenance & Lifetime Warranty Tips :
Wash with pH‑neutral soap; avoid harsh acids meant for aluminum. Polish twice a year with non‑abrasive stainless cream—2 minutes per wheel. Register your serial number at autoenhance.com/warranty within 30 days. Inspect security screws at every oil change. Registered owners enjoy a lifetime, no‑rust guarantee plus single‑cover replacements at cost if a blowout chews one up.
Frequently Asked Questions :
Will they fit my tag axle? If your tag wheel is 22.5‑inch steel and stamped on the list, yes. Order an extra steer cover for visual match. Do I need valve‑stem extensions? Deep‑rear covers are pre‑drilled. Stainless extension kits ($29) make air checks painless. Can I install on a gravel pad? Absolutely. Chock wheels, set parking brake, and you’re good. No jack needed.
Final Checklist :
22.5‑inch painted steel wheels? ✓ Wheel number on approved list? ✓ Need six covers (2 steer + 4 rear)? ✓ Want lifetime shine and theft protection? ✓
Next Step: Grab the limited‑time sale set at $632 (or $594 in a group buy) and read the full technical breakdown here: Ultimate 22.5″ 10‑Lug Wheel Simulator Guide →
See you down the road—sparkling wheels leading the way!
About the Creator
Keep reading
More stories from aaajr design and writers in Wheel and other communities.
Coastline Bound on a Budget: The Complete Georgia→Florida Moving Blueprint
Introduction A Georgia→Florida move looks simple on a map: a few hundred miles down I‑75 or I‑95, a trunk full of towels, and you’re done. But the real math includes hotel nights, condo freight‑elevator rules, SunPass tolls, hurricane‑season buffers, and that sneaky overlap when Florida rent hits before your Georgia deposit returns. As a relocation accountant turned planner, I’ve audited 200+ Peach‑to‑Palm budgets. Here’s the budget for moving from Georgia to Florida you can actually trust—clean ranges, a sample all‑in plan, and decision rules that protect both your cash flow and your sanity.
By aaajr design6 months ago in FYI
5 Best Food Choices at Auto Shows
Attending an auto show is an exciting experience filled with gleaming vehicles, innovative technology, and hours of walking through massive exhibition halls. With so much to see, you need the right fuel to keep your energy levels high. Here are five of the best food choices to enjoy during your next auto show visit.
By Karter Odinabout 19 hours ago in Wheel
I wanted to title this something different, but worried that my chosen title might cause problems entering the United States in the future so this is the new title. It's the greatest title. No one has ever written a title better than this. (All titles unrelated to content).
Let me be honest. I am finding this difficult. Now, I like a challenge, a stretch, a bit of an obstacle course. “Write about the decline of the British Empire in the form of a narrative poem in which your protagonist is an artichoke” I read, and flex my fingers. “Write a haiku to evoke the sensation of sibilance using only the first half of the alphabet.” “Well”, I think to myself, “this should be fun.” But “write about a system that isn’t working”? A system that isn’t working? Now? In 2026? ONE system? My favourite system that isn’t working? The sexiest system that isn’t working? The one giving me the most angst day to day? The one giving me the most existential dread? I am, as I say, finding this difficult. I will own that I have contemplated writing a thousand words on why the steady “all on” setting on my fairy lights is the EIGHTH of seven options which must be sequentially activated to get there, because that is a system that some fool came up with and it definitely doesn’t work, and now who is paying the price, eh? But how can I write about my fairy lights when…. When…. When….
By Hannah Moore6 days ago in Humans


Comments
There are no comments for this story
Be the first to respond and start the conversation.