

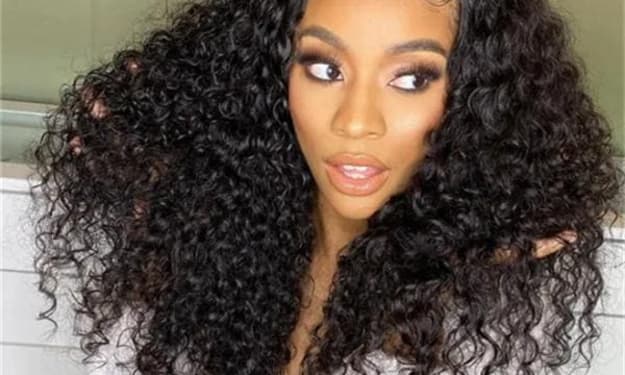
Many women choose glueless wigs because they don't require glue and are easy to put on and take off. However, when wearing one, they often worry about it falling off. For example, the wind might blow it sideways while walking, or the wig might shift slightly when adjusting your hair. Although it's not noticeable, it can still make you feel uneasy. The key to a glueless wig's stability lies in the correct wearing procedure. From hair preparation to final fastening, every step requires careful attention to detail. Today, we'll break down these super practical "Glueless Wig Maintenance Steps." Follow these steps to ensure a natural and secure fit, perfect for daily commuting, shopping, or even light exercise.

How Do Glueless Lace Wigs Stay On?
1. Hair Preparation: Adequate "Basic Foundation"
First, make sure your hair is dry. Wet hair not only makes the wig cap slippery, but also traps bacteria inside. If your hair is long or thick, it's recommended to separate it into several strands and braid them tightly against your scalp. If your hair is short or thin, use a fine-tooth comb to smooth it out and secure any loose strands with hairpins to prevent them from sticking out of the wig cap and affecting its secure fit.
2. Adjusting the Wig Cap: Proper Positioning is Key
Take out a dedicated wig cap (it's recommended to choose a style that matches your hair color to prevent the edges from showing). Slip it on from your forehead, aligning it with your hairline. The brim of the wig cap should generally be level with your natural hairline, or slightly further back (depending on the wig's hairline design). Then, pull the cap back to ensure that all hair is completely enclosed, leaving no loose strands. If the wig cap has an elastic band, gently adjust the tightness to ensure it's comfortable and comfortable.
3. Trimming Excess Lace: The First Step to a Natural Look (Applicable Only to Glueless Lace-Front Wigs)
If your glueless wig has a lace-front, don't rush to put it on. Hold the wig in your hand and compare it to your hairline in a mirror. Use small scissors to carefully trim the excess lace from the edge. Cut slowly and follow the lace pattern as closely as possible. Avoid cutting into the wig strands or cutting too close to your hairline. Leave a 1-2 mm margin for the lace. This will create a more natural fit and prevent the lace from being too short and becoming loose.
If you're worried about trimming the lace, opt for pre-trimmed lace wigs such as HD lace wigs.

4. Combing the Wig: Avoiding Tangles
Use a wig comb (preferably a wide-tooth or round-tooth comb to avoid damaging the hair) to gently comb the hair, especially the ends. Comb out any tangles and keep the hair flowing smoothly. If the wig is curly, comb in the direction of the curl and avoid pulling too hard, as this will disrupt the curl and affect subsequent styling.
5. Wearing the Wig: Align and Gently Lower It
Holding the sides of the wig with both hands, align the lace section of the forehead with your hairline (or the edge of the cap if it's a laceless style). Then, slowly pull the wig back to cover the entire cap, ensuring the back of the head fits snugly against your scalp without any bulges. You can gently adjust the wig as you wear it to ensure it's symmetrically positioned and the length and height are consistent on both sides.
6. Secure with Combs and Clips: The Core Stability Step
This step is crucial for keeping a glueless wig secure! Most glueless wigs come with one to three removable combs (usually located by the ears and at the back of the head), and some even come with small clips. First, locate the combs on each side. Press the top of the comb with your fingers and gently insert it between the cap and your hair, ensuring the teeth of the comb firmly grip the cap and hair. Then, gently press the comb to secure it. Next, secure the comb at the back of your head and insert it into your hair, ensuring a secure grip. If you have extra clips, use them to secure loose hair around the edges of the wig or to reinforce areas not covered by a comb.
7. Styling and Blending: Make the Wig More "Like Your Hair"
After securing the wig, gently play with the hair, especially the bangs and sideburns, to allow the hair to flow naturally. If the wig has loose hair at the parting, use a small comb to gently comb it out for a more realistic look. If the wig has curly hair, gently rub the ends to restore the volume. If a few strands of your own hair are sticking out of the edge of the wig (such as at the sideburns), use a pair of small scissors to trim them slightly to blend naturally with your hair.
8. Final Adjustments: Check for Every Detail
Finally, carefully inspect the wig in the mirror: Check the hairline for a natural fit, ensuring no lace is visible; check the combs on both sides are securely fastened. Gently pull on the edges of the wig to check for looseness; check the fit of the wig at the back of your head for any bulges; and check the overall shape for symmetry, ensuring no unevenness on one side. If any areas are out of place, gently adjust the combs or the angle of the wig until you're satisfied.
9. Other Accessories: Tips for Additional Reinforcement (Optional)
If you're concerned about the wig coming loose during exercise or in windy weather, you can use some additional accessories: For example, use a small amount of double-sided tape (softer and easier to remove than traditional glue) to secure the lace edges. Alternatively, wear a narrow wig band around your forehead for both style and stability. Alternatively, use small wig clips to secure the wig on both sides and near the combs at the back of your head for added security.
About the Creator
Hottest in the Office
Dear Rafi, You’re very distracting to work around. For the first second I saw you the other day, I thought you were some type of executive. It took a moment to realize no, you were just the new guy, dressed up for the job he wants. Be still, my heart.
By Gabriel Shamesabout 22 hours ago in Pride


Comments
There are no comments for this story
Be the first to respond and start the conversation.