
We’ll fix it in the mix
With a well composed photo, the editing part is easy, even fun, and what you can create is virtually limitless.


“We’ll fix it in the mix.” It’s a phrase used in the world of music recording as the last resort. Producers and Engineers might be able to pull a rather underwhelming performance out of the fire with a lot of editing, but often the performance gets scrapped. That’s because it’s nearly impossible to turn a mediocre sound into something amazing. Same is true with photography. You can edit all you want, but you can’t make a bad pic great. Different? Yes. Acceptable? Maybe. Interesting? Sure. But great? No.
Whether it’s creating music or taking photos, the key is getting it right from the start. With a well composed photo, the editing part is easy, even fun, and what you can create is virtually limitless.
So, before we get to the fun part —editing— here are a few tips to help you take better looking photos from the start.
Simple Equipment Is Fine
My phone is my camera. When I see something that catches my eye, I point and shoot. No expensive gear required.
Golden Hour
Photographers know that the best time to take photos is early in the morning or late in the afternoon. That’s because the light is crisp and the shadows are long and interesting.
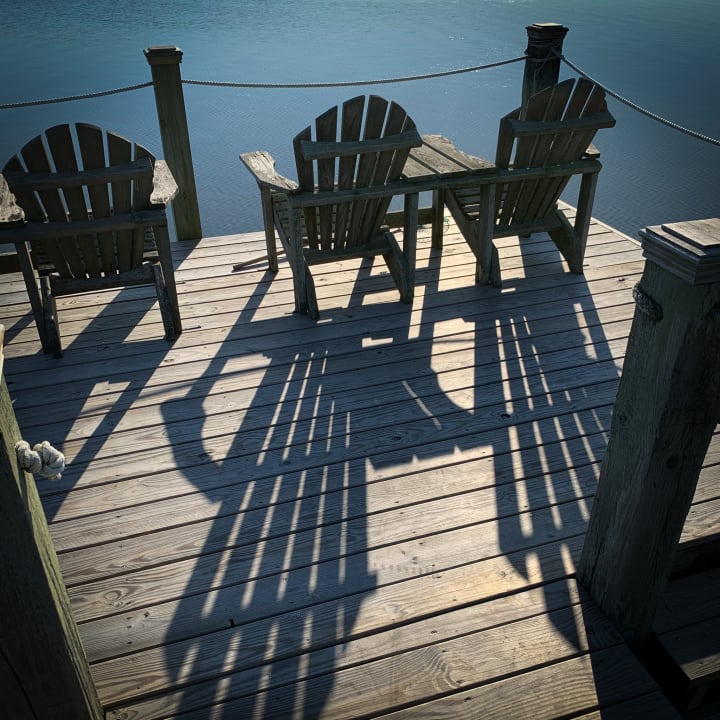
Here’s a shot of chairs on a dock in the late afternoon. It’s not the chairs that make it interesting. It’s the shadows. If this shot were taken at lunchtime, when the sun was directly overhead, the shadows wouldn’t be there. The photo would be flat and uninteresting.

Point of View
Take a look at some photos that really catch your eye. Are the photos taken from eye level? Maybe what sets them apart is that they were taken from a different point of view. A different perspective can make all the difference. Try it for yourself. Take a photo of a hallway or some other location you see every day. Take the first shot at eye level. Then take a second shot from a much lower angle looking upward slightly. Compare the two. I’ll bet the second is more interesting.
In this example, the shot was taken just below waist level. It’s a bit more interesting because it’s a viewpoint that we don’t see everyday. Another trick is to use elements to draw the viewer's eye into the photo. The dock and ropes pull your eyes into the center of the photo while the bird coming towards you contrasts that movement.


Combining Golden Hour with a Different Point of View
Here’s an example of both Golden Hour and a lower point of view. Again, I’m using the dock and ropes to guide your eyes into the photo where the sunset is the star of the show.


Details
Try to look beyond the big picture. Sometimes it’s all in the details. Everyone’s seen a piano before. But what about what’s inside? For this one, I was waiting in the lobby of a hotel where they had an old piano with the top open. *Click* Look how the shadows make everything pop. Shadows add contrast and contrast makes things interesting.


EDITING
So now that you know a couple of little tricks to get better shots, how can you make them look better through editing?
The application I use for editing is Adobe Lightroom. Most of my editing is done on the desktop because I find the screen on the phone to be a little too small to see the details. The camera I use is an iPhone with the stock camera app. If I’m looking for something a little different (that intentionally isn’t subtle in the least), I use an app called Hipstamatic. You can get really creative with your editing using this app.
Bring Your Photo to Life
There are no rules with editing. Experiment. Have fun. Do what looks best to you. Push things too far, make mistakes, make even more mistakes, and then use those to learn.
First off, don’t be shy when it comes to editing. Click on every button. Find out what they do and how they work together. Grab the sliders one by one and crank ‘em. Then dial it back to get the photo exactly how you’d like it. Don’t worry, it’s easy to tell when you’ve gone too far. And if you go too far, just reset the sliders and start over. It's non-destructive, which means the app doesn't save over your photo. Your original is safe.
Lightroom has different editing sections, and you don't need to work in one section before you move to the next. It’s all a balancing act so feel free to jump around a bit.
Note: If the application you’re using has the ability to show clipping, turn it on. It’ll bring up a color overlay that indicates where there’s too much contrast (solid black) and which areas are blown out (solid white). The colors and details of the photo will be much more balanced if you use clipping to guide you as you edit, and you'll definitely know if you went too far.
Adjustments I Use the Most
Cropping and Rotating: When you take a picture, always give yourself a bit of extra room in the frame for cropping and rotating. Take a step back when you take the shot so you don’t lose anything later. There’s nothing more frustrating than getting a perfect, close-in shot that isn’t straight and when you go to rotate it, a part of your photo gets cut off. I don’t have a preference whether I crop first or last. Try both and see what works for you.
LIGHT
Contrast: This one is pretty obvious. Lower the contrast and the darks become darker, increase it and the lights become lighter.
Highlights: This is great for skies. Pulling down the highlights will make the skies pop and clouds become more defined.
Shadows: Increase the slider to increase the details in the darker areas. It's pretty amazing how much detail you'll be able to pull out of the shadows.
COLOR
Vibrance: Adjusts the intensity of the colors.
Saturation: Adjusts the amount of color.
Try not to go crazy with these two. Pull out just enough color to make the image interesting, but not so much that it starts to look artificial. Who wants to see grass and trees that look like they're made of plastic?
EFFECTS
Clarity and Sharpening: I usually add a touch of both but adding too much of either will make everything too crisp, so be careful not to over do it.
Dehaze: This works wonders on hazy days. It also adds a lot of contrast so try to find a nice balance between the two.
Vignette: If I add this, it’s always towards the end of the process. Vignettes add focus to the shot and can be white edges or black edges. It frames the entire outer edge of the photo.
Set a Mood
I have an example to share where creative editing can completely change the mood of a photo. When I took this shot, I wanted to capture the emotion of the sculpture and then make it really dramatic with editing. The light wasn't great that day (didn't have a chance to shoot at golden hour) so when it came time to edit the original, you'll see that in the first version, I increased contrast, highlights, and saturation, and then added a vignette. In the second version, I choose stronger contrasts, and then I converted it to black and white to create a much more somber feel. Same shot. 3 different moods.


As long as you start with a decent photo, creative photo editing makes the possibilities limitless.
About the Creator
Reader insights
Outstanding
Excellent work. Looking forward to reading more!
Top insights
Expert insights and opinions
Arguments were carefully researched and presented
Eye opening
Niche topic & fresh perspectives
Masterful proofreading
Zero grammar & spelling mistakes
On-point and relevant
Writing reflected the title & theme
Keep reading
More stories from writers in Photography and other communities.
Leavie Scott
ORDER HERE Chicago – A Radiant Urban Masterpiece by Leavie Scott Arts & Culture Review – Feature Story In his striking new work Chicago, photographer Leavie Scott captures the soul of the Windy City with a level of vibrancy and emotional resonance that is impossible to ignore. The image immerses viewers in a dazzling skyline bathed in mesmerizing tones of purple, pink, and gold—a palette rarely seen in traditional urban photography and one that instantly distinguishes Scott’s artistic voice.
By Organic Products 3 days ago in Photography
Curious Photography Tips Every Beginner Should Try
Have you ever wondered why two people using the same camera can produce completely different photos? The answer often lies in how well the photographer understands the camera itself. For beginners, cameras can seem filled with confusing buttons, dials, and settings. But what if those settings are actually the key to better photos?
By Craig Spiesmanabout 19 hours ago in Photography
Who is your "Person"?
It's important to recognize that you cannot go through life as easily on your own. My name is Elizabeth and I'm a survivor of child abuse and horrific trauma. Healing from trauma is not a quick fix and recognizing that it will take time, is part of the struggle.
By Elizabeth Woods3 days ago in Psyche


Comments (1)
Great insights