
Marking Moments: Photo Collage
I take you through step by step of my process to create a fun photo collage. Whether you want to compile memories or find new inspiration, this is a go to!

I am someone who really enjoys photography and editing as a way of marking memorable moments. I am not by any means a professional, but I like to snap a photo of a beautiful sunrise or my friends laughing or a good plate of food. When it comes to editing, one of my favorite things to do is compile a collage of pictures that I took over the course of a month, a week, or even just a day, to mark special memories.
For this piece, called “Ancient City”, I took my pictures culminating from a trip to The MET, and I wanted to use this inspiration for a painting. A lot of the collages I make are usually used towards creating more art.
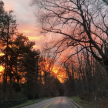
To begin, I took the first picture I wanted to incorporate, which I had taken a week prior. This was of a lake nearby and thought the colors would compliment my other pictures nicely. This is how it looked to start:

Immediately, the way the clouds and trees reflected off of the water remind me of the use of historical artifacts. Ancient artifacts are used as a representation of time and reflect that specific culture or social significance. Before adding any more pictures, I wanted to first adjust this photo. At this step, I used PhotoScape X to adjust the coloring and lighting of the image. This is the app I used to do the same for my other pictures. Some things I adjusted were:
- Darkening - Deepening - Vibrance - Lightening the shadows - Increasing the clarity - Turning the exposure down - Adding a touch of blue and yellow
I recommend looking back and forth from your adjusted images to the original to see what your eye is more drawn to. Do this in small steps and don’t be afraid to experiment. The last touch I added was a gaussian noise to have a little more grain and character to the photo. This is how it turned out:

The main difference is how dark the image ended up, and I chose this to represent the passage of time. Now, I had a background image to work off of and began to begin choosing the photographs I took from the museum. I landed on these two images:

I loved the curves and depth of these images and thought they would intertwine nicely when layering them with the previous photo. In order to get a clean collage, I first had to get rid of the backgrounds on both of them. This is the most tedious step but it is worth it when seeing the images blend together. To do this, I used the lasso tool and zoomed in really close, to get a clean edge on both images. After getting rid of the backgrounds, I took the images back in to adjust the color and light. I mainly wanted to get rid of the shadows, lighten the images, and make the colors more harmonious. This is how it looked once placing the images on top of my background:

I did the same process for the next two images I included. I cropped a bench to cover more space and a cityscape to tie it into my theme. Then, I adjusted the light and placed them into the collage. The last step was to add finishing touches. I added a dotted line to add some style and color boxes in the top right corner. This was the final result:

Like much of my art, looking back on it there are things that I would maybe do differently. But I think it is important to appreciate the process and that every step along the way gets you closer to what makes you happy. Art is a way I can express myself and this piece made me happy. It was fun to create and look back on, marking my day in pictures.
My biggest tip for someone like me who is an amateur photographer and editor is to do the work for yourself. When taking pictures and editing, I am trying to appeal to myself, gather special moments, get further inspiration, and push my creative muscles. I encourage artists of all kinds to do the same and to not get stuck on trying to make a ‘perfect’ piece. Losing self judgment will lead to more growth and more satisfaction.
About the Creator
KB
A snippet of life. Some real, some not. Thanks for reading!
Keep reading
More stories from KB and writers in Photography and other communities.
Curious Photography Tips Every Beginner Should Try
Have you ever wondered why two people using the same camera can produce completely different photos? The answer often lies in how well the photographer understands the camera itself. For beginners, cameras can seem filled with confusing buttons, dials, and settings. But what if those settings are actually the key to better photos?
By Craig Spiesman3 days ago in Photography
Leavie Scott
ORDER HERE Chicago – A Radiant Urban Masterpiece by Leavie Scott Arts & Culture Review – Feature Story In his striking new work Chicago, photographer Leavie Scott captures the soul of the Windy City with a level of vibrancy and emotional resonance that is impossible to ignore. The image immerses viewers in a dazzling skyline bathed in mesmerizing tones of purple, pink, and gold—a palette rarely seen in traditional urban photography and one that instantly distinguishes Scott’s artistic voice.
By Organic Products 5 days ago in Photography
The Piggy Project
I’ve had so many names in this life I lose track of which ones were ever really mine and which ones I wore because someone needed me to. Some were handed to me before I had words to refuse them, before I knew what they meant, before I knew I could say no. Most weren’t meant to hurt. That doesn’t mean they didn’t leave marks. Marks that told me who I belong to, who I am by way of who claims me, recognizes me in the good and bad, who walks beside me.
By Fatal Serendipity3 days ago in Confessions


Comments
There are no comments for this story
Be the first to respond and start the conversation.