
Introduction to Urban Photography
A starter guide to urban photography with DSLR cameras
You may like the vibrance of nature, or diversities of wildlife. And yet, nothing is more vibrant and diverse than living moments of a city life.
You may also want to take photos when you walk inside a large city, you look around, up and down. You see a skyscraper popping up high into the sky. You raise up your camera, focus onto your main target, and this is where you start to get things wrong.
Chapter 1: The Basics - Composition
The busy streets, and roads, are the essence and the soul of your photograph, even though they often end up taking only a tiny space near the bottom of your image.
As a starter, this is how your would like to structure your image, it will consist of three parts:
The first part is the streets, roads, along with the people, cars that are moving onto it. It will often only take a tiny space near the bottom of your image. You probably even end up just photographing the upper body of people or cars moving on it, but this is the key and essence of your photograph.
The second part are the buildings near and around the street or road.
The third part are the high rises that are far away into the background.
Just remember, the first part often takes up the smallest portion of your photo, but it is the most important.
If you like the beauty of a city, and are trying to figure out a way to put that beauty into an image, then this is the composition that you should consider, as something to start with.
To use this composition, you will often have to rotate your camera, and shoot a lot of vertical images, instead of photographing what you see horizontally, so you can photograph the height of nearby buildings.
To give you an idea of what have just been discussed, please take a look at these examples:
Remember this starter composition, because almost everything that you will hear later (but not all) on this page, is built upon this idea.
Chapter 2: The Basics - Zoom
You may sometimes have trouble deciding how to frame your photo properly. You then spend time zooming in and out, and may end up taking several different shots, each on a random zoom. And you would hope that after you go back to the comfort of your own home, you would sit in front of a computer, and compare which of those several shots is the best.
If you were ever troubled by this, then please consider the following zooming tactics:
First, recall the 3-layer urban image composition that was just mentioned above, keep that in mind, because we are going to use it.
Second, start your focal length at about 55mm (or the closest focal length that your lens has), before each shot. Because at around 55mm, what you see through your viewfinder in your camera, is what you see with your bare eyes. If the focal length is significantly less than 55mm, you will see everything gets smaller through the viewfinder, and if the focal length is significantly larger than 55mm, you will see everything being magnified in your camera. At around 55mm, the size of the buildings you see in your viewfinder, will be pretty close to the size of buildings you see through your bare eyes.
Third, look around the city, and use the 3-layer composition method to pick a view with your bare eyes.
Fourth, once you find it, hold your camera vertically, and then look into your viewfinder. Remember, as a starter, you may want to shoot vertical images, so you can easily photograph the height of the nearby buildings.
Fifth, starting with 55mm focal length, if you find the image to be smaller, then zoom in. Otherwise, if you find the image is too big to fit in your frames, then zoom out.
Once you are happy with what you see through your camera, then do whatever the adjustment you would like, such as: aperture, shutter speed, iso, where to focus etc, or just put it on auto mode, and let your camera decide those for you.
Then hold your camera steadily, and press down the shutter button, and you are done.
Part 3: Intermediate - Light
Once you are through with what was just discussed above, you may also want to go to a level higher – that is to make your photo more artistic.
The key in making your photos appear more artistic, is to observe the behavior of light, on how the light wraps around the buildings, bridges, and roads etc.
To be more specific, those are the few things that you should be looking for:
First, the complementary colors. In urban shooting, this often means the colors of yellow and blue. The sky is blue. The glass on the buildings will reflect the sky, and therefore can be bluish also. The sun is yellow, and once the sunlight is shining upon the buildings and roads, it will produce yellowish color and glare onto the parts of those buildings and roads that are out of the shadows. You should pay close attention to the complementary effects of those blues and yellows, and use those effects to create artistic impressions in your image.
Second, the orange color. The oranges that are found in the sunlight, or its glare and reflection, will give your image a golden and warmish feeling. Orange color is also found on the bricks of a building. When the bricks, and sunlight (and its reflection and glare) are being put together in one photograph, the orange of bricks will enhance the golden and warmish effect from the oranges of sunlight.
Third, the contrast. That is the light and the shadows, and how they are wrapped around buildings, roads and bridges, to give your scene a more 3D effect, on a 2D display.
Here are some examples, to demonstrate what have just been discussed above:
Part 4: Intermediate - Pattern
Unlike shooting in nature, where every single detail is different from one another. The structures and objects you see in a city are artificial. Meaning they can repeat. And that is something you can use, to create artistic effects on your photos.
And here are some examples:
Part 6: Intermediate - Making art from Chaos
One annoying thing about looking through roads and corners of a city, is that sometimes, objects, cars, wires, people, and signs can look messy, really messy.
As a photographer, can you do something about this? To make your photos still look good, even though everything around is so chaotic?
The answer is yes, and here are a few of the things that you can do, to create art, in chaos:
The first is to align them. Position yourself properly, and choose a direction that would line up the signs and objects, here is an example:
The second way is to go black and white. When colors are killed, things that are usually looking messy and chaotic, may look beautiful and still in black and white. With the absence of color, the distraction from chaotic patterns are gone also. Here is an example:
Look at the picture above, and think, wouldn’t that picture look really messy and chaotic, when the colors are turned on? With only blacks and whites, doesn't the image above look still and beautiful.
The third method is to kill any empty space in your photos, such as empty roads etc. Empty space is clean and orderly. When empty space is put together with chaotic scenes, it creates a comparison, a contrast, that makes the viewer think the part that is not clean and empty, is chaotic and messy. And if you kill the clean and empty space, the comparison is gone. People will then find it much easier to accept what they see in front of their eyes, without a cleaner space being put up in the first place.
Look at the previous example, do you see any empty spaces in those photos, and think, if the empty spaces were included in the photo, would that make other parts of that photo feel messy?
Part 5: Advanced - Panoramas on Landmarks
This is an advanced topic since you have to know how to do panoramas with your DSLR camera. If you do not know yet, you can search for some tutorials online, and practice some on yourself. You will find this to be very easy and interesting.
The reason to use panorama on landmark buildings, is to achieve those two effects below:
First, is to stand pretty close to a large building, so your camera sees the building as a giant from a close distance. This gives the viewer of your photograph, a feeling of grandness and magnificence about the building that you are shooting at. And of course, when you stand close to a large building, you can no longer put the entire building into one frame, so you have to do the panoramas.
Second, is to include at least one road beside the building, or two, into the photograph. Remember in our 3-layer composition method, the roads and streets are the essence and soul of an urban scene.
There is a downside for using panoramas, that is you will produce geometrical distortions on the subjects of your photos. So use it with care, so you can make the best out of it.
Here is an example of using panorama on landmark buildings:
Part 7: Advanced – Urban Night Scenes
This is also an advanced topic, since in order to take night scenes, you will have to know how to put your camera onto a tripod and do a long exposure, or even perform a HDR merge. If you are new to this, you can search for tutorials online, and you will find this to be very easy and interesting too.
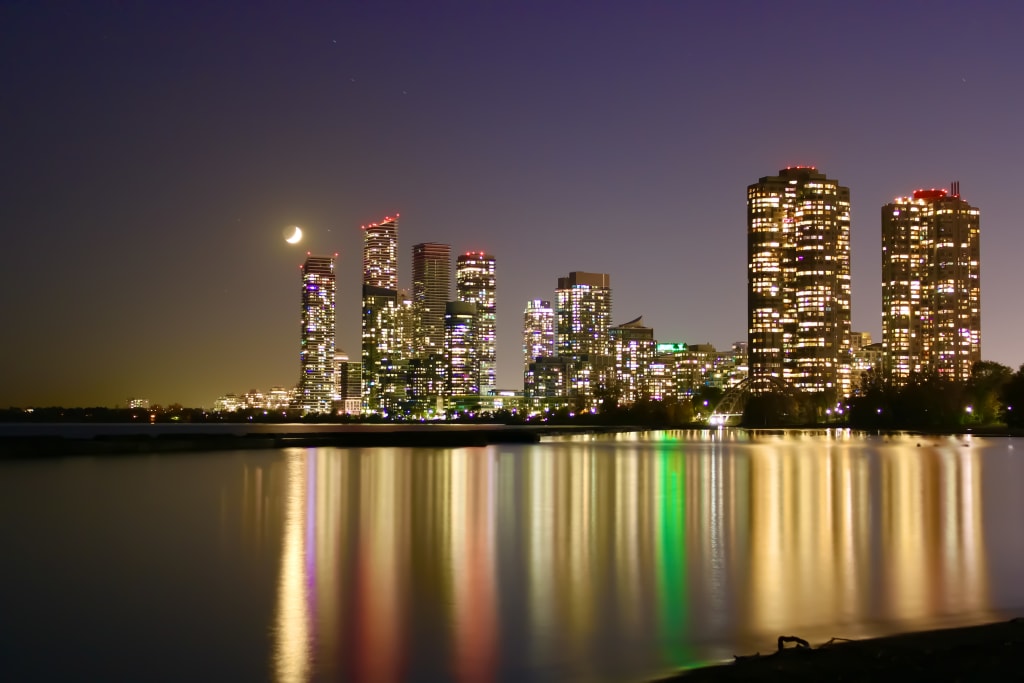
To photograph a city at night is all about creating arts with colors. To achieve artistic effects, when you are photographing in the night, look for one the following things:
First, is the reflection of city lights onto a nearby lake or river.
Second, is to photograph the trails produced by the vehicle lights while they are traveling by.
Third, is to photograph a street scene, near a lamp. If you pick your scene and lamp properly, with good long exposure skills, you can easily get some stunning artistic photos, out of some very simple and ordinary street scenes, which you would call magic.
Here are some examples:
Part 8: Advanced – Things to look for in the winter:
Many people would like to take shots with their cameras on sunny days of spring, summer and autumn, and would like to stay warm inside the comfort of their home during winter. But still, there are some things worth looking for during the winter season in a city.
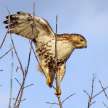
One thing to look for is the wild life on the trees. With the leaves having already fallen down, animals playing upon the branches of a tree are directly visible via telephoto lenses. This can give you more opportunities for a clean shot of a squirrel or a bird on a tree that would be covered by leaves during other seasons.
Another thing to look for is the texture on the freezing surface of a lake or river. You can even use panoramas on them. Sometimes when the frozen surface is reflecting the sun, it can look more special to the eye.
Here are some examples:
And those are pretty much some of the things that can get you started to photograph in the cities. Pick up your camera, keep your beauties and visions in mind, and just enjoy the ride in the urbans.
About the Creator
Haitao Ran
https://haitaoran.picfair.com
Keep reading
More stories from Haitao Ran and writers in Photography and other communities.
The Photographer's Code
You decide to visit your local park. You have become a close confidant to the homeless people who gather there most days. While talking to Cleo and Reed, you notice a new face in the crowd. It belongs to a stick-thin, middle-aged woman. She has her hand on her forehead as if taking her temperature.
By Paul Aaron Domenick6 days ago in Photography
The Gold Tone (Orotone) Technique
She picked it up from a dusty shelf at an estate sale, thinking it was just an old frame. Then the light caught it. The image glowed, not like a print, not like a painting, but like something that seemed to carry its own inner warmth. That was her first encounter with an Orotone, and she bought it without asking the price.
By CurlsAndCommas3 days ago in Photography
Pandora’s Burden
“My brother warned me to not accept gifts from the one who commissioned you,” said Epimetheus to the woman clad in silvery raiments standing at the entrance to the temple. Her silver tiara and the silver rings on her fingers and toes glinted in the firelight cast by torches set on either side of the doorway. Lingering in the shadows, beyond the reach of the flames as she was, he could not tell what she held in her hands. At first what appeared to be a box was perhaps a funerary urn, or maybe merely an apple.
By J. Otis Haasa day ago in Fiction


Comments
There are no comments for this story
Be the first to respond and start the conversation.