
How to Edit iPhone Photos to Create an Exercise Program
Even a non-photographer like me can create a quality product with just a few low-cost tools.

I will say up front that I am not a photographer by trade, nor do I take pictures as a hobby. I own an aging iPhone 7 and as of right now, that is the only equipment I have to take my photos with.
But as a fitness blogger, I’ve picked up a few tricks about photography and photo editing.
For example, a few months ago I had an idea for my first digital product; a printable 4-week fitness program for beginners with images demonstrating the exercises.
Why? Because the world of home fitness is overrun with fitness apps and internet-based subscription services. Don't get me wrong, I love a good fitness app as much as the next person, but they aren't for everyone.
I wanted to create a low-tech, fuss-free printable fitness program that would be a low-cost, one-time investment for my audience.
I’m pleased to say the final product turned out pretty well, especially for someone with nothing but an old iPhone, and a couple of browser-based image editing subscriptions, and an “I’ll figure it out” attitude.
Here’s how I created the photos for my product, step by step.
Step 1: Taking the Exercise Photos
I wanted my program to demonstrate each exercise using 2-3 images. I didn’t have any lighting equipment, so I had to wait for a bright day and set up my “studio” in the living room of my house where there’s the most sunlight.
I removed as much from the background as possible to make editing the photos easier down the road.
I didn’t even have an iPhone stand of any kind so I just kind of propped it up on the back of my couch.
At first, I used my Apple Watch’s 3-second timer to remotely snap pictures from my iPhone once I was in each pose. However, I quickly realized it was a lot faster and easier to record a video of myself moving through the exercises and then take screenshots from the video.
The total program contains over 30 exercises but I was able to capture each exercise on camera in a way that I was satisfied with in about an hour.
Step 2: Erasing the Background
Next, I uploaded all the photos to Canva, a web-based graphic design platform I’ve been using for years to make images for my blog and social media accounts.
I love Canva because it’s super easy to use for non-techy people like me. It has a robust free version, but I subscribe to the pro membership as it’s the only way to gain access to the program’s best features.
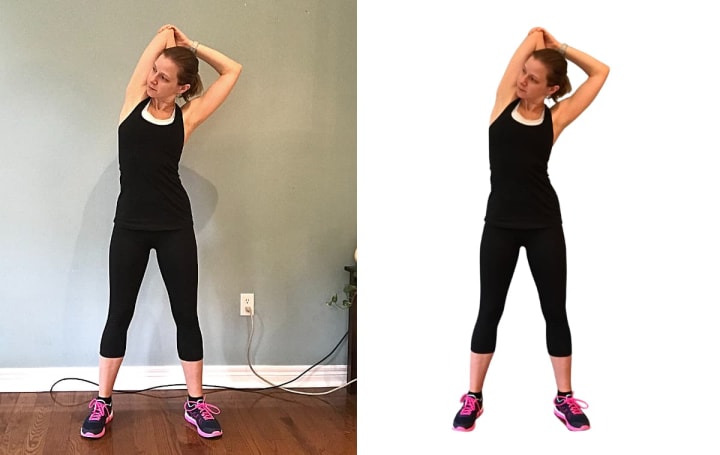
One such feature is the background eraser.
With one click of a mouse, Canva can determine what the focal object is in the picture and automatically erase everything in the background.
It isn’t perfect; sometimes it doesn’t erase something it should and vice versa. But it’s easy to correct this manually with the “erase” and “restore” brushes.
Step 3: Stylizing the Images
I wanted to go a step further to make my graphics more stylized for the final product. To do this, I turned to yet another web-based graphic editor called PicMonkey.
Sidenote: I admit that using two photo editors was not the most efficient way to create my product. PicMonkey also has a background erasing function but it's only available to Pro users which requires paying the annual rate upfront.
Truthfully, I like PicMonkey a little more than Canva because it has more features - like the effects I’m about to talk about - but I already had a Canva Pro account at the time. It was cheaper for me to stick with PicMonkey’s basic account and switch between the two platforms.
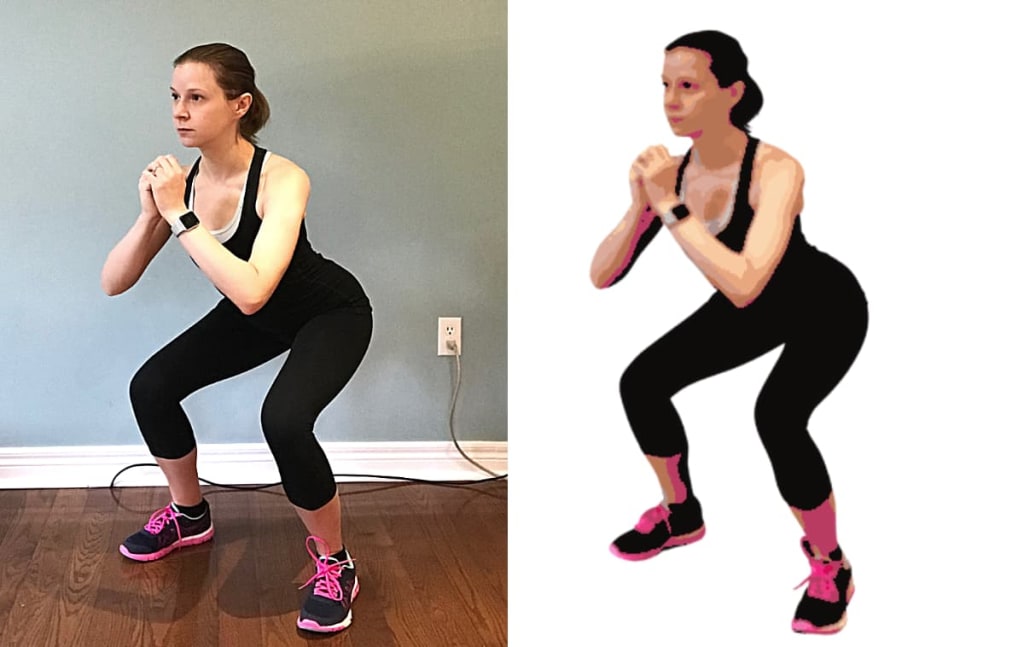
In PicMonkey I uploaded all my backgroundless exercise photos and added something called the "Posterize" effect. This function is found under the “effects” menu and turns the image into something that looks less like a photo and more like an illustration.
I used this effect because I wanted the images to look less like me and more generic, like they could be anybody. I turned the level of detail down to about 50%, which removed most of my defining features. Then I turned the number of colors down to 18 so that it looked more like a drawing than a photo.

Step 4: Creating the Product
After I posterized all my photos, I returned back to Canva to create the final product. I used an 8.5” x 11” template with four large squares per page. Each square represents a different exercise, and there are four per workout.
Then it was just a matter of dropping in the stylized photos into the design and positioning them where I wanted them.
As simple as it sounds, it was by far the most time-consuming part of the project. But by the end, I was left with a quality 16-page printable workout guide that my customers can use to kick off their own home fitness journey.

This type of photo editing may not result in gorgeous photos that you'd want to frame and hang on your wall, but it did create something valuable and useful for my audience.
And to me, that makes it a work of art!
If you're interested in learning more about the workout guide, you can check out the details here.
If you found this article interesting or helpful, please hit the like button and consider leaving a small tip. Every little bit is greatly appreciated and helps me create even more helpful content for you!
About the Creator
Corrie Alexander
Corrie is an ISSA-certified PT, fitness blogger, fiction-lover, and cat-mom from Ontario, Canada. Visit her website, thefitcareerist.com or realmofreads.com for book reviews and bookish tips.
Keep reading
More stories from Corrie Alexander and writers in Photography and other communities.
How Vocal Remedies "Niche Fatigue" for Bloggers
This month marks my third year as a semi-professional fitness blogger. I love everything about blogging. I love learning and implementing everything I can about SEO, affiliate marketing, WordPress, and - of course - writing compelling content.
By Corrie Alexander5 years ago in Journal
Leavie Scott
ORDER HERE Chicago – A Radiant Urban Masterpiece by Leavie Scott Arts & Culture Review – Feature Story In his striking new work Chicago, photographer Leavie Scott captures the soul of the Windy City with a level of vibrancy and emotional resonance that is impossible to ignore. The image immerses viewers in a dazzling skyline bathed in mesmerizing tones of purple, pink, and gold—a palette rarely seen in traditional urban photography and one that instantly distinguishes Scott’s artistic voice.
By Organic Products 2 days ago in Photography
Flower Bloom 369
FLOWER Bloom 2/25/26 Wednesday By Mariann Carroll Karen had been with Tony for 7 years. Tony started acting strangely after her surgery. He would mow the lawn in the rain and be on his cellphone. He started pushing Karen away. Tony came clean about seeing someone. Karen moved out two months later. Karen moved in with a friend. She felt betrayed.
By Mariann Carroll7 days ago in Fiction


Comments
There are no comments for this story
Be the first to respond and start the conversation.