
Editing Real Estate Photos Like a Pro: Techniques That Instantly Boost Listing Appeal
Boost Listings Fast: Edit Real Estate Photos Like a Pro

Let’s face it—first impressions sell homes. These days, a home buyer’s journey often starts online. Whether they’re browsing Zillow, Redfin, or social media, they’re doing one thing first: looking at pictures.
Now here’s the kicker: listings with professional-looking photos sell faster and for more money. But what if you’re not a pro photographer? Don’t worry. With the right editing skills, even a decent photo can become wow-worthy.
In this blog, we’re going to walk you through real techniques used by top pros in the USA real estate market. You’ll learn insider secrets from commercial real estate photo editing experts and get practical, easy-to-follow tips for Editing real estate photos that instantly upgrade any property listing.
Why Editing Real Estate Photos Matters
Before we get technical, let’s answer the big question: Why does photo editing matter so much in real estate?
Because raw images straight from a camera (even a DSLR) rarely do justice to a property. They might be too dark, too yellow, or have crooked angles that make rooms look odd. And in real estate, that can kill a sale before a buyer ever steps foot inside.
Here’s what well-edited photos can do:
- Make small rooms look spacious
- Highlight natural light
- Improve color balance
- Create emotional appeal
- Showcase details buyers crave (like countertops, flooring, or ceiling height)
It’s not about faking a space—it’s about presenting it at its best.
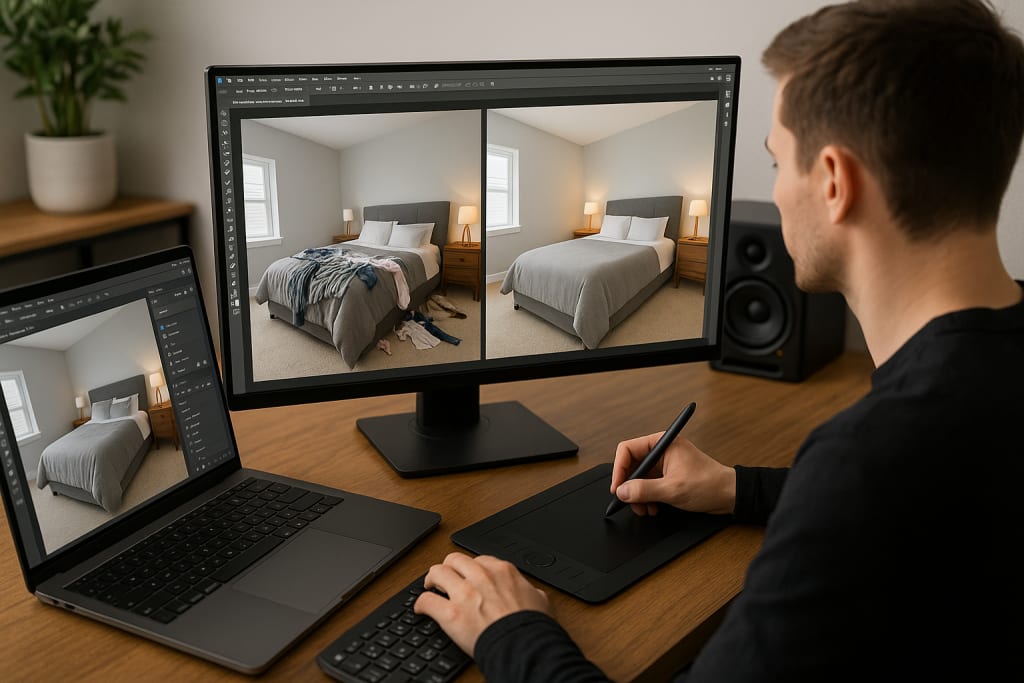
Pro Editing Tools That Make the Difference
If you're serious about photo editing real estate listings, you'll need more than just a smartphone filter. Here are a few tools the pros swear by:
1. Adobe Lightroom
Best for: Lighting adjustments, color correction, bulk editing
Why it’s great: It’s fast, powerful, and has batch processing tools to edit multiple photos at once.
2. Adobe Photoshop
Best for: Object removal, sky replacement, window pulls
Why it’s great: Photoshop can handle detailed commercial real estate photo editing like a boss.
3. Luminar Neo or Aurora HDR
Best for: High dynamic range editing (especially if you shoot in brackets)
Why it’s great: These tools help bring out the full range of shadows and highlights in one stunning image.
4. Snapseed (for mobile)
Best for: Quick edits on the go
Why it’s great: Free and surprisingly powerful if you’re editing on a phone or tablet.
10 Pro Techniques to Instantly Upgrade Your Real Estate Photos
Now, let’s get to the real magic—techniques that real estate pros and photographers in the USA are using to make listings pop online.
1. Straighten Those Lines (Seriously)
Nothing turns off a buyer like a tilted room. Use the lens correction and transform tools to fix crooked angles. This is especially important in commercial real estate photo editing, where architectural precision matters.
Pro Tip: Always align verticals like door frames and window edges.
2. Balance the Light Like a Boss
Most interiors have uneven lighting—natural light from windows clashes with yellowish bulbs.
Fix this by adjusting the white balance and exposure. Aim for bright, natural-looking light that mimics daylight.
Pro Tip: Use Lightroom’s eyedropper tool to sample a neutral white and balance the tones.
3. Use HDR the Right Way
HDR (High Dynamic Range) combines several shots taken at different exposures. Done right, it makes your photos look rich and real. Done wrong, it looks fake and overcooked.
Pro Tip: Keep it subtle. Use HDR to reveal detail, not to create a sci-fi look.
4. Sky Replacement = Instant Mood
A dull gray sky can kill the vibe of your exterior photos. Many pros use Photoshop’s AI-powered sky replacement feature to add sunny blue skies—or dramatic sunsets.
Pro Tip: Match the new sky’s lighting with the rest of the image for realism.
5. Declutter With Clone & Heal
That ugly wire or trash can in the yard? Gone. Use the Clone Stamp or Healing Brush in Photoshop to remove distractions. This is one of the most valuable services in photo editing real estate.
Pro Tip: Zoom in and clean up small but noticeable elements (e.g., outlet covers, cords, window smudges).
6. Window Pulls: See the Outside, Too
Often, window views are overexposed and washed out. But you want buyers to see what’s outside!
Use manual blending or bracketing + masking to pull in the exterior view. This is a high-level technique used often in commercial real estate photo editing.
Pro Tip: Blend the well-exposed window scene into the room shot using layer masks in Photoshop.
7. Add Warmth, But Not Too Much
Real estate photos should feel inviting. Add a little warmth to your color temperature—but don’t overdo it.
Pro Tip: Adjust the “temperature” slider in Lightroom to just kiss the image with warmth.
8. Highlight Key Features with Vignettes
Want to subtly draw the viewer’s eyes to the fireplace, chandelier, or kitchen island? Add a soft vignette around the photo edges.
Pro Tip: Keep it light and feathered—no dark corners allowed.
9. Sharpen Strategically
Sharp images = pro images. But sharpening everything can make the image noisy.
Pro Tip: Use selective sharpening on edges (doorways, furniture) to keep focus clear without harshness.
10. Consistency Across the Set
Nothing looks more amateur than a photo gallery where one room is yellow, another is blue, and another looks like it’s from a horror movie.
Pro Tip: Use Lightroom presets or saved settings to keep your edits consistent across all photos in a listing.
Commercial Real Estate Photo Editing: Extra Considerations
Commercial listings require precision and polish. These photos often represent office spaces, retail centers, or warehouses where structure, scale, and cleanliness are key.
Here’s what sets commercial real estate photo editing apart:
- Architectural symmetry is crucial
- Neutral tones are preferred over artistic styles
- Wide angles should still look natural
- Remove reflections and glare from glass walls or signage
If you're shooting or editing for commercial spaces, the margin for error is smaller—but so is the competition if you do it right.
Who’s Doing It Right? My Pro Photos in the USA
Across the USA real estate industry, more realtors and photographers are partnering with My Pro Photos to get professional-level editing without spending hours at the computer.
From sky replacements to object removal, from basic touch-ups to full-blown Commercial real estate photo editing, the brand offers services designed for fast, consistent, and beautiful results that help listings stand out.
Final Thoughts: Small Edits, Big Wins
You don’t need a film degree or $10,000 worth of gear to create listing photos that grab attention. Editing real estate photos is less about flashy filters and more about making a property look true-to-life and welcoming.
And in a market where buyers decide in seconds, those polished images? They make all the difference.
Quick Checklist: Must-Do Edits for Real Estate Photos
- Straighten lines
- Fix exposure and white balance
- Use natural-looking HDR
- Remove clutter or distractions
- Replace boring skies
- Blend window views
- Keep color tones consistent
- Add slight warmth and sharpness
Don’t Just List—Stand Out
Whether you’re a realtor, photographer, or homeowner, your photos are your first chance to make an impression. With just a little effort (and smart editing), you can transform “just okay” images into “wow, let’s go see it!” listings.
So go ahead—grab your camera, open up those editing tools, and start creating magic. Because the right photo doesn’t just show a space. It sells it.
About the Creator
Jack Thomas
I’m Jack Thomas, a versatile blogger and SEO expert with a passion for exploring every niche. From tech to lifestyle, I craft engaging, high-quality content that informs, inspires, and connects readers.
Keep reading
More stories from Jack Thomas and writers in Photography and other communities.
How Real Estate Photography Photo Editing Can Instantly Upgrade Your Brand as a Realtor or Photographer
Picture this: You walk into a stunning home, natural light streaming through floor-to-ceiling windows, marble countertops gleaming, and hardwood floors that seem to go on forever. You snap what you think is the perfect shot, but when you upload it to your computer, something's off. The colors look dull, the lighting seems harsh, and somehow that million-dollar property looks more like a fixer-upper.
By Jack Thomas7 months ago in Photography
My Year, in Prattling and Photos
It's been a year since... last year. Ironically, it seems I've found myself a new tradition of getting sick during the New Year holidays. At least, this year (that is, this inter-year period remarkable for its shiny decorations in the streets and houses, and closed supermarkets and pretty much everything), I'm doubtlessly doing better: I've managed to come visit my friends in Germany for Christmas (which I failed to do last year) and—after having some good quality time eating machanka, playing Munchkin and swinging machetes (the last one obviously crept into this checklist only for the sake of the phonological form)—I came back home via proverbial Deutche Bahn and probably less known Schweizerische Bundesbahnen, my body hosting a family of viruses, virions and who knows what other tiny critters somewhere inside my chest.
By Andrei Z.16 days ago in Photography
Prepare to Flash
I’ve learned to master the art of picking up cameras on a budget, I would like to say I do it now subconsciously out of a sense to capture the world in a not so perfect and more realistic point of view, but the reality is that I’m just too cheapskate to invest in a top of the line camera so I make do with what I can afford.
By Malachai Hough4 days ago in Photography


Comments (1)
You're right that first impressions matter in selling homes, especially online photos. I've seen how good editing can transform a listing. Adobe tools are great, but I've also used others like Luminar Neo with success.