
Clothing Photography Lighting Setup
Clothing Photography Lighting Setup

High-quality product photography is essential for clothing For many customers, you need more than just a great product description - your photos will determine whether they buy your product or not.
But necessity does not have to mean expensive. The difference between professionals and amateurs is talent, equipment, and experience.
1. Prepare Your Garment
Your products should look their best in your photos. It is an unfortunate fact in life that clothing can wrinkle, curl and look worn out from storage and transport. Particularly rough time of clothing samples of it, as they often cover many miles and may not have been perfectly constructed to begin with.
Preparing clothes for photography is a crucial starting point for photographing your products, but many photographers skip this step and rely on Photoshop or a free photo editing program to correct wrinkles, blemishes and other visible imperfections. Do not do that. Photoshop is not magical: it takes time and expertise to master advanced editing techniques and excessive editing can reduce image quality.
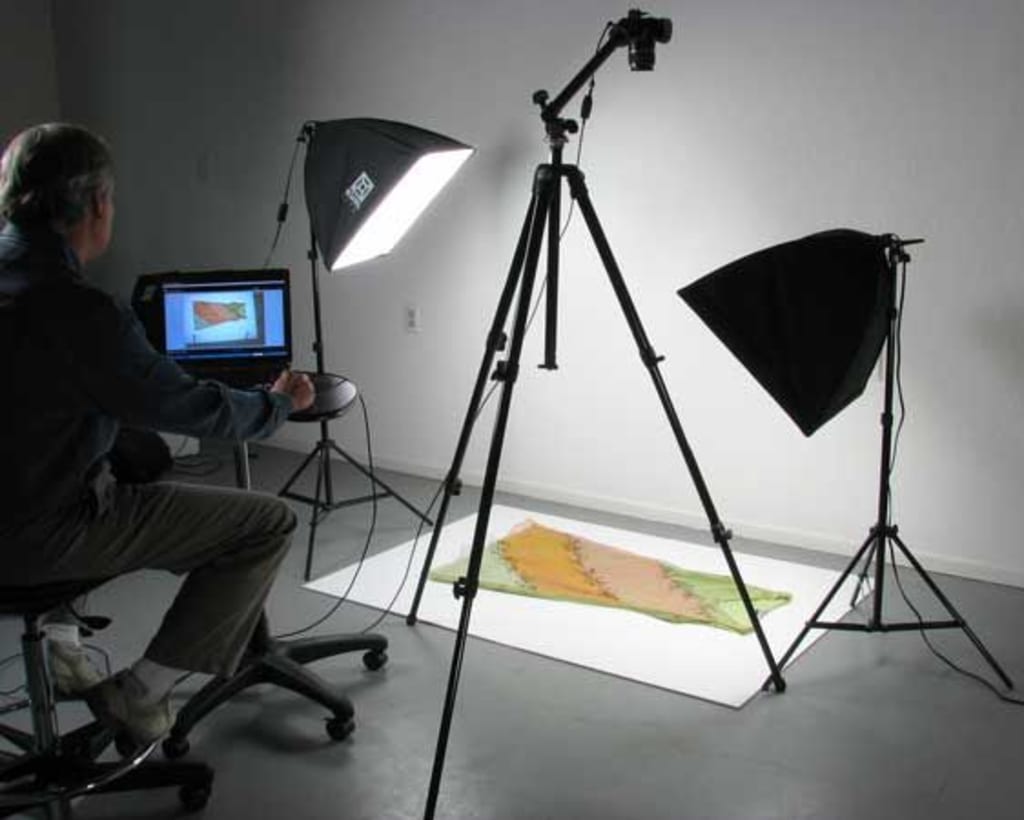
2. Set up Your Studio
With a few things, you can change almost any room with space in a photo studio. If you have a budget, you can get by with a camera, tripod, seamless white paper, tape, and natural light. If you have a little more to spend and want to control when and where you shoot, it's worth investing in some extra equipment.
3. Status Description
If you are using natural light, place the product near a window where it can receive even, indirect light. If you are using a simple installation, below is a diagram of the bird's view of an effective installation of single lighting.
Place one light source and Lightbox or umbrella at a 45-degree angle to the product so that the lighting on the product is soft and even throughout. Place the camera directly in front of the subject. If you have placed the product too close to the background, you may get shadows. If this happens, simply move the subject further away from the background to achieve a clean, white background. Set the power of the light source to about half.
Properly positioning your image is usually just a matter of using the camera's light meter, which you can find by scrolling through the viewfinder on your camera and adjusting the settings so that the meter reaches 0. It's not that simple when you are to use a strobe, as there is no exposure for the camera to read until the flash fires. However, a handheld light meter helps you to read light with ease and accuracy. By synchronizing it with the lighting system and placing it in front of the subject, you can ensure an accurate reading.
If you do not have a light meter, start at a shutter speed of 1/200 or lower and set the aperture to f / 11 or higher. From there, you have to take test shots and adjust the camera settings to get the best lighting and focus.
Give yourself time to recharge between flashes. Depending on the strength of your battery pack, the light source might not turn on at the right time if you shoot too fast.
4. Style of Person or Model
Forming a garment for a person or a model is the best way to demonstrate shape and fit, but at the same time encourage customers to envision being in it.
If you are concerned that humanity may interfere with or cheapen your product, you can use invisible human technology in post-production processing. A few additional shots of each product allow you to remove humanity from the product images and present a 3D image that shows the shape and fit.
5. Adjust Your Camera
If your camera settings are wrong, then no amount of Photoshopping expertise can make your photos beautiful. Make sure you understand the ISO, aperture, and white balance before forming your products.
6. Shoot
Finally, this is finally the moment you have been waiting for! Focus the camera on the subject and press the shutter-release button halfway, allow the camera to focus on the subject, and then click the image. Change the camera settings during shooting if you notice that your pictures need more or less light. The more you shoot, the more natural your adaptations will be.
Take as many pictures as possible. You may want to shoot front and rear, 45-degree angles, left and right sides, and all the details. The more shots, the better. You want to have many options to choose your final images from and it has been shown that more images per product on your website increase sales. Customers can trust their appearance of the product if it is supported in many photographs from many angles.
7. Post-processing Process
After shooting, it's time to prepare your product images for the web. The goal of post-production processing is to make your images look as professional as possible while maintaining the best performance.
This is the simplest and most useful step to outsource, as digital assets are easily transferable and time and cost savings are significant.
If you would rather do it yourself, you should ensure that your post-production process includes alignment, harvesting, background removal, and color correction to maintain a consistent and professional look. Keep track of your processes so you can develop a standard script for both shooting and editing.
Background
We used a white background, which is recommended implementation and even required by some marketplaces. You can take it a step further and eliminate potential distractions by removing the background. Removing the background allows you to increase the flexibility of web design and modestly reduce the file size.
Color
Even with careful attention to white balance, some colors - such as neon, red, and pink - are difficult to capture correctly in a camera and often need to be adjusted in Photoshop.
Inaccurate color descriptions can leave customers frustrated and dissatisfied, so take a few more minutes to ensure the colors of your garments are accurate. The point is, you want your customer to see exactly what they get in the mail if they order your product.
There are several ways to optimize colors, so read Photoshop offers and choose your favorite tool. After you adjust the colors, be sure to convert your images to SRGB format to make sure that different browsers, computer screens, and web pages do not change the exact colors you worked so hard to create for your clients.
About the Creator
kitchenpeddler
At Kitchen Peddler, we uncover and share the best kitchen gadgets with you. Our focus will always be on talking about the products that add value to your life and kitchen.
Keep reading
More stories from kitchenpeddler and writers in Photography and other communities.
How to Measure a Frying Pan
Whenever this is done, you ought to expand the estimating tape right to the front of the container. Simply check the estimation from the edge of the estimating tape to the furthest limit of the pan and you will get the appropriate estimation of the dish.
By kitchenpeddler5 years ago in Serve
The Two-Setting Walk That Fixed My Photos (Without Buying Anything)
I used to come home from a photo walk with 200 frames and one “maybe.” The problem wasn’t my camera. It was my brain—spinning through menus, second-guessing every choice, and turning a simple moment into a technical debate.
By Puryear Pebley17 days ago in Photography


Comments
There are no comments for this story
Be the first to respond and start the conversation.