
Can you spot the difference?
Here are my editing tips and tricks, FOR FREE.

In the early stages before the worldwide pandemic hit, I was wondering how I was going to be able to keep myself busy knowing there was really nothing I could do outside of my home with all shops, museums and my favorite restaurants going out of business and shutting down.
I figured what better time is there for me to enhance my skills than now? And so, I soon took interest in photoshop. ____________________________________________________
I don’t know if any of you guys have read my previous post related to design, but I mentioned that I went to fashion design school, however, I barely learned much about photoshop. Because this is a skill that very much comes in handy when working in this industry, I soon found interest in enhancing my skills and knowledge in working with this platform.
Funny enough, I didn’t end up feeling as bored as I thought when covid hit.. Maybe because I was already planning my schedule and my days accordingly, I felt much busier than I expected. I wanted to acquire as much knowledge as I could during this time. I don't want even a second to go to waste. I’m not saying it’s not okay to take a break. Trust me, I needed one after working full-time everyday before getting laid off from my job.. However, I think it’s just a part of my character and personality, I always feel like I need to be up on my feet or doing something productive in order for me to have a means to keeping myself sane.
Anyway, like I said, I ended up keeping myself quite busy during these times with the use of Photoshop and YouTube. Oh man, I watched A LOT of youtube. Not complaining though, I did actually learn quite a few things, maybe even more, compared to what I learnt from design school… lol.
And so, as I was trying to look for new tasks and challenges to take on each day, I found a couple of interesting photoshop-related projects to take on during these hard/unmotivating times. Also, to mention, anybody can do this. I didn’t even have a subscription to the Photoshop app, but I found a great alternative on a website called Photopea, which is literally almost the exact dupe of the original PS. So, if I can do it, so can you!

Firstly, one of the first projects I took on, was for an instagram post on April 20 2020.
(Swipe left to spot the differences!)
I wanted to do a repost of a photo I had posted a while back on my instagram page, because it went well with my instagram feed. However, I had to make a couple of changes:
1. The color of the sign (to match my feed aesthetic better)
2. Removed all the people
3. I got rid of all unnecessary things (address numbers and reflections)
This was the first project I decided to work on, so my photoshop skills were still pretty rusty.
So first, I changed the color of the sign by clicking the “Layers” tool on the right side of the screen, then you will see a button that says “normal” which you can click to select any options. In my case, I used the overlay tool. Then, I chose a different color in the swatches panel to replace the blue sign. I decided on a brownish tone, since it went with my instagram feed color theme at the time.

I proceeded with removing all humans you can see in the photo by clicking on “Brushes” and you will see an option that says clone tool (MY FAVORITE TOOL EVER!).
How I was able to remove and replace it, was by stamping an already existing spot on the image that I’d like to duplicate, and replacing it on top of the human. And then I just kept doing that for every person in the photo.

Last, I proceeded to get rid of all other unnecessary things such as the address on the building, and the reflections of the people and objects you can see from the window.
And that was the first project completed! Hooray!
Of course, there are some iffy parts on the photo such as the stairs being a bit crooked lol, but I was pretty impressed by the outcome, considering the fact that this was almost my first time trying out PS. I think this took about 3 hours of editing, after fiddling with the tools and trying out different colors and techniques. If I could turn back time, I definitely would like to make a couple of changes.
I posted the picture on my instagram feed and captioned it “social distancing by using my rusty photoshop skills, to get rid of all the people in my pic”. I thought this caption was totally appropriate for the current situation haha. I got some good feedback from others, so that was nice. Not too bad for my first project, I think.

__________________________________________________
Second project, was another one for my instagram (what a surprise..lol).
This post was however in collaboration with the jewelry brand, “Mejuri”.
I had to come up with a post regarding the Black Friday Sale they were having that upcoming week. I needed to take photos of the jewelry- and not only did the photo have to fit my instagram color theme, but had to match the brand’s style.

There were a couple of things I had to change in the photo:
1. The background is too messy (random water bottle).
2. Editing out the distracting ceiling seen in the mirror.
3. Cropping out the bottom portion of the mirror, not important in the photo.
4. The color of the photo (a little too bright for my instagram feed).
First, the background had too many busy things going on. Considering the fact that the main attention should be going to the earring, I knew I had to get rid of the bottle, and the other random things in the background. I did this once again by using the clone tool. I selected any part of the white background and replaced it with that clone. Easy as that!
Then, I edited out the distracting ceiling things seen in the mirror. It was drawing the attention away from the earring, so I had to remove that as well by using the clone tool.
The next two steps, I was able to modify using the instagram edit tool.

I was able to crop the image to my liking by getting rid of the bottom portion of the mirror.
Then, I proceeded with editing the overall color of the image to make sure it matched the mood of my overall instagram feed. I mostly played with the highlights and shadows.
And that pretty much completed my partnership project with Mejuri!
Here's the final instagram post!
___________________________________________________
Finally, the last project I took on was freelance for my brother’s girlfriend.
After the first two projects, I really got the hang of editing on Photopea and using the clone stamp tool, so from what I can remember, it didn’t take more than an hour to complete.
For this particular project, because it was for her professional picture that she needed to update for her linkedin, I only needed to make one change. The photo was already professionally taken by a photographer, and because of this, the picture really focused/captured her hair quite well. And that is why I had to take on the task of removing all unnecessary hair and messy flyaways seen in the picture:

I only had to use one tool on Photopea for this modification:
1. Clone stamp (around all the messy areas of her hair).
The only thing I had to do was make sure all the small hairs were gone. I did so by clone stamping specific parts of the image to replace it over the hair that was very distracting. I made sure nothing else in the photo was unnatural/seemed off and tried to keep the quality of the image high resolution as it is.
And that was it! With only a couple of modifications, I was able to create a much more professional look to her linkedin profile. She loved the outcome, and I was really proud of my work.
___________________________________________________
These are a couple of other projects I did for my own personal use. See the before and after pictures below from just a couple of modifications made ONLY using the instagram editing app! :
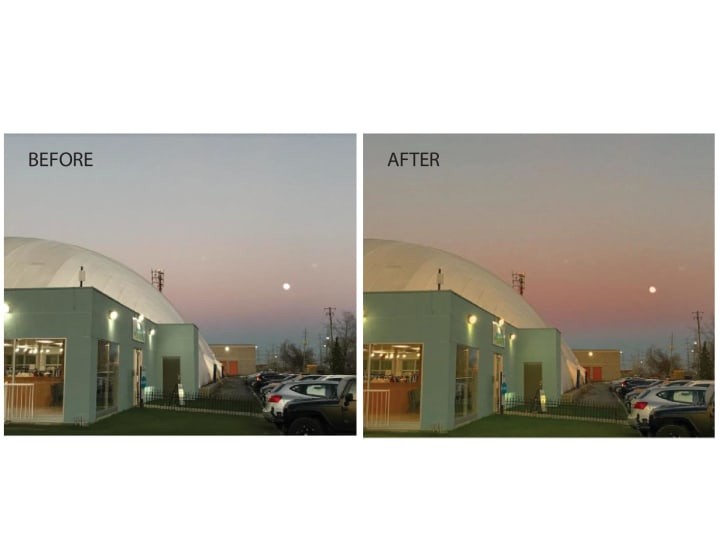

As you can see from the before and after for both the photos, the before photo looks VERY cold (because it really was cold..!). With only a couple of modifications such as raising the warm tones, and adding slight highlights and playing with the shadow levels, I was able to bring the colors of the sunset, sky, grass, and building look more alive and vibrant, and made the overall picture look warmer and moodier (in a good way lol). And this was used using only the instagram edit! It also went with my instagram feed very well once the changes were made, so I consider this another successful project. I wouldn’t change anything about it!
I know many people have asked me how I make my photos look so warm and cozy and if I buy many different apps to achieve the outcome. And I literally have NEVER bought a subscription when it comes to editing photos. I’ve always only used the instagram app and sometimes Photopea for clone stamp purposes. People always get so shocked because they don’t know that we don’t always need to have a fancy app or have to pay for something expensive to achieve high quality results!
Here's the final post!:
___________________________________________________
Well, there you have it! My tips and tricks for photo-editing!
Overall, whatever the project it may be for, personal or work, or just freelance, I really enjoy editing. Whether it be using photoshop or using just a simple edit took, being able to achieve amazing results with just an app is truly fascinating, and always pushes my creativity even more everyday. Especially during these hard times, it is a good way for me to stay busy and it really makes me find something else I love doing for fun. I found passion for experimenting with new tools and finding new ways to incorporate some kind of interesting technique in my photo.
I learnt that you don’t have to be good at something from the beginning- as time goes you can get better with practice. I can see a huge improvement from my first project to my last project. The joy in editing and seeing crazy results, is seriously such a satisfying feeling, and even better when people compliment your work!
I hope that whatever it is, that you all try to challenge yourself and take on a new skill that you’ve always been interested in. Experiment and try. I think in this day and age, the saying, "it doesn’t hurt to try” could really mean and play a big part in our lives. Who knows, we might not be here tomorrow, so might as well spend our time doing something we enjoy- there is no better feeling knowing that at the end of the day that at least we tried, rather than regretting not trying. :)
Thanks for coming to my TedTalk! <3
-Caroline G. Kim
About the Creator
Caracarabonitaa
Howdy! Thanks for stopping by :)
Keep reading
More stories from Caracarabonitaa and writers in Photography and other communities.
Leavie Scott
ORDER HERE Chicago – A Radiant Urban Masterpiece by Leavie Scott Arts & Culture Review – Feature Story In his striking new work Chicago, photographer Leavie Scott captures the soul of the Windy City with a level of vibrancy and emotional resonance that is impossible to ignore. The image immerses viewers in a dazzling skyline bathed in mesmerizing tones of purple, pink, and gold—a palette rarely seen in traditional urban photography and one that instantly distinguishes Scott’s artistic voice.
By Organic Products a day ago in Photography
me, me, me
when i read back my poetry it screams “me, me, me” on my screen in bold letters and i can’t shut it up — most days, i cannot make any other words out; i want to throttle a thousand versions of the me gone by, i want to throw myself from a figurative balcony, i want to sink a sword into every pen i’ve held
By angela hepworth7 days ago in Poets
Review of 'Man on the Run'
My wife and I saw Man on the Run, a nearly 2-hour documentary on Amazon Prime, about Wings, Paul McCartney's group that flew around the world from shortly after The Beatles broke up in early 1970 to shortly after John Lennon was murdered at the end of 1980, making a Beatles reunion forever impossible.
By Paul Levinson4 days ago in Beat


Comments
There are no comments for this story
Be the first to respond and start the conversation.