
How to Build a Foldable Wooden Coffee Table
A beginner-proof, step-by-step woodworking guide (metric system)


This project shows you how to build a compact, foldable coffee table that is sturdy when open and slim when folded. Every measurement, cut, and screw placement is explained clearly, so you don’t need prior woodworking experience or guesswork.
Final Dimensions (Very Important)
- Length: 900 mm
- Width: 500 mm
- Height: 450 mm
Table folded:
Thickness: 85–95 mm (depends on folding brackets)
Materials — Explained Clearly
1. Wood Type (Why Pine Is Used)
Use solid pine boards, thickness 18 mm. Pine is:
- Easy to cut
- Lightweight (important for folding)
- Cheap
- Forgiving for beginners
Avoid MDF or particle board — they do not hold screws well.
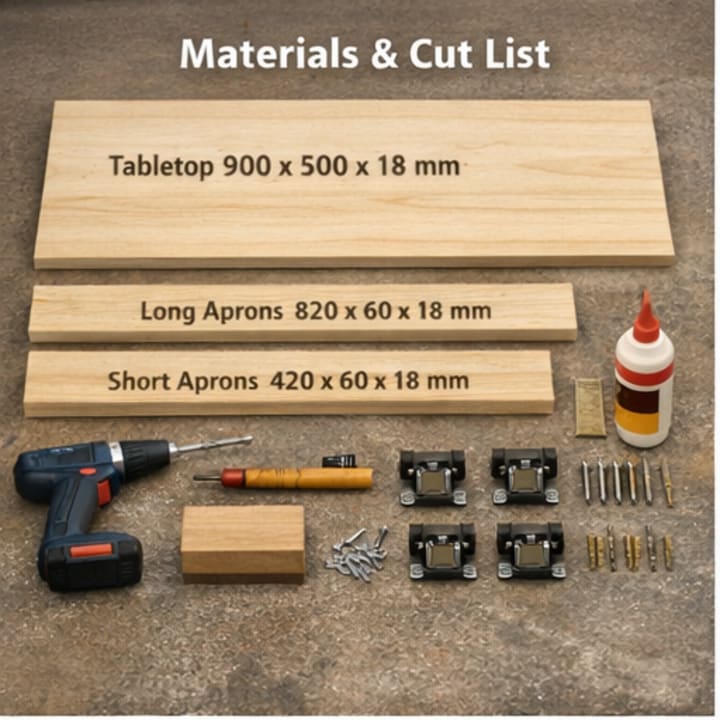
2. Wood Cut List (Exact Measurements)
Tabletop
1 piece: 900 × 500 × 18 mm
Legs
4 pieces: 450 × 60 × 18 mm (60 mm width gives strength without bulk)
Apron Frame (Supports the Tabletop)
2 long aprons: 820 × 60 × 18 mm
2 short aprons: 420 × 60 × 18 mm
These dimensions allow a 40 mm inset from the tabletop edges on all sides.
3. Hardware
4 folding leg brackets with locking mechanism
Must lock automatically when opened
Wood screws
4 × 40 mm (frame + legs)
4 × 30 mm (frame to tabletop)
Wood glue (PVA)
Optional: felt pads for feet
Tools Required (Beginner Friendly)
Measuring tape (metric)
Pencil
Hand saw or circular saw
Drill
Drill bits:
3 mm (pilot holes)
6 mm (optional countersink)
Screwdriver bit
Sandpaper: 80 / 120 / 220 grit
Clamps (optional but helpful)
Step 0 — Lay Everything Out (DO NOT SKIP)
Lay all wood pieces on the floor:
Group legs together
Group aprons together
Keep tabletop separate
Double-check measurements before assembly. This is where mistakes are prevented.
Step 1 — Sand All Pieces
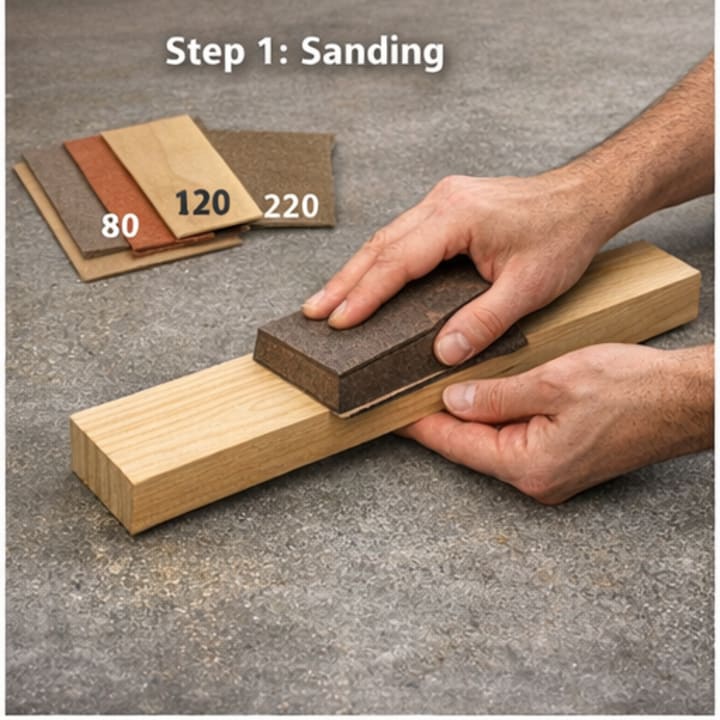
Start with 80 grit to remove rough edges
Move to 120 grit
Finish with 220 grit
Lightly round all sharp edges — this prevents splinters and looks professional.
Step 2 — Build the Apron Frame
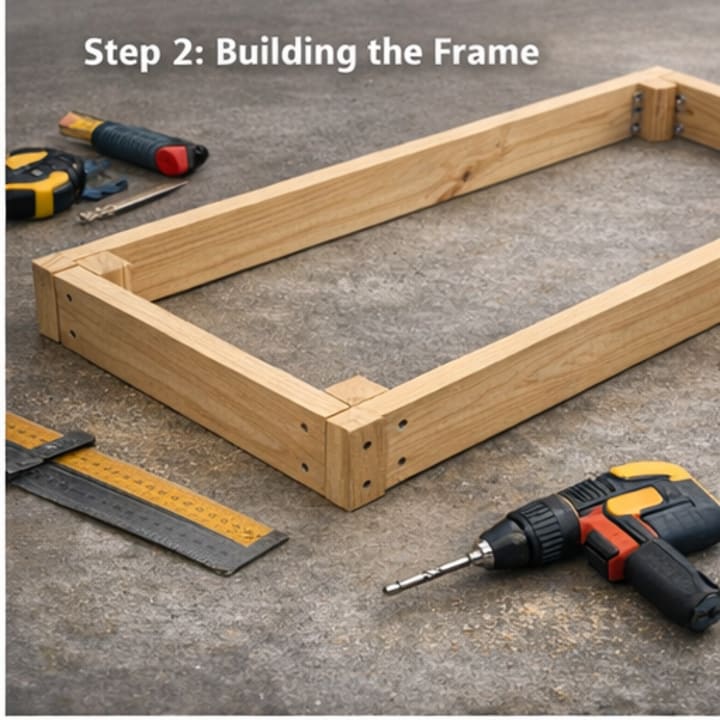
Assembly Dimensions
Outside frame size:
820 + 2 × 18 mm = 856 mm
420 + 2 × 18 mm = 456 mm
Instructions
Lay the long aprons parallel
Place short aprons between them
Apply wood glue to joints
Clamp or hold firmly
Drill 3 mm pilot holes
Drive 2 screws per joint
Check squareness by measuring diagonals — both must match.
Step 3 — Attach Frame to Tabletop
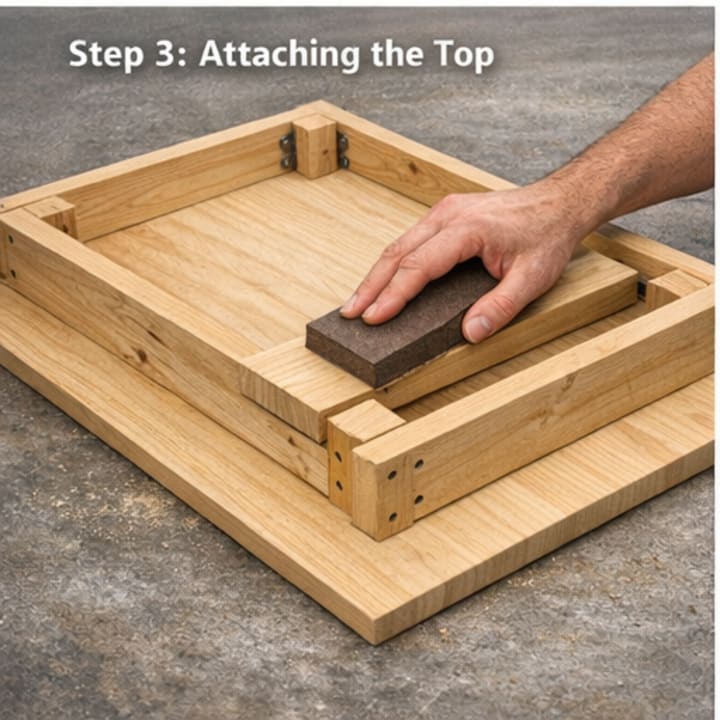
Turn the tabletop upside down
Center the frame:
40 mm inset from each edge
Drill pilot holes upward
Use 4 × 30 mm screws
Use 8–10 screws total
Do not drill through the tabletop.
Step 4 — Prepare the Legs
Each leg:
Length: 450 mm
Width: 60 mm
Thickness: 18 mm
Sand edges thoroughly — legs are frequently touched.
Step 5 — Install Folding Brackets
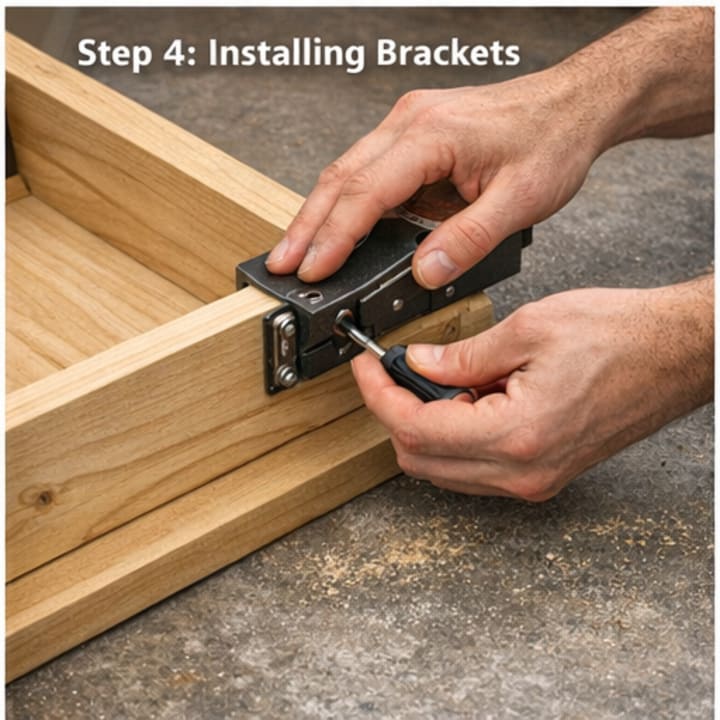
This step determines how well the table folds.
Attach one bracket to the top of each leg
Align bracket flush with leg edge
Screw firmly (pilot holes first)
Fold bracket flat
Position leg inside apron corner
Screw bracket to apron
Important:
All legs must fold inward toward the center.
Step 6 — Test Folding Action
Open all legs until brackets lock
Press down gently on tabletop
Fold legs inward
Ensure nothing rubs or jams
Minor movement is normal; wobble is not.
Step 7 — Final Sanding
Lightly sand entire table again with 220 grit.
Wipe clean with a damp cloth.
Step 8 — Finish (Optional but Recommended)
Options:
Clear varnish (natural look)
Wood stain + varnish
Paint (modern style)
Apply 2–3 thin coats, sanding lightly between coats.
Final Result
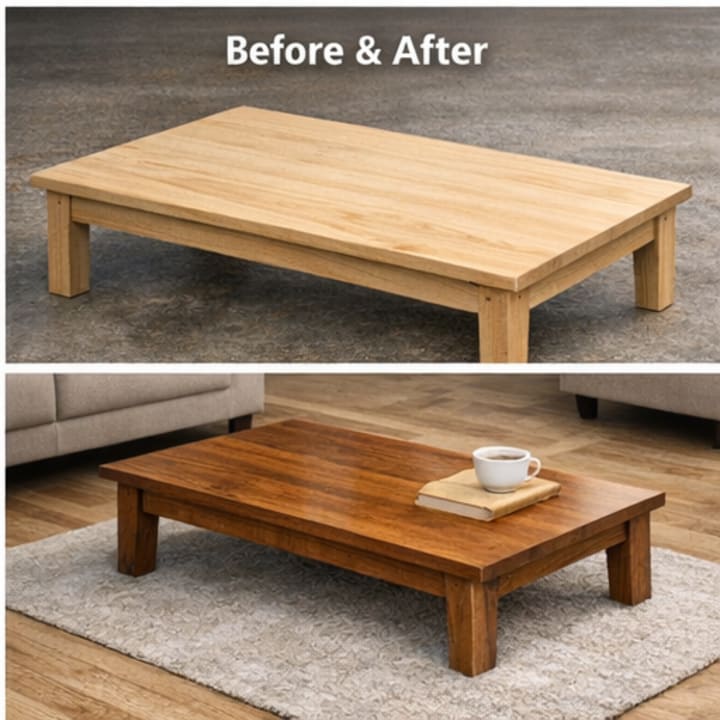
You now have:
A strong foldable coffee table
Slim storage profile
A solid beginner woodworking project
A foundation to build more advanced furniture
About the Creator
Stefan Toader
Passionate blogger and movie enthusiast with a keen eye for great storytelling. I share my insights on the latest movies, trends in the industry, and the craft of storytelling through my blog.
Keep reading
More stories from Stefan Toader and writers in Men and other communities.
How Well Do You Really Know Your Partner? Answer:
When it comes to relationships, communication is key. Even if you think you know your partner pretty well, there is always room for improvement. Every person is unique and complex, with different thoughts, feelings, and experiences that shape who they are. As such, it's essential to keep the lines of communication open to continue getting to know your partner on a deeper level.
By Stefan Toader3 years ago in Families
Unlocking Relief: Your Candid Guide to Prostate Massage for Chronic Prostatitis
For many men, it’s a silent battle fought in quiet desperation. The constant, nagging urge to urinate. The dull ache in the perineum that spreads to the lower back. The frustration of a condition that waxes and wanes, stealing your focus and peace of mind. This is the daily reality of chronic prostatitis, a condition that often feels as isolating as it is uncomfortable.
By Shuang hou2 days ago in Men
The Silent Saboteur Wrecking Your Prostate Health (And It's Not the Beer You Think)
Prostatitis. The word itself can make a man clench up. It’s not cancer, but its relentless, nagging presence can feel just as draining. It’s not like a cold that comes and goes; it’s more like a stubborn, unwelcome guest who overstays their welcome, often flaring up just when you think you’ve finally shown them the door. For many men navigating this frustrating condition, life becomes a game of "whodunit," trying to pinpoint the trigger for the latest bout of pain, urgency, or discomfort.
By Amanda Chou3 days ago in Men
Why Black History Matters in America?
The United States of America is celebrating their 250th anniversary in 2026. I'm proud to be an American and as someone who was born here, I wouldn't imagine myself living anywhere else. This is a country where opportunities are possible. Where anyone can be successful in anything they desire to do. Equality, community, and togetherness are the backbones of what America is and should be about. However, we have an administration who wants to erase and disregard those who have made positive, meaningful impacts in our country, specifically Black figures, such as Martin Luther King, Jr., Rosa Parks, and Maya Angelou. President Trump and his administration have been constantly complaining and fighting against what they call the "Woke agenda". They use this excuse as a distraction from other issues they refuse to address, such as the high cost of living, climate change, and inflation. That equality is dividing America, when in reality, it's bringing us together. Being woke is not tied to a specific political party. No matter where you stand on the political spectrum, you can still care about other people and their plights. Compassion and empathy for others isn't tied to a political party, either. We were taught as children to treat others the way we want to be treated and not judge others because they're different from us. Caring about others isn't a personal attack on your beliefs. It doesn't make you any less of a person. People who are easily offended over African American figures, past or present, or anything related to it, are grasping at straws. Current and future generations need to know who people like Harriet Tubman and Shirley Chisholm were, especially in the classroom. Black History is part of American History. It should be recognized, not hidden or forgotten. Besides, you can't shield children from everything, just because your feelings are easily hurt.
By Mark Wesley Pritchard 5 days ago in The Swamp


Comments
There are no comments for this story
Be the first to respond and start the conversation.