
The Hammock Handbook: Types, DIY, and Hanging with Brackets
Hammock Haven: Create Your Perfect Retreat with Our Comprehensive Guide
Hammocks are the ultimate symbol of relaxation, offering a cozy spot to unwind, nap, or simply enjoy the outdoors. Whether you’re dreaming of lounging in your backyard, setting up camp in the wilderness, or adding a unique touch to your indoor space, a hammock can transform any area into a personal retreat. Even better, making your own hammock is a fun and rewarding project that lets you customize it to your exact preferences. And when it comes to hanging your creation, hammock brackets play a crucial role in ensuring safety and stability.
In this, in-depth guide, we’ll dive into everything you need to know about hammocks—from their fascinating history and various types to a detailed tutorial on how to make a hammock and the essential role of hammock brackets. By the end, you’ll be ready to craft and enjoy your very own hammock setup with confidence.
The Fascinating World of Hammocks: A Brief History
Hammocks have a rich history that dates back centuries. Originating with the indigenous peoples of Central and South America, particularly the Taíno of the Caribbean, hammocks were first crafted from the bark of the hamack tree—hence the name "hammock," derived from the Taíno word "hamaca." These early designs were practical, keeping sleepers elevated above the ground to avoid insects, dampness, and other hazards.
When European explorers encountered hammocks during their voyages, they were quick to adopt them. Sailors, in particular, found hammocks invaluable on ships, as they provided a comfortable, space-saving sleeping option that swayed with the motion of the sea. Over time, hammocks evolved from simple bark nets to more sophisticated designs made from cotton, nylon, and other durable materials.
Today, hammocks are a global favorite, prized for their comfort, versatility, and ability to create a relaxing atmosphere anywhere. Whether you’re looking to craft your own or buy one, understanding their background adds a layer of appreciation to this timeless invention.
Exploring the Types of Hammocks: Which One Suits You?
Before you learn how to make a hammock, it’s helpful to know the different types available. Each style offers unique features tailored to specific needs, climates, and preferences. Here’s a rundown of the most popular options:
1. Traditional Hammocks
- Description: Made from cotton or nylon with a net-like weave.
- Benefits: Lightweight, breathable, and perfect for warm weather due to excellent air circulation.
- Best For: Casual lounging in hot climates.
2. Brazilian Hammocks
- Description: Crafted from cotton with a gathered-end design and vibrant, colorful patterns.
- Benefits: Provides a cocoon-like feel for a snug, secure experience.
- Best For: Those who love a cozy, enveloping relaxation spot.
3. Mayan Hammocks
- Description: Handwoven from cotton or nylon in Mexico’s Yucatán Peninsula.
- Benefits: Durable, supportive, and often spacious enough for multiple people.
- Best For: Families or hammock enthusiasts seeking long-lasting quality.
4. Camping Hammocks
- Description: Lightweight and portable, often with added features like mosquito nets or rain flies.
- Benefits: Easy to pack and set up, offering an elevated alternative to tents.
- Best For: Outdoor adventurers and backpackers.
5. Hammock Chairs
- Description: Single-person seats that hang from one point.
- Benefits: Compact and versatile for small spaces, indoors or out.
- Best For: Apartment dwellers or anyone wanting a unique seating option.
Understanding these types can inspire your DIY hammock project and help you decide which style to emulate.
How to Make a Hammock: A Step-by-Step DIY Tutorial
Creating your own hammock is easier than you might think, and it’s a fantastic way to personalize your relaxation space. Below is a detailed guide on how to make a hammock using simple materials and tools. This method produces a sturdy fabric hammock perfect for beginners.
Materials Needed
- 3 yards of sturdy fabric (cotton for breathability, canvas for durability, or outdoor fabric for weather resistance)
- 2 wooden dowels (1 inch in diameter, 3 feet long)
- 2 carabiners or hammock hooks
- Strong rope or hammock straps (at least 12 feet total)
- Sewing machine (or heavy-duty needle and thread for hand-sewing)
- Scissors
- Measuring tape
Step-by-Step Instructions
Cut the Fabric
Measure and cut your fabric to 3 yards long and 60 inches wide. This size accommodates one person comfortably, but you can adjust it for a larger hammock (e.g., 4 yards by 70 inches for two people).
Hem the Edges
Fold each edge of the fabric over by 1 inch and sew a hem along all four sides. This prevents fraying and gives your hammock a polished look. Use a double stitch for extra strength if using a sewing machine.
Create Pockets for the Dowels
At each short end of the fabric, fold over 2 inches to form a pocket. Sew along the edge, leaving the ends open. These pockets will hold the wooden dowels.
Insert the Dowels
Slide one wooden dowel into each pocket. The dowels distribute weight evenly across the hammock, adding stability when hung.
Attach the Ropes
- Cut four pieces of rope, each about 6 feet long (adjust length based on your hanging distance).
- Tie one end of each rope securely to the ends of the dowels—two ropes per dowel, one at each corner. Use strong knots like a bowline or double knot.
- Gather the two ropes from each end and tie them together into a single loop about 1 foot from the dowel. This loop will connect to your hammock brackets or anchor points.
Test and Hang the Hammock
- Before fully committing, test the knots and fabric strength by gently applying weight.
- Use carabiners or hooks to attach the loops to trees, posts, or hammock brackets (more on those below).
Customization Tips
- Fabric Choices: Opt for breathable cotton in summer or weather-resistant polyester for outdoor use year-round.
- Size Variations: Increase the fabric dimensions for a wider or longer hammock—add 1-2 yards for extra room.
- Personal Touches: Sew on decorative trim, dye the fabric, or add pockets for books or snacks.
Alternative DIY Hammock Methods
If sewing isn’t your style, try these options:
- Paracord Hammock: Weave a net-like hammock using strong paracord and knotting techniques (e.g., a simple hitch pattern).
- No-Sew Hammock: Use a large, durable sheet, fold the ends around dowels, and secure with rope—no stitching required!
With your hammock complete, it’s time to focus on hanging it safely—enter hammock brackets.
Hammock Brackets: The Key to a Safe and Secure Setup
A hammock is only as good as its support system, and hammock brackets are the unsung heroes that keep you safely suspended. These essential pieces of hardware anchor your hammock to fixed points, ensuring it stays stable and secure while you relax.
What Are Hammock Brackets?
Hammock brackets—also called hangers, anchors, or mounts—are the tools or fixtures used to attach a hammock to trees, walls, ceilings, or stands. They come in various forms, each suited to different environments and installation needs.
Types of Hammock Brackets
Tree Straps
- Description: Wide, flat straps that wrap around tree trunks.
- Pros: Tree-friendly, adjustable, and easy to set up.
- Cons: Requires trees of sufficient size (12+ inches in diameter).
- Best For: Outdoor setups in wooded areas.
Wall Anchors
- Description: Metal plates with hooks or eyelets that bolt into walls or posts.
- Pros: Sturdy and permanent; great for patios or indoors.
- Cons: Requires drilling and a solid surface (e.g., a stud).
- Best For: Fixed installations without trees.
Ceiling Mounts
- Description: Heavy-duty hooks or plates screwed into overhead beams or joists.
- Pros: Ideal for indoor hammocks or covered porches.
- Cons: Needs a strong ceiling structure.
- Best For: Indoor relaxation nooks.
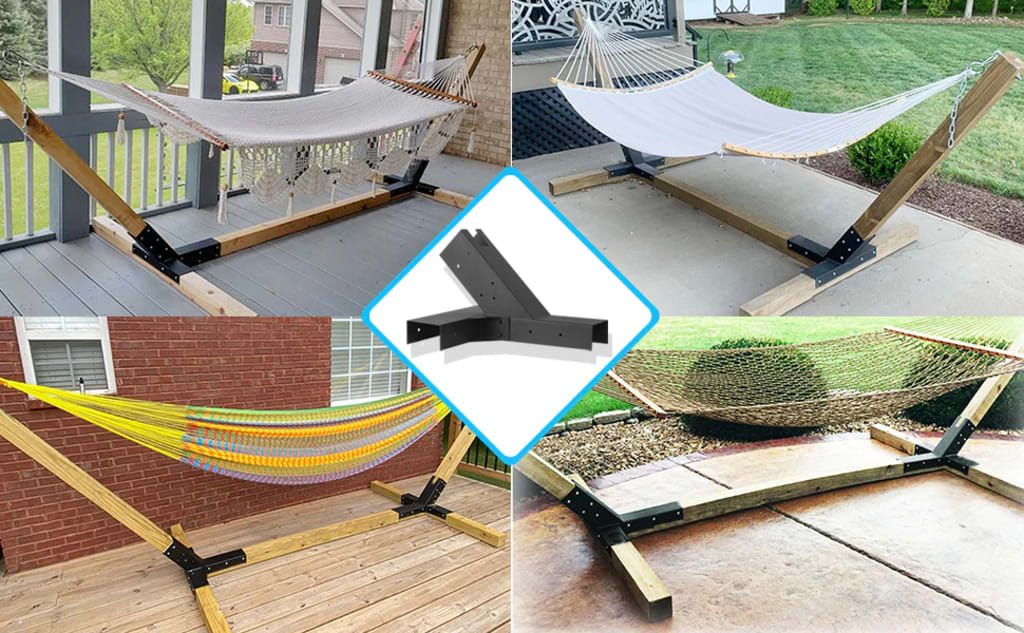
Stand-Alone Hammock Stands
- Description: Freestanding frames made of metal, wood, or plastic.
- Pros: Portable, no trees or walls needed, adjustable.
- Cons: Bulkier and often more expensive.
- Best For: Versatile use in any location.
How to Choose the Best Hammock Brackets
Picking the right hammock brackets depends on your setup and safety requirements. Here’s what to consider:
Weight Capacity: Check that the brackets can handle the hammock’s weight plus occupants (e.g., 300-500 lbs for most single hammocks).
Material: Choose rust-resistant options like stainless steel or powder-coated metal for outdoor durability.
Location: Match the bracket to your space—tree straps for yards, wall anchors for patios, stands for flexibility.
Ease of Use: Beginners might prefer simple tree straps, while DIYers can tackle wall or ceiling mounts.
Installing Hammock Brackets: A Quick Guide
Proper installation is vital for safety. Here’s how to set up each type:
Tree Straps
- Wrap the strap around a healthy tree at least 12 inches thick, 4-6 feet off the ground.
- Keep it flat (no twists) and secure with buckles or carabiners.
- Space trees 10-15 feet apart for optimal tension.
Wall Anchors
- Locate a stud or use a heavy-duty wall anchor (rated for 300+ lbs).
- Drill a hole, insert the anchor, and screw in the hook until flush.
- Space anchors 10-15 feet apart, aligned horizontally.
Ceiling Mounts
- Use a stud finder to locate a solid beam or joist.
- Drill a pilot hole and screw in the mount, ensuring it’s tight.
- Position mounts 10-15 feet apart for a standard hammock.
Hammock Stands
- Assemble per the manufacturer’s instructions.
- Place on flat ground and adjust the height (about 18 inches off the ground when loaded).
With your Hammock Brackets installed, you’re ready to hang and enjoy your DIY masterpiece!
Caring for Your Hammock: Tips for Longevity
To keep your hammock in top shape, follow these maintenance and safety tips:
Safety Guidelines
- Check Weight Limits: Never exceed the capacity of your hammock or brackets.
- Hang Low: Set it about 18 inches off the ground for easy entry and exit.
- Avoid Sharp Edges: Keep it clear of rocks, branches, or anything that could tear the fabric.
Cleaning and Storage
- Cleaning: Spot clean with mild soap and water; air dry completely to prevent mildew.
- Storage: Store in a dry, cool place when not in use. Remove tree straps to protect trees.
Maintenance Checks
- Inspect Regularly: Look for frayed ropes, worn fabric, or rusted brackets.
- Tighten Up: Re-secure knots, bolts, or straps as needed.
Why Make a Hammock? The Benefits Await
- Crafting and using a hammock offers more than just a fun project—it comes with perks:
- Customization: Tailor it to your style and size preferences.
- Cost Savings: DIY hammocks can be cheaper than store-bought options.
- Relaxation Boost: The gentle sway reduces stress and improves sleep quality.
- Eco-Friendly Option: Use sustainable materials like organic cotton or recycled fabric.
Conclusion: Swing Into Your Hammock Adventure
Hammocks are a timeless way to relax, and making your own takes the experience to the next level. With this guide, you’ve learned how to make a hammock from scratch, explored the different types available, and discovered the critical role of hammock brackets in creating a safe, stable setup. Whether you’re hanging it between trees, on a patio, or indoors, the right brackets and a little care will ensure years of enjoyment.
So grab your materials, pick your perfect spot, and start crafting your hammock today. Soon, you’ll be swaying in comfort, enjoying the fruits of your DIY labor!
About the Creator
Keep reading
More stories from Flooring Tips and writers in Lifehack and other communities.
Kitchen Renovation Material Trends (2026 Report)
The 2026 kitchen is a study in deliberate, thoughtful evolution. Homeowners and designers are moving away from the stark minimalism and cold, sterile palettes that have dominated recent years. In their place, a new design language is emerging—one that speaks to our collective desire for warmth, tranquility, and a deeper connection to craftsmanship. This year, the kitchen is not just a place to cook; it is the hearth of the home, a multi-functional sanctuary designed for living, working, and gathering. The trends shaping this transformation are rich with texture, grounded in nature, and seamlessly integrated with invisible technology. This report delves into the definitive material trends of 2026, exploring how surfaces, colors, and finishes are being reimagined to create spaces that are both visually stunning and profoundly personal.
By Flooring Tipsabout 14 hours ago in Lifehack
Mother’s Day Gift Ideas for Garden Lovers
Mother’s Day is just around the corner, and there’s no better way to celebrate one of the most important women in your life than by giving her the perfect present. Have you decided what to give her this year? If your mom loves gardening and finds peace among her plants, there are plenty of meaningful gift ideas that can perfectly match her passion.
By Andrew Lemieuxabout 15 hours ago in Lifehack
I Quit LinkedIn — Here’s Why Smart Entrepreneurs Are Leaving
It was a Tuesday morning, right around 8:30 AM, when I finally snapped. I was sitting at my kitchen table, nursing my first cup of coffee, mindlessly scrolling on my phone. I stopped on a post from a guy I used to know a few years back.
By John Arthor3 days ago in Lifehack


Comments
There are no comments for this story
Be the first to respond and start the conversation.