
How to Prepare Your Ground for Artificial Grass Installation
So, you chose to leave the hard-to-care-for real lawn behind and pick fake grass—good call!

So, you chose to leave the hard-to-care-for real lawn behind and pick fake grass—good call! But before you lay down that bright green turf, there's a key step you must not miss: ground prep. Believe me, the last thing you want is a lumpy, rough lawn that looks all patchy. The right prep work is the trick to a smooth, long-lasting fake grass set-up. From taking away old grass to making sure there's good water flow and putting down the right base, each step counts. In this guide, I will show you how to get your ground ready for fake grass like a pro. No guessing, no sad faces—just a nice, green lawn that stays great all year. Ready? Let's start.
Step 1: Make the Space Clear and Get Rid of the Old:
We must take out what is already there before we can install the new. It must go, whether it's old concrete, grass, or a botched rock garden attempt!
How to Get Rid of Various Surfaces:

Pro-Tip: Use a weed killer at least two weeks prior to weed eradication if your current lawn is overrun with weeds. Later, this will stop any regrowth that is difficult to control.
Step 2: Put a Weed Membrane—This Is An Essential Step!
You know what irritates me? Six months after you think you've defeated weeds, they start to snoop through your brand-new fake grass.
The most effective defence? An excellent weed membrane.
Why a Weed Membrane Is Necessary:
-stops the growth of weeds through the turf.
-keeps the earth stable and enhances drainage.
-provides an additional layer of defense between your new lawn and the dirt.
How to Set It Up:
-After the ground has been cleared, spread the weed membrane cloth out.
-Make the edges go over each other by 10cm to stop any gaps.
-Hold it down with yard pins or staples.
Pro-Tip: If weeds grow a lot where you live, think about double-layered weed membranes for more safety.
Step 3: Construct a Robust Sub-Base:
The sub-base is the most crucial component of your ground preparation. This prevents your synthetic grass from becoming uneven, sagging, or lumpy over time.
Sub-Base Materials That Are Best for Artificial Grass

Laying the Sub-Base:
-Cover the entire area with a layer of Type 1 MOT crushed stone that is 50–75 mm (2–3 inches) thick.
-Spread it evenly using a rake.
-Use a vibrating plate compactor (wacker plate) to condense it.
-Place a 25mm (1-inch) layer of granite dust over it to get it all smooth.
Pro-Tip: Avoid using builder's sand as your primary basis because it holds water and can lead to drainage and sinking issues!
Step 4: Examine and Enhance Drainage:
Fake grass won't soak up water, but your yard will! If water can't flow out right, you'll get a yard full of puddles.
The Best Way to Check Your Drainage:
-Make a tiny hole that is six inches deep.
-Pour water into it.
-You're set to go if it drains in an hour or less.
-Better drainage is required if water remains for hours.
Resolving Drainage Problems:
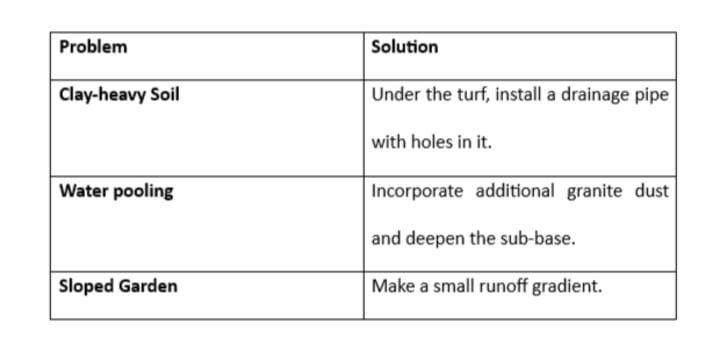
Pro-Tip: For improved drainage in high-rainfall areas, choose a permeable sub-base with larger stones.
Step 5: Install the Shock-Absorbing Underlay (Suggested, but Optional):
A shock pad underlay is the best option if you want your fake grass to feel very plush and soft. It's particularly helpful if you're putting on concrete or have children or pets.
A Shock Pad Underlay's Advantages:
-It makes walking more comfortable.
-Minimizes the effect of falls (perfect for children's play areas).
-It prolongs the life of your artificial grass and improves drainage.
Pro-Tip: Shock pads also aid in soundproofing when installing fake grass on patios or balconies!
Step 6: Secure and Install Artificial Grass:
And lastly! Let's unfold that verdant, rich splendour.
The Proper Way to Lay Artificial Grass:
-To lessen wrinkles, let it settle for a full day.
-Make certain that every blade of grass faces the same way.
-Make sure to use a sharp utility knife to trim the edges correctly.
Securing Your Fake Grass:
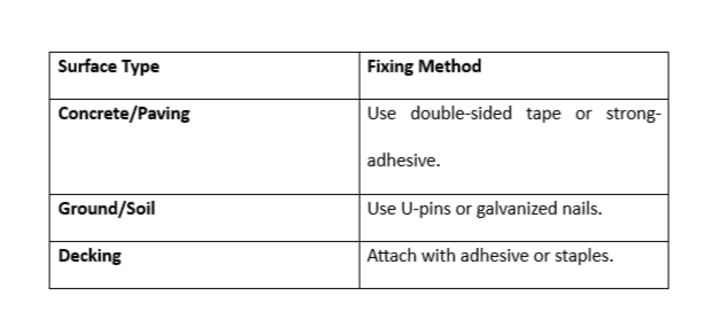
Pro-Tip: Use strong glue and joining tape to link two pieces of artificial grass for a smooth appearance. For the ideal bond, apply pressure firmly!
FAQs:
1. Is it possible to lay artificial grass straight onto soil?
Never, ever! Over time, soil movements might result in uneven grass. In order to guarantee stability, always lay a suitable sub-base.
2. For artificial grass, how thick should the sub-base be?
Aim for 50–75 mm of crushed stone (Type 1 MOT) for the best results, then add 25 mm of granite dust for a smooth finish.
3. Is a weed membrane really necessary?
Of course! Without it, your fake grass's gaps will allow weeds to grow. If you want long-term protection, always install one.
Your ground is now ready for artificial grass, so there you have it! Although it may need some work, doing this correctly will guarantee that your grass remains stable, smooth, and beautiful for many years to come.
About the Creator
Phoenix, Arizona: The City That Learned to Grow With the Desert
When people first arrive in Phoenix, Arizona, the landscape can feel almost surreal. The vast Sonoran Desert stretches outward with towering saguaro cacti, rugged mountains, and wide skies that shift colors dramatically at sunset. At first glance, it seems like an unlikely place for a major metropolitan area.
By House Doctor4 days ago in Lifehack
Soft Rugs for Bedroom Creating a Cozy and Comfortable Space
Every element in the room should contribute to a calm and inviting atmosphere. One of the easiest ways to enhance both comfort and style in a bedroom is by adding a soft rug. Soft rugs for bedroom spaces not only improve the appearance of the room but also create a warm and comfortable surface that makes daily routines more pleasant.
By Nandini Shukla6 days ago in Lifehack


Comments
There are no comments for this story
Be the first to respond and start the conversation.