
How to Make a Weaving By Hand
DIY

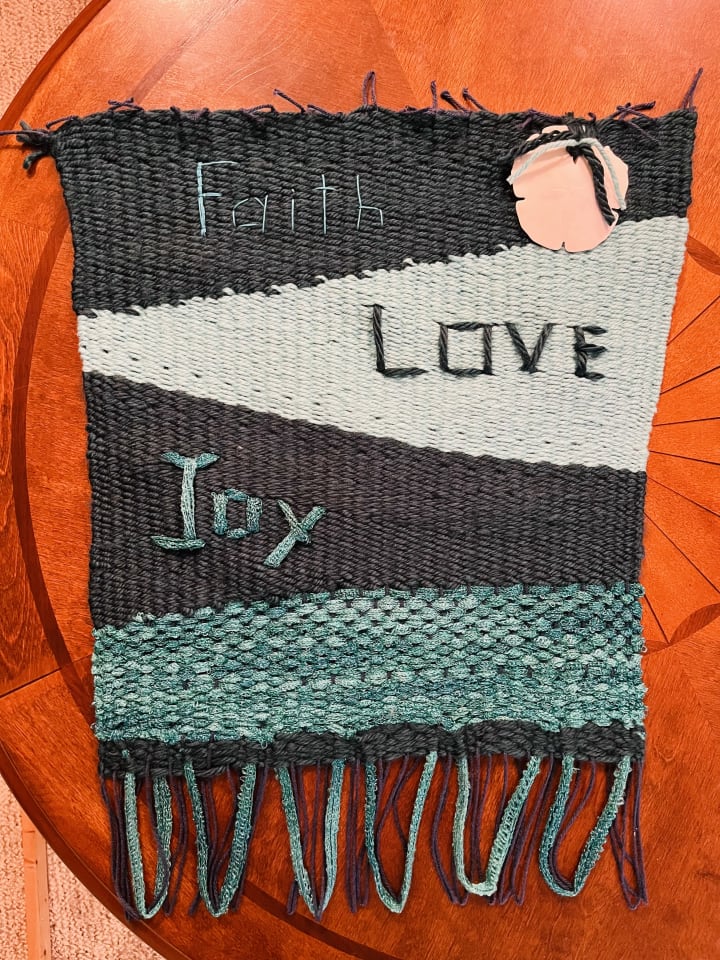
Ever since I was a young kid, I have enjoyed weaving. There is something very calming about weaving that just soothes the soul for me. The purpose of this piece is just to give some simple directions on how to start your own weaving if you would like to give it a try. Feel free to ask questions in the comment section or let me know if you have done weavings in the past. The photos below are from me doing a recent weaving that I gave to my daughter. I was going to give it to some octogenarian at a local nursing home, but my young daughter stopped me and said that she wanted it. I'm not sure if she was just being nice, but I ended up giving it to her and it is currently hanging in her room now.
Step 1:
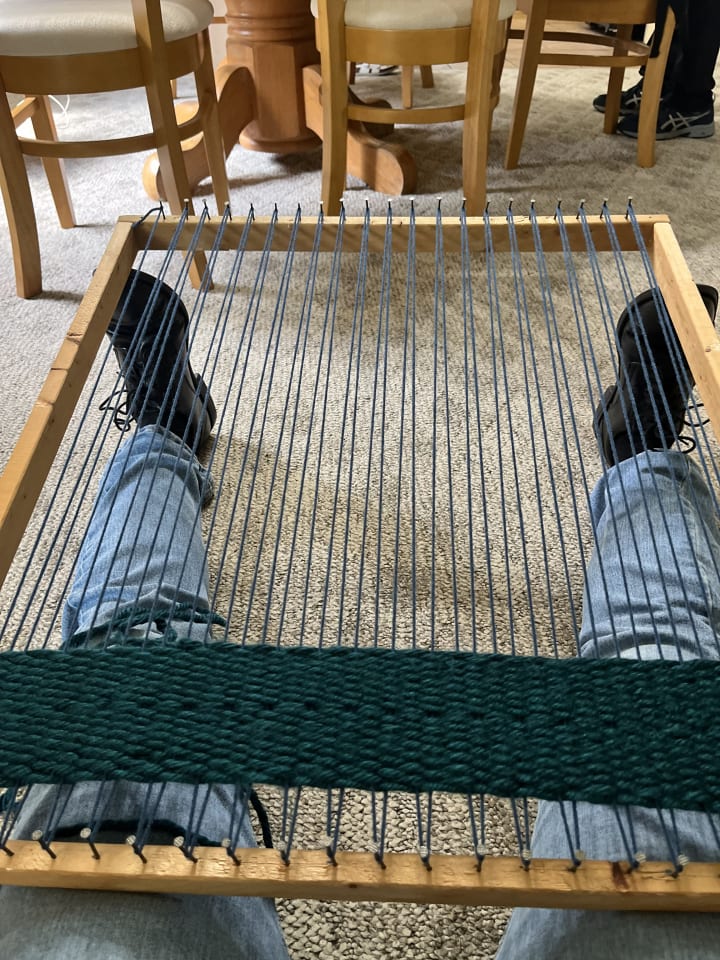
Build a simple loom made from wood as shown in the photo below. It requires an equal number of nails on the north top and south bottom of your loom. Or, you could purchase a loom if you do not wish to make the loom yourself. You can make the loom smaller than the one in the picture if you want something that is a smaller piece. On the top, tie the base vertical yarn color that you wish to have. Tautly run the yarn down to the bottom nail and then back up to the top, repeat this until you have wrapped the year around each nail. Then, you can use a different color, or the same color of year to do the horizontal weaving (over, under, over under). On the next row, you do the oppose (under, over, under over). Some people like to use a large plastic needle or you don't technically need to have a needle. I actually just use may hands for this part honestly. A drybar the slider wide-tooth comb can be used to pull down the horizontal yarn as you go row by row, or you can simply use your fingers to gently pull down the horizontal yarn.
Step 2:
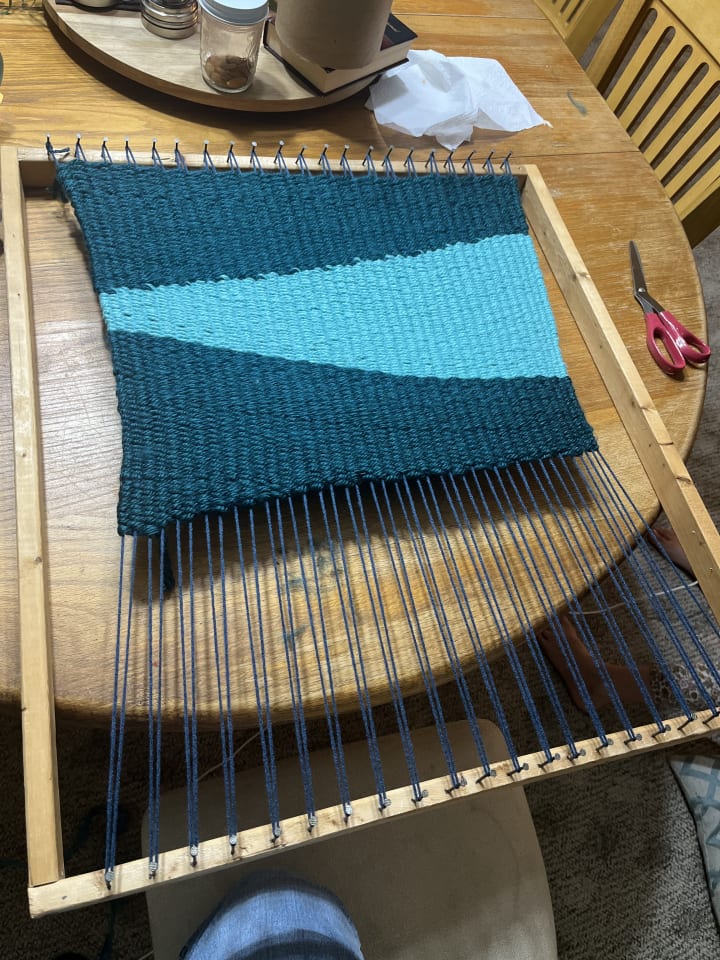
The next step would be to change the yarn color. Obviously, you are not required to change the yarn color but if you do it makes the contrast of colors a bit more interesting. In the past I would do equal lengths on both side but on this particular project I decided to change it up so I made the pattern more diagonal. Once I got an inch and a half in with the darker color, I started weaving not as far in and then it tapered. Then, I added the lighter color to fill in the void. Again, usually I just do equal strips of horizontal colors. I would not recommend doing a diagonal pattern on your first weaving because it is a bit more complex to do. I encourage you to try not to pull too tightly on the ends because otherwise the weaving starts to take on more of an hourglass figure. If you want it to be more rectangular, then try to keep it loose in the middle especially.
Step 3:
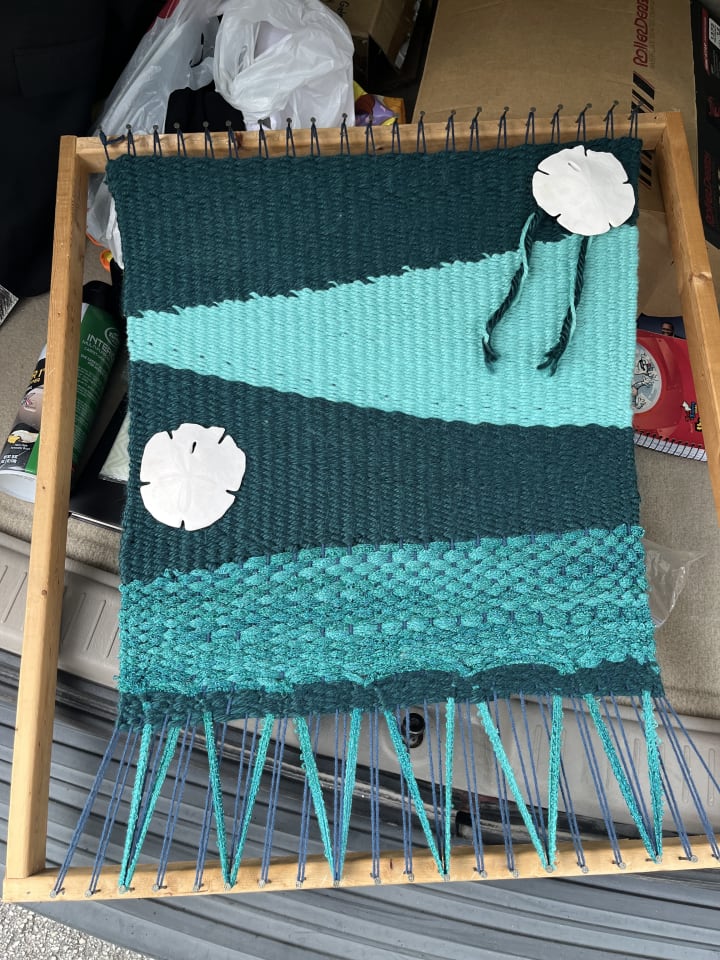
In step three I added a different textured yarn which I really liked. It really changed up the weaving and ended up being my favorite part. I thought about tying on two sand dollars to give it a bit of a beach feel because I like the beach. You could add beads to your weaving or other tokens wish to.
Step 4:
The final step is to sew in words if you choose to but you don't have to add words if you don't wish to. This was the first time that I added words. In the past, I would usually just do the weaving without words of any kind. After you finish the words, then you can carefully cut off the ends and tie them off. I left the loops at the bottom because I liked the way it made it looks like waves. You could also add beads on the bottom for extra decoration. Remember, the back of the weaving isn't going to look pretty because it will show all the knots that have been tied. This type of weaving is designed to be a decorate piece that can be hung on the wall.
I would love to hear about your projects and how they are coming along! Post a comment below to let me know what you are working on or if you feel inspired to give weaving a try.
About the Creator
Rowan Finley
Father. Academic Advisor. Musician. Writer. My real name is Jesse Balogh.
Keep reading
More stories from Rowan Finley and writers in Lifehack and other communities.
Our Slow Journey into Minimalism
Minimalism. Over the last several years my wife and I have started a slow journey toward minimizing our lives. I will not lie, some days it feels like I am pulling teeth. She tends to have way more attachments to material possessions, whereas I tend to have very few attachments to things. As of right now, we have a four-year-old daughter who has been given many toys, stuffed animals, and random items that well-meaning relatives love to give her. It gets overwhelming, very overwhelming when we get rid of some of these items and before we know it, the items have doubled. Some days I look around our house and I feel mentally exhausted when I see how much stuff we have laying around. As Americans, we tend to fall into thinking we need all this stuff, when in reality we don't need most of it. Can we please get back to the basics? Americans get way too caught up in stuff.
By Rowan Finley 6 years ago in Lifehack
Why Smartphones in 2026 Will Feel Very Different From the Ones You Use Today
The top phones from 2024 and 2025 don't appear that different when you put them next to each other. The displays are a little brighter. The cameras are a bit clearer. The CPUs are a little speedier. But in real life, things haven't altered much. You still swipe. You still tap. You still plug in your phone every night. You still care about battery life.
By abualyaanart3 days ago in Lifehack
5 Essential Daily Habits for a Healthier and More Productive Life in 2026
In the fast-paced world of 2026, where digital distractions and high-stress environments are common, maintaining a healthy and productive lifestyle has become more important than ever. Many of us strive for success, but we often forget that true success starts with a healthy body and a clear mind. You do not need to make massive changes overnight to see results. Instead, focusing on small, consistent daily habits can create a significant positive impact over time.
By MD. Rahmat Ullah4 days ago in Lifehack


Comments (1)
OMG, I so much enjoyed it and yes , I literally learnt stuff . Fantastic content , I subscribed to you and you can check out my articles and reciprocate also . Looking forward to more of ya stuff