
How to Fix a Loose, Rocking Toilet
Rocking is for concerts and chairs—not toilets. If your toilet is wobbly or loose but not leaking, this band aid could be just what you would like.

Rocking is for concerts and chairs—not toilets. If your toilet is wobbly or loose but not leaking, this band aid could be just what you would like. Toilets usually rock because they're not resting flush against the ground. Underneath the rest room base may be around toilet flange that connects the rest room to the drain pipe. If the flange may be a little above the encompassing flooring, the rest room becomes raised slightly within the center, allowing it to rock to either side.
This problem can develop over time, like when caulk hardens or when a surrounding floor settles a touch. In any case, you'll steady the rest room by shimming under its base. But before you are trying that, confirm the bolts at the bottom of the rest room are snug.
The best shims for this project are small, plastic shims with ridges that help the shims stay in situ. they're commonly sold reception centers, hardware stores, and restaurant supply stores. Wood shims aren't recommended because they will compress over time and are susceptible to moisture damage.

Instructions
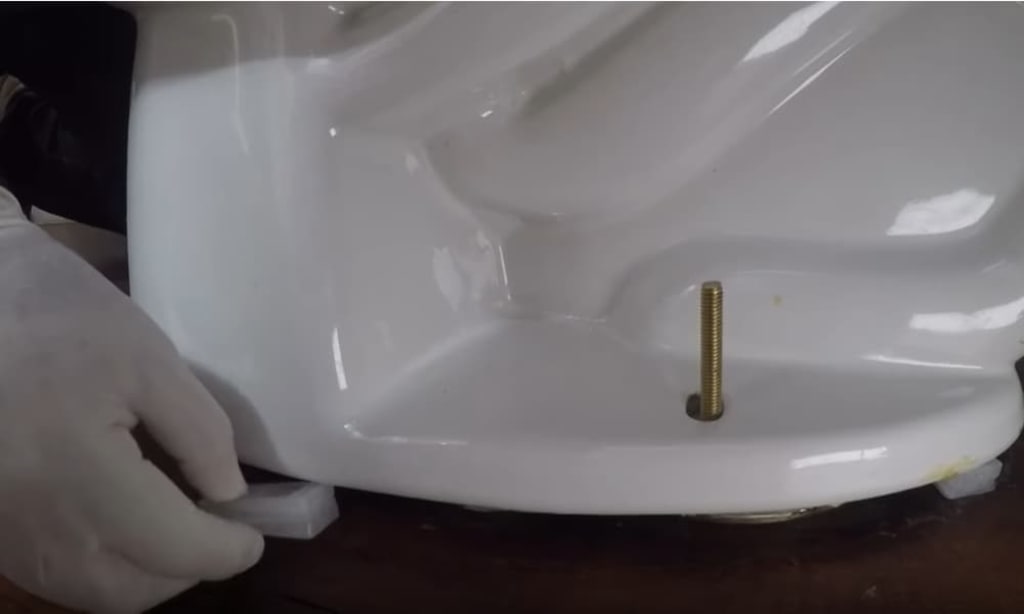
01 Check the Bolts First
Sometimes a rocking toilet is often fixed by tightening the 2 bolts at the bottom of the rest room, called flange bolts or closet bolts. Do that carefully! Tightening the bolts an excessive amount of can crack the brittle porcelain of the rest room, that there's no repair.
Check the flange bolt at all sides of the rest room, employing a pair of pliers or alittle wrench. If a bolt is loose, tighten it slowly just until it's snug. Check the opposite bolt to form sure it's equally snug, then test the rest room for rocking. If it still rocks, proceed with shimming the bottom.
02 Search for Leaks
Start the repair by confirming that your toilet isn't leaking. Check carefully for water around the base of the rest room. If water isn't present, you'll proceed with the repair. But if there are signs of leaking around the base, it likely means the wax ring sealing the rest room horn to the rest room flange has got older and compressed. During this case, you want to remove the rest room and replace the wax ring.
03 Locate the Gaps
Examine the bottom of the rest room, and identify any gaps between the rest room and therefore the floor. It's going to help to rock the rest room from side to side. Even alittle space is often the source of the matter. If the gaps are too small to ascertain, try sliding a shim under the bottom to ascertain how far it goes in.
04 Insert the Shims
Level and steady the rest room by inserting shims into any gaps you've identified. You'll need to try them during a few different positions to properly level the rest room. As you're employed, check the rest room for stability by sitting on the seat and rocking altogether directions. Repeat until the rest room doesn't move in any direction.
05 Trim the Shims
Trim the shims on the brink of the bottom of the rest room, as needed, employing a sharp utility knife. Take care to not dig the flooring.
You can add a dab of caulk below the shims to assist them stay in situ. Let the caulk dry overnight before trimming the shims.
06 Caulk around the Base
Apply a skinny, even bead of caulk around the base of the rest room to hide the gap along the ground and conceal the shims. If necessary, smooth the caulk together with your finger, wiping your finger clean frequently with a towel or a rag.
Caulk is vital for a finished look and to stay mop water and crud from getting under the rest room base, but if you seal all the way around the base, the caulk can hide a leak by trapping the water. For this reason, some plumbers leave the backside of the base—the side you cannot see—without caulk in order that leaking water will announce itself by running out onto the ground.
07 Let the Caulk Dry
Allow the caulk to cure as directed before using the rest room. Once it dries fully, your toilet should be nearly as good as new.
If the restroom Won't Stop Rockin'
If tightening the flange bolts or shimming the rest room base doesn't stop your toilet from rocking, there could be more significant problems down below. The flange bolts that secure the rest room base are themselves held by a metal or plastic ring at the highest of the rest room flange. The ring can corrode or break, loosening its grip on the bolts.
If your rocking comes back after a short time, or if the bolts relax and won't retighten, a damaged flange is probably going the cause. The answer is to get rid of the rest room and either replace the old flange or repair it with a flange repair kit.
About the Creator
Sanjuana Cuellar
Hey! I am Sanjuana and welcome. I am an individual who is positive about every aspect of life. I am a contant writer.
Keep reading
More stories from Sanjuana Cuellar and writers in Lifehack and other communities.
Digital Well-Being
We live in a time where the internet is not just a tool — it is an environment. From the moment we wake up to the moment we fall asleep, screens shape how we think, work, communicate, and relax. Technology connects us instantly, but constant connection can quietly drain our attention, energy, and peace of mind. Digital well-being is the practice of using technology in a way that supports — rather than harms — our mental, emotional, and physical health.
By shaoor afridi3 days ago in Lifehack
I Stopped Chasing Men—And This One Lifehack Made Them Come to Me Naturally
For the longest time, I thought attracting men was about looking perfect, saying the right things, and never making a mistake. I believed if I could just be more attractive, more interesting, or more “ideal,” the right person would notice me.
By Lukáš Hrdlička6 days ago in Lifehack


Comments
There are no comments for this story
Be the first to respond and start the conversation.