

When I craft I make bookmarks. This craft brings me so much joy because I love books, so much so, that I have turned my office into an at home library. I am currently chasing my dream of writing and publishing books so when writers block hits or I just can’t handle sitting at the computer I make bookmarks.
Crafting bookmarks has so many pros and no cons that I can currently think of. It is one of the simplest crafting projects that I have come across. Not to mention the hours of fun, that when done right can cost next to nothing. Most of the tricks and tips I’m going to share I learned from my Mormor (grandma). My favorite thing about crafting bookmarks is that they have a purpose.
Let’s get started. The first thing that you will need to do is gather up all of the needed key supplies. These are the things that the project needs to be successful. Once you have the necessities you can move on to gathering your decorating elements. This list can get long quick so I suggest trying a few at a time, eventually you’ll figure out which ones you’re comfortable with.
Key Supplies: card stock, ruler, scissors, clear packing tape, pencil, embroidery floss, a single hole punch (round), scotch tape, and glue (sticks work best).
Decoration Supplies: markers, ink pad, stamps, stickers, paint, glitter, duct tape, nail polish, colored pencils, and stencils.
Tip 1: My favorite thing to decorate bookmarks with is collage materials. You heard right, collage materials. Collage materials are clippings from pictures, newspapers, catalogs, and magazines. Some of my favorite magazines to clip from are: “Better Homes and Gardens,” “Vogue,” “Game Informer,” “National Geographic,” and “Easy Living.” I also look at things like stationary, sometimes you can find an amazing picture or quote. Oh, don’t forget to get some actual words as you’re clipping along. You never know when a simple word can be just what the picture needed.
Tip 2: Now that you know what you need but where to get it? Well, you have more options than you probably realize. Obviously, there are grocery stores, each has a small section of books and magazines. Places like Wal-Mart and Target have a larger section with more selection. Personally, I’m not always down to pay the price for new when I’m going to cut it up. I would recommend finding your local thrift stores, used books stores, look online, and check around for yard sales.

Let’s make some bookmarks.
~ 1. Find a spot that has some open space. I use a standard card table.
~ 2. Gather all of your key supplies and decorating supplies.
~ 3. Begin by using the ruler and pencil to measure out sections of card stock that are 2” by 7.” Repeat this with two more sheets of card stock.
~ 4. This is basically step three again, EXCEPT, the measurements are 3” by 6.” Again, do the same with two more pieces.
~ 5. Now, take your scissors and cut out all six pages. When you’re done you should have fifteen of the 2” by 7” and nine of the 3” by 6.”
~ 6. This is the fun part… Decorating!!! Be you. Design what you want. One thing to remember is if you use any clipping or pictures from magazines be sure to check and see which size book mark it fits best.
~ 7. Depending on what type of decorating you did make sure all of your bookmarks are dry. No wet paint or glue.
~ 8. Carefully take the packing tape and pull of a strip a tad bit longer than your bookmark. Gently put the tape on the bookmark. Repeat overlapping so that the surface is completely sealed in tape. Make sure to cover both sides.
~ 9. After all of your bookmarks have been “laminated” take the hole punch and put one hole in the top center a half inch down. Repeat until all have a hole.
~ 10. Making tassels is easy. Pick the colors of embroidery floss that you want (they can match the decorations or not) then use the scissors to make a TOTAL of ten 5” strips.
~ 11. Bundle the floss strips together and fold in half. Place folded side through the hole you punch.
Tip 3: It can be tough to get the floss through the hole without bending the bookmark, ripping the hole, or fraying the floss. I use a crochet hook for this problem (G and H are good hook sizes). Put the crochet hook through the hole first then hook the floss at the half fold and pull through. Be easy, don’t yank on it. If tip 3 is not of use to you here’s what is next.
~ 12. Once you have your folded floss through the hole you’ll take the ends and put them through the loop where you folded the floss. It sounds complicated but it’s not.

~ 13. After the tassel is secure use the scissors to trim to desired length. That’s it! Done!
Making bookmarks is a simple, fun, inexpensive way to spend an afternoon. I have made roughly 300 of them so far. Of course you don’t need to make that many, just whatever tickles your toes. I made that many because I sell them. I think that stores charge way too much for bookmarks, $5.99+ for one is crazy. I sell both sizes the at the same rates: 1 for $3, 2 for $5, 3 for $7, 4 for $9, and 5 sell for $11.
There you have it! That’s how to make bookmarks both fun and profitable.
About the Creator
Kristen Renee
Kristen Renee
Writer of poems, short stories, and soon a novel.
Six "Editor's Choice Awards" (1997-2011)
Published in the Library of Congress
Bachelor's Degree in English
Master's Degree in Business Administration
Collector of Books
Keep reading
More stories from Kristen Renee and writers in Lifehack and other communities.
Mormor, Hear Me Roar!
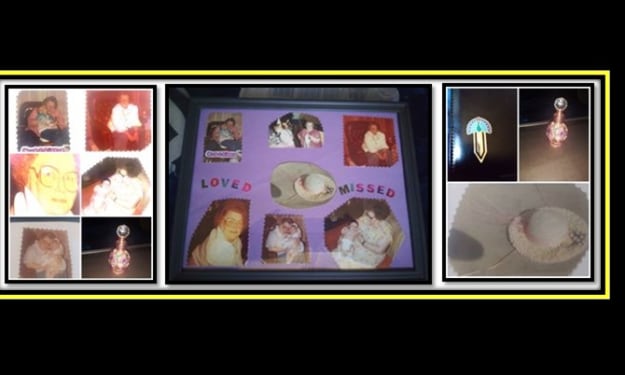
I would have to say that my Mormor, which is Swedish for grandma, is the person that I give credit to for me being me. My Mormor’s name was Lillian. She was about five feet tall and what I like to call pleasantly plump. She wore glasses with pink frames and her grey hair was always tightly permed. The brace that went from foot to thigh on her right leg clicked as she walked. I always knew when she was going somewhere because of the click. The thought of that click always makes me smile. Then my brain goes right to her perfume, ahh, lavender.
By Kristen Renee5 years ago in Families
Work Less, Create More: Why Smart Creators Are Delegating Their Work
What once required a publishing company can now be done with a laptop, a website, and a strong idea. But as many bloggers quickly discover, running a successful online platform involves far more than writing articles.
By Bella Clum6 minutes ago in Lifehack
Wedding RSVPs Made Easy: A 2026 Planning Guide
Couples are juggling timelines, vendors, budgets, travel schedules, and guests who live on their phones. Because of that, the RSVP process has changed dramatically. What once depended on mailed cards and handwritten responses has shifted into a digital first system built around speed and clarity.
By Vala Flynnabout an hour ago in Lifehack
The Piggy Project
I’ve had so many names in this life I lose track of which ones were ever really mine and which ones I wore because someone needed me to. Some were handed to me before I had words to refuse them, before I knew what they meant, before I knew I could say no. Most weren’t meant to hurt. That doesn’t mean they didn’t leave marks. Marks that told me who I belong to, who I am by way of who claims me, recognizes me in the good and bad, who walks beside me.
By Fatal Serendipityabout 13 hours ago in Confessions


Comments
There are no comments for this story
Be the first to respond and start the conversation.