
DIY Dream: Build Your Own Pergola
Create your own backyard oasis.
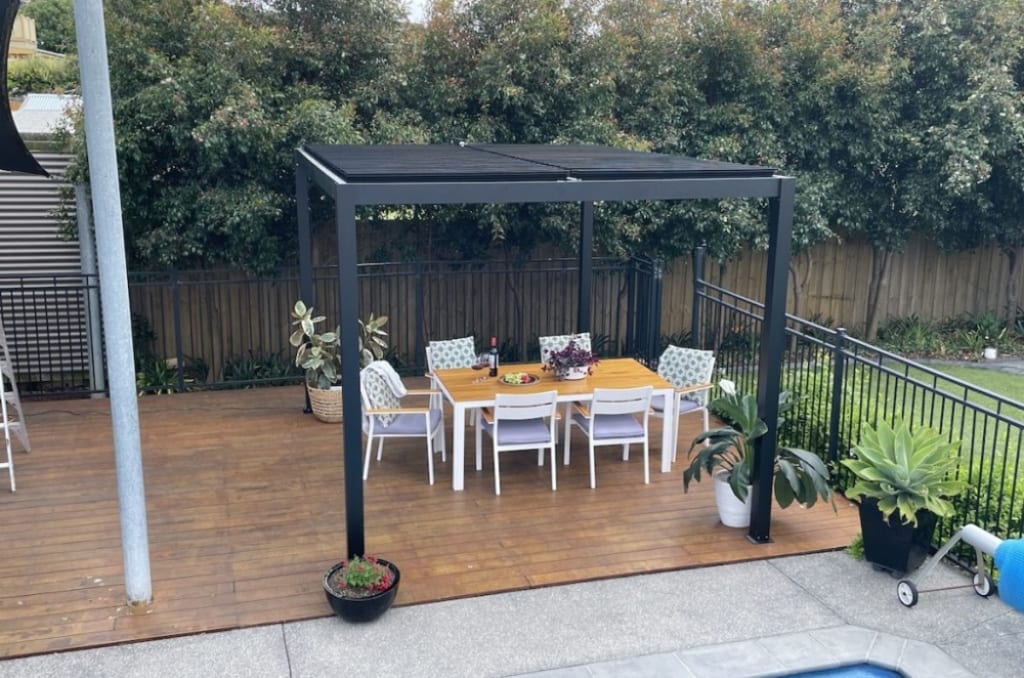
Do you ever find peace in an oasis within your backyard, somewhere you can keep calm and underneath the beauty of a pergola? Building your pergola yourself is a rewarding do-it-yourself project for anyone who is handy with tools and has some spare time. This is an excellent way to add a little value to your home, create a great functional outdoor space, and feel good about crafting something with your hands.
Pergola kits Australia-wide are also available with the aim of making life easier. It shall include pre-cut materials complete with an instruction booklet to simplify life. However, creating a structure all on your lonesome self is somewhat of a rewarding experience should you be more of a personalised approach. Building Your Pergola
Planning your Pergola
The first thing to do is to plan for the style of your pergola. You shall take into consideration:
- Location: A place in your backyard that is sunny and well-protected from strong winds.
- Size: The size of the pergola will be determined by space and how one would intend to use it.
- Style: What kind of appearance do you desire for your pergola? Modern, rustic, and classic are common styles.
- Materials: The materials used should be durable enough, considering the climate of one's home. Wood, metal, and vinyl are among the common materials.
Essential Tools and Equipment
Before you begin, gather the necessary tools and equipment:
- Saw (circular or miter saw)
- Drill
- Level
- Measuring tape
- Hammer
- Screwdriver
- Safety glasses
- Work gloves
Step-by-Step Guide
Step 1: Site Preparation Clean the site:
- Clear the land: Remove junk, weeds, or anything that may interfere with your building process. Stake out the foundation: With the help of stakes and string, chalk out the outline of your pergola.
- Dig the holes: The posts should be deep and level enough to hold the pergola's weight. The depth of the hole, however, depends on the type of post used and, most importantly, your area's soil condition.
Step 2: Building the Base
- Setting the footings: In the case of concrete footing, they must be poured into the holes and fully cured.
- Place the posts in the holes, plumb them to ensure they are straight and level, bracing the posts until the concrete has set. Then attach the base on the posts with screws or bolts after setting the concrete.
Step 3: Raise the Posts:
- Removing temporary braces: After the concrete has set, the temporary braces can be removed and a final check made for the plumb of the posts:
- Attach crossbeams: Make the crossbeams at the top of the posts available by using screws or bolts. The crossbeams should be level and secure.
Step 4: Rafters attachment:
- Cuts in the rafters: The rafters will have to be cut to length and to the proper angle; that information is below.
- Screw or bolt the rafters onto the tops of the posts and crossbeams; ensure the rafters are level and secure.
- Additional support: Attach beams to the rafters for added support.
Step 5: Installation of the Roof Covering (Optional):
- Add Roofing: You can add roofing to the top of your pergola, adding one that provides whatever shade and protection you need. You can choose between lattices, fabrics, solid materials, or the above combination.
Step 6: Finishing Touches:
- Paint: This is usually used to protect against the weather elements and to add a look. You should use paint or a type of stain that is friendly with the exterior and appropriate for the look you want to achieve.
- Add Décor: Add ornamental lights, plants, or climbing ivies to give your pergola a personal signature and turn an outdoor space into a cosy one.
Tips and Tricks
- Take your time: A pergola is one of those projects that takes time and requires several minute details. Take your time with the steps.
- Ask for help: If you are unsure about something or find it difficult, never hesitate to ask a friend or relative for help.
- Consider a do-it-your-end: Many manufacturers are now selling DIY pergola kits with pre-cut material and instructions on how to put it up.
- Get prepared: Prepare all that you need before beginning work.
Pergola Maintenance
After your pergola is set up, good maintenance enables it to serve for a long time. Following are some tips for that:
- Regular Cleaning: Remove all leaves and debris from the roof and structure.
- Damage Check: Inspect the arbour for any damages, and loose screws, among other signs of wear and tear.
- Weatherproof: Apply a protective coating every couple of years to protect against UV rays and moisture. If any issues arise, take the necessary repairing measures soon.
Building a pergola alone can be satisfying and is hence rated as one of the finest DIY projects. With careful planning, attention to detail, and patience, you can create an attractive, functional outdoor space that you can always look at and smile at for years to come.
About the Creator
Keep reading
More stories from Barbie Fex and writers in Lifehack and other communities.
How Do I Know If My Roof Needs Painting?
A worn-out roof in Sydney can be stressful. You notice the wear and tear or spots of damage. You can ask yourself whether it needs to be repainted. Homeowners are usually confused. They look for incredible ideas. It is necessary to keep your roof in good condition. A well-painted roof keeps your house safe. It also enhances your curb appeal. For tailored guidance and support, it's worth consulting roof painting Sydney experts for your home needs, especially when visible damage leaves you uncertain about your next step. Professionalism is paramount to most local experts. They do it better and with quality materials. These are vital elements. They provide you with the best service on all fronts. This guide is your promise. We shed light on your FAQs. We lean on experience and expertise to guide your decision.
By Barbie Fex9 months ago in Lifehack
Yoga Brisbane and the Rise of Consistent Practice in a High-Pressure City
Brisbane has changed significantly over the past decade. Once seen as a slower-paced alternative to Australia’s larger capitals, the city now carries many of the same pressures found elsewhere: demanding workloads, blurred boundaries between professional and personal time, constant connectivity, and a strong expectation to keep moving forward. In this environment, wellbeing has shifted from an abstract ideal to a practical concern. For many residents, Yoga Brisbane has become less about novelty or fitness trends and more about building consistency in a city that rarely slows down.
By Rochelle Martinez5 days ago in Lifehack
Restaurant POS System Made Simple: Understanding POS System Meaning in Real Life
When operating a restaurant, it is much more than just cooking great food. Managing the flow of orders in addition to accurate tracking of food and beverage products utilized, in order for your guests to have an enjoyable dining experience. All of this can be done efficiently and accurately through a Restaurant Point Of Sale (POS) System. To truly understand the potential advantages to an establishment, it is helpful to obtain a firm understanding of the Definition of a POS System, and how it fits into the Restaurant Inventory Management Systems that help restaurants manage daily operational activities.
By Abdul Ahad3 days ago in Lifehack


Comments
There are no comments for this story
Be the first to respond and start the conversation.