
Crafting A Pony Bead Worm
A comprehensive guide


Pony bead worms are simple, fast, and enjoyable to make! It’s an ideal craft project for kids, teens, and even adults! You can add a silver finding to the end of the worm to create a zipper pull or a keychain. You can even turn it into a DIY fidget toy to keep in your backpacks or purses for when you need to fidget on the go.
All you need are some multicoloured pony beads (you can choose which colour you’d want your beaded worm to be), string of your choice (I’m using black nylon silk cord), scissors, and a silver finding to add at the end of the worm. I unexpectedly discovered this craft on Pinterest, and I immediately fell in love with making pony bead worms. In the past several weeks, I’ve generated heaps of beaded worms in various colours.
This would make an ideal DIY project for children, teens, adults, and even seniors! If you’re looking for a new DIY project that’s simple, fast, affordable, and fun, pony bead worms are your solution!
Materials Needed

- Roughly 3 yards of any cord of your choice
- 38 light pink pony beads (or any colour of choice)
- 2 black or dark blue pony beads for the eyes
- Scissors
Instructions
Note: For this written tutorial, I'll refer to light pink pony beads, since that is the colour I selected for this worm. Please select any colour you'd like to use for your worm. The worms look amazing in any colour, but lighter and/or neon colours stand out more than darker colours.
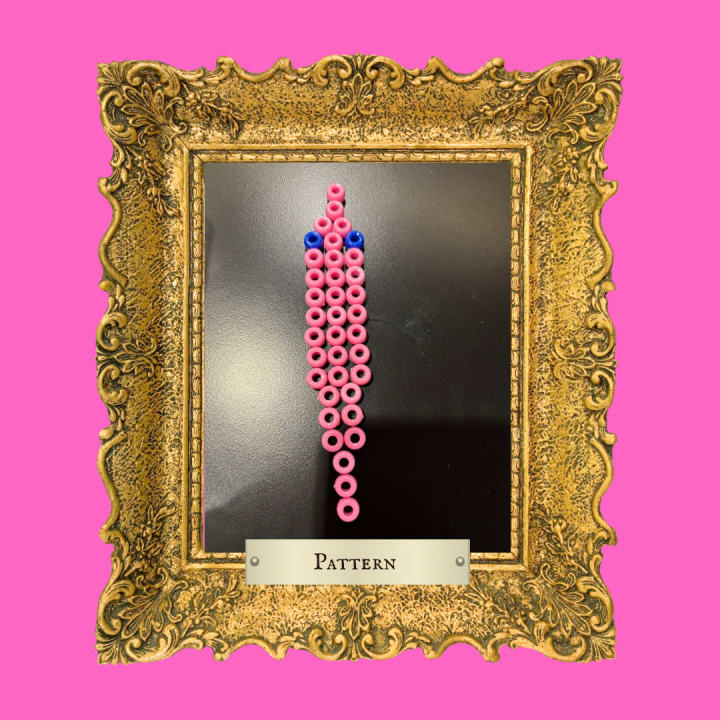
1. Start by looping 1 bead in the middle of the string.

2. After you've looped your first bead, take one end of the string (you can take any end you'd like), and loop a second bead. Take the other side of the string and loop it through the second bead you added. It should resemble the start of a straight line.

3. Repeat the following pattern. You should have a pylon-like shape once you’ve completed the first 3 steps.

4. Once you've completed the first 3 steps, string on 3 more light pink pony beads. You should have a pylon-like shape to begin with.

5. String on 2 dark blue or black beads and one light pink bead to create the eyes.

6. Repeat the rest of the steps using only light pink pony beads. It's always the same pattern.

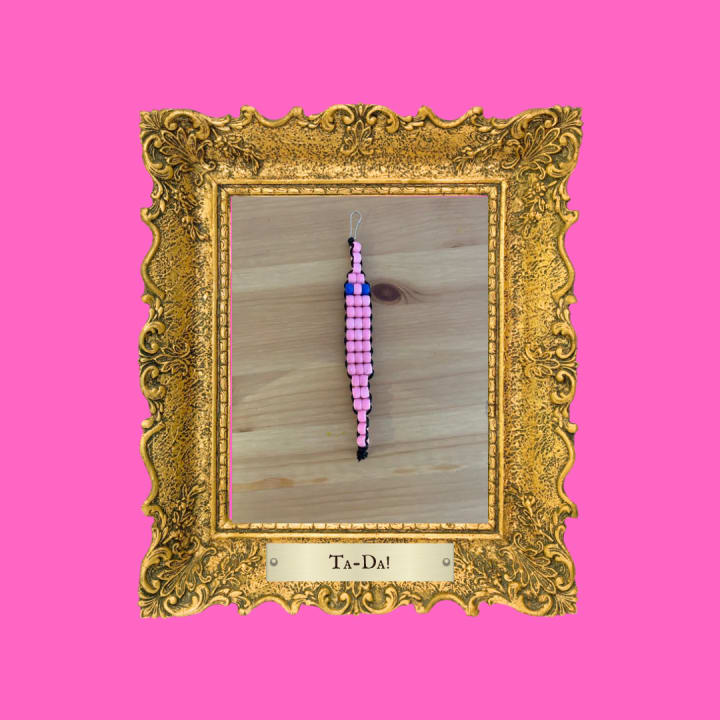
7. Once you're done, tie a knot at the end of the worm. Now you have your cute little pony bead worm you made all by yourself!

Thank you for taking the time to read my first written arts and crafts tutorial. If you enjoyed reading this tutorial and/or making the pony bead worm, please give it a ❤️, share it with others, comment, and please feel free to send me a tip to help me pay for my arts and crafts supplies! To stay tuned for more DIY tutorials and projects, please consider subscribing to me. Your support will means a lot to me.
Please feel free to keep in touch with me!
My small business IG: @its_beadtastic
My private art IG: @taliascreations331
FB: Talia Devora
**Please join my public Facebook group It's Beadtastic Customer Orders and Updates to see what I have in stock. Even if you don't live in Canada or Ontario, you are more than welcome to check it out and join. Supporters from around the world are welcome.

About the Creator
Talia Devora
Poetess, entrepreneur, visual artist, DIY lover, recreation and leisure enthusiast, history buff, and a foreign language addict!
Let’s connect and be friends!
Keep reading
More stories from Talia Devora and writers in Lifehack and other communities.
I Was Born To Create
Where did my creative journey begin? I was born to be an artist, writer, chef, baker, decorator and handicrafter. I started pursuing visual arts when I was only two years old. My parents enrolled me in different art classes that would occur at various art schools in the community. My parents always kept art supplies in the house and I would constantly use them during my ABA therapy sessions at home. Even if I wasn't practicing visual arts, I was always doing some kind of creative activity whether that was cooking, baking, writing, dancing and other activities. I always enjoyed thinking outside the box and creating things that would enable me to feel great about who I was.
By Talia Devora5 years ago in Lifehack


Comments (2)
Great instructional write up! So glad you included pictures as I'm a very visual person. Looks like a fun project :)
Great job Talia! This looks like fun!