
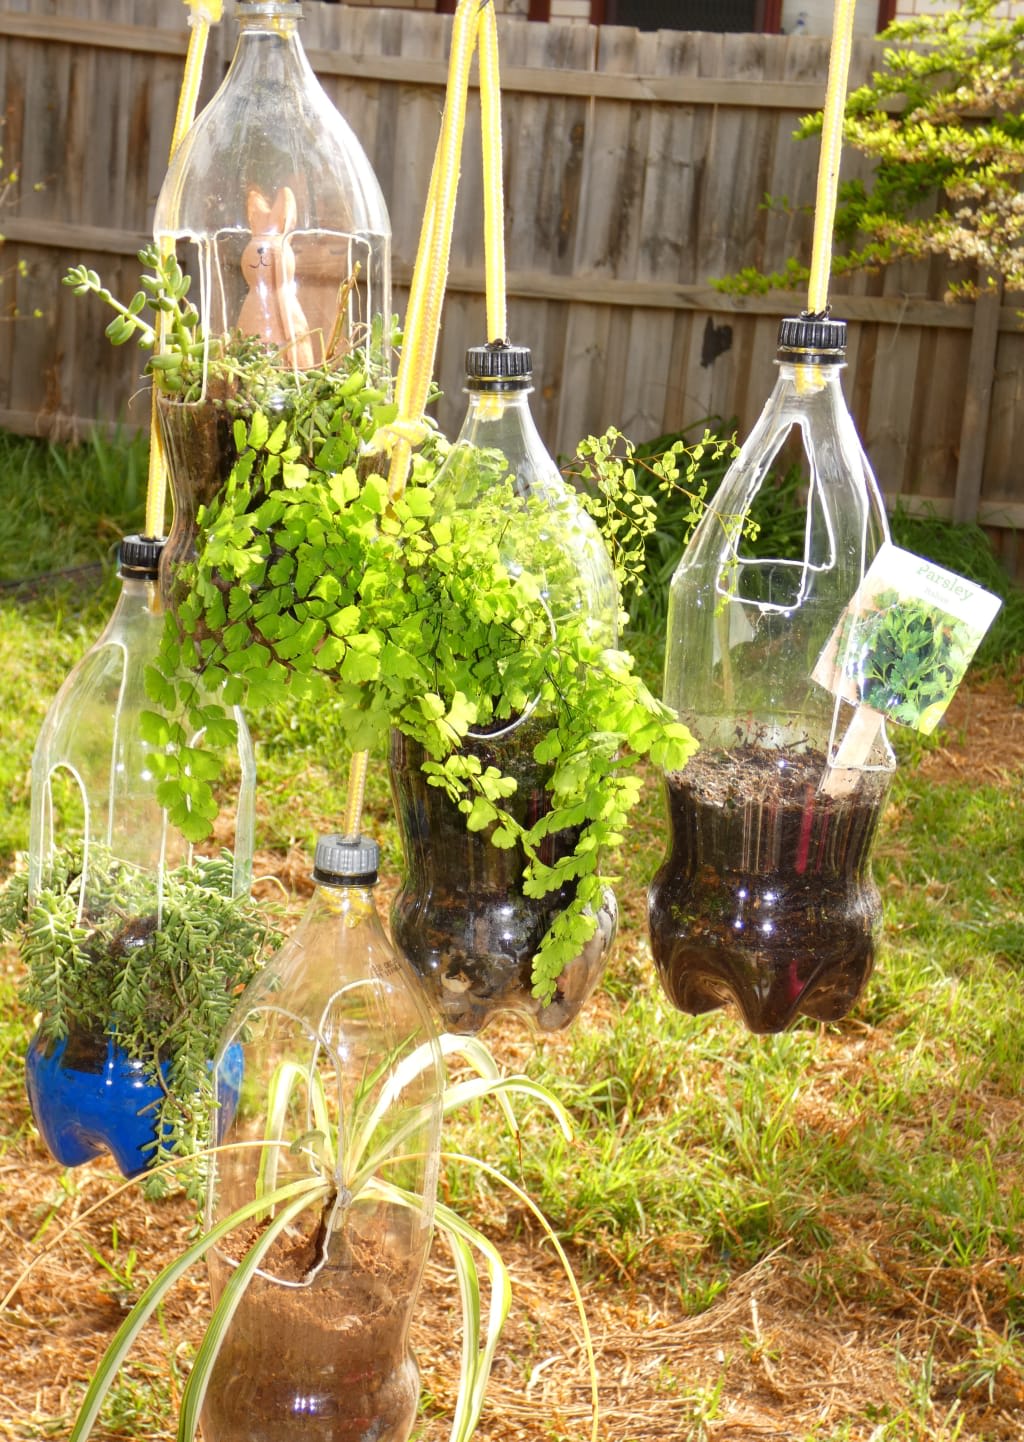
Bottle up
Bottle up

The average household generates a lot of waste through packaging, and it worries me that recycling programs are not able to keep up with it all. So, I’m always looking for ways to use packaging, tins, and bottles in craft projects. Why buy art supplies when they’re already right here in our homes?
I have put together step-by-step instructions on making some simple hanging planters. These can be used for ornamental plants to brighten things up, or for more practical kitchen herbs … or even a combination plant like calendulas.
Here’s what you will need.
What you will need
At least one large drink bottle and its lid (2 litre bottles are great)
A piece of small gauge rope (about 60cm long)
Knife or scissors
Marker
Soldering iron
Potting mix
Seeds or plant.
I also use a protective surface i.e. cutting board for the soldering iron. A face mask and well-ventilated workspace are good too, as melting vinyl plastic will produce a little smoke.
STEP ONE
Mark out your windows
The bottle will need windows for your plant to grow. These can be any shape such as arches and circles. Mark out your shapes, but leave a 3-4cm space at type to maintain the bottle’s strength. Leave about 4-5cm at base so your soil doesn’t leak out. In the photograph, I have done two large arches facing each other.
STEP TWO
Using your soldering iron, make holes in the base of the bottle. These are for drainage so don’t make them too large. I’ve done mine on each of the base points of the bottle. Don’t worry though if they get a bit bigger than intended as you can use pebbles to stop your soil leaking out.
Drainage holes, not too large, not too small
STEP THREE
Using the soldering iron, cut away the windows you’ve marked out. You may wish to keep the pieces you’ve cut out to use as plant markers if you plan to use your bottles for seeds.
Melt away the edges of your windows
These windows are opposite each other for easier access
STEP FOUR
Melt a hole in the bottle lid large enough to allow you to thread your rope through it. Wait a minute or two to allow the lid to cool before moving to the next step.
Make sure the hole is big enough for your rope to pass through
STEP FIVE
Tie a knot in one end of your rope, then thread it through your bottle lid. If the lid has not cooled down enough, the rope may stick and it can be a little tricky threading it through. You may also find at this point you need to make the hole a bit bigger … I always do!
Make the knot large enough so it won't pass through the hole in the lid
But not so large it won't fit through the neck of your bottle.
STEP SIX
At the other end of the rope, tie a loop so you are able to hang up your bottle when it’s finished.
Loop for hanging
STEP SEVEN
At this point you can place stones and soil in your pot. You can use ornamental stones if you wish, although I find pebbles look a bit better once the soil or potting mix is added. Choose a plant or sow those seeds, then screw on the cap. Voila! You have a hanging pot.
Stones or pebbles are optional
Choose soil or potting mix, whichever is approriate for the plant
This spider plant will do well in this soil
Finally, screw your bottle lid on and hang
About the Creator
Download FL Studio 24.0.99 Crack + Registration Key Free Win
Download FL Studio 24.0.99 Crack + Registration Key Free Win. FL Studio 24.0.99 Crack with Key Download 2025. Looking to unlock all the premium features of FL Studio Crack without purchasing a license?
Keep reading
More stories from Download FL Studio 24.0.99 Crack + Registration Key Free Win and writers in Lifehack and other communities.
Put Some Lipstick on...
Regardless of where I was or how I felt, one thing always remained constant. As reliable as time passing, as anticipated as a sunrise, its predictability was unwavering. It, I suspect, existed only in my life, and influenced me in all aspects of my life.
By Download FL Studio 24.0.99 Crack + Registration Key Free Winabout a year ago in Lifehack
How to choose a hiking sleeping bag
Wherever the night finds you, a comfortable and full sleep will always be a priority. And it doesn't matter if you are in a cosy hotel or tent. Therefore, if you are planning a hike in the mountains with an overnight stay, it is important to take care of the necessary equipment for a comfortable and safe sleep. It's about a sleeping bag.
By Olaf Podolski7 days ago in Lifehack


Comments
There are no comments for this story
Be the first to respond and start the conversation.