
“My sledge and hammers lie declined,
My bellows too have lost their wind,
My fire's extinct, my forge decay'd,
My vice is in the dust all laid,
My coal is spent, my iron gone,
My nails are drove, my work is done,
My fire dried corpse here lies at rest,
My soul smoke-like, soars to be blest."
- Tombstone of Thomas Garner, Houghton, Cambridgeshire,1826
I came across this epitaph in a book of poems in my school’s library when I was 14 years old. I had always been interested in blacksmithing – even though it was a kind of dying art. It wasn’t until I was 30, nearly 4 years ago, that I finally made the jump to try it for myself. I had watched several videos from master smiths and had settled on blade smithing. I don’t have the kind of time I once had and I wish I had started sooner, but I am finally at a point where I feel confident enough to submit a knife to earn my journeyman blade smithing rank. My dream is to become a master blade smith one day myself.
My Process
My process is very similar to others – with only slight differences. When a customer orders a knife from me, I first ask a few questions, like what they plan on using the knife for (this determines the shape and size) and what kind of colors they like. I draw out the design for them and verify it is to their liking, usually drawing it out on my phone.
Next, I end up asking my wife to make a CAD drawing, as she is a drafter and knows how to use Autocad – something I hope to learn eventually. Once I’ve given her the picture and some dimensions, she can make a more detailed drawing with proper dimensions for each section of the knife in their respective proportions.
The next step is for me to print and cut out the design. For this knife, I used 8.5x11 cardstock and a pair of metal scissors that my wife has had for a very long time. Once the design is cut out, I will do one of two things, depending on what the customer wants and what they pay for. Either I will forge the blade out of a billet of steel (blade smithing), or I will trace the design onto the billet and cut out the design (stock removal.) Blade smithing takes considerably more time and effort than stock removal, so I charge more for my pieces that I forge.
Once the blade shape is mostly worked, regardless of the method, the next step is to refine the knife’s profile and drill holes for pins. I grind the profile with a belt grinder and can get the shape of the knife perfect.
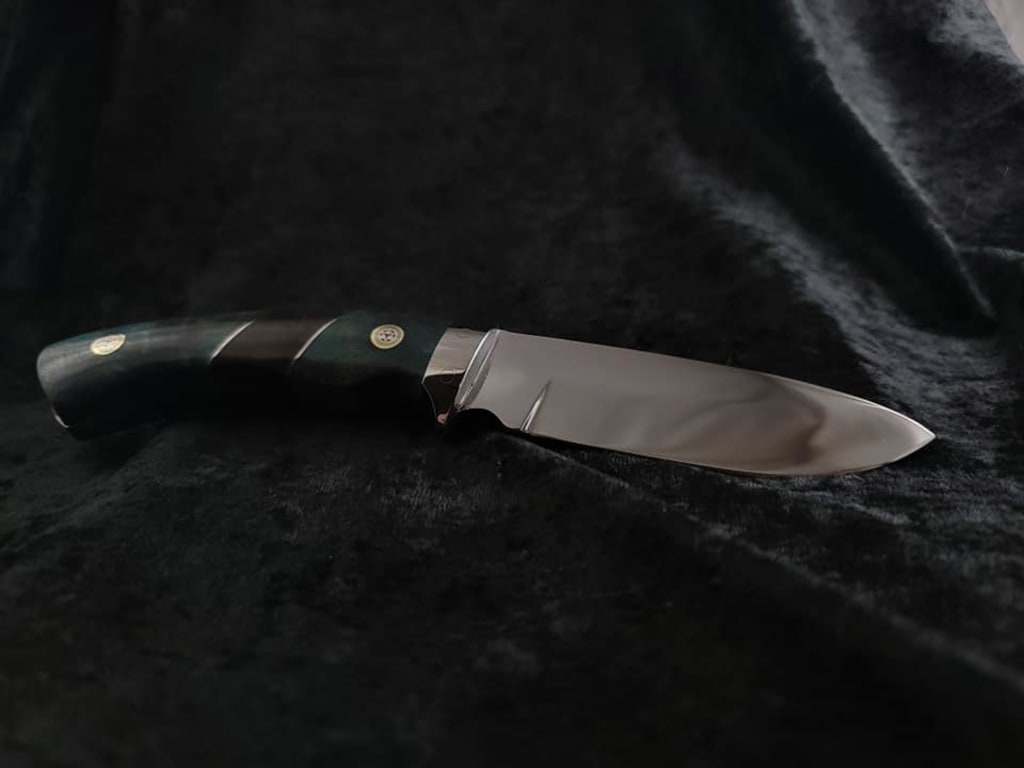
After the profile is done, I will work to getting everything flat so that my bevels can be ground in perfectly. The bevels are one of the harder parts of the knife making process. The angle of the edge must be right for what the knife will be used for. This one was ordered to be an Everyday Carry (EDC) knife. Because of the type of knife, the angle needs to be steeper than something like a kitchen knife, which is meant solely for slicing or chopping.
At this point, I almost have a fully functioning knife. The next steps are hardening and tempering the blade. This process involves heating the knife up to a cherry red color, to the point it is no longer magnetic, and then quenching the knife into oil. On this knife, instead of quenching the entire knife, I only quenched the edge – what is considered differential hardening. It allows the edge of the knife to get very hard but leaving the spine soft. Once this is done, it goes into an oven at 400F for 2 hours to temper. This allows the hardened edge to soften just enough so that it is no longer brittle.
The knife at this point must be cleaned and have the final metal work done on it. This involves more grinding with the belt grinder and probably the worst part of knife-making… hand sanding. Hand sanding is exactly what it sounds like – sanding the knife by hand. This part of the process usually takes a minimum of 5 hours to get a good finish. This knife came in right around 6 hours to get to a mirror polish.
From here, it is time to work on the bolsters. Bolsters are usually some type of metal that separate the blade from the handle on a knife like this. On a dagger or a hidden tang knife, this area would be where the hand guard goes. I reprint the drafted design again and cut out just the bolster section this time to get the shape for it.
Of course, working on the bolster scratched the knife, so there will be more hand sanding coming up. First, I must finish assembling the handle material onto the knife. This involves decorative pins, epoxy, and a lot of clamps. Eventually, I get to the point where the material is on, the epoxy is dried, and I shape down the handle material.
The bottom pin ended up breaking the hole out, so I had to remove it and clean the hole up again. This wasn’t too problematic, but took extra time waiting on the epoxy to dry again. Once it has dried, I go back to hand sanding on the blade and on the handle and bolsters until I get the kind of finish I’m wanting for the knife.
My favorite part of knife making is the last part, seeing the look on the customer’s face when they receive it. Bringing joy to others is mostly what brings joy to me. It is the process of creating something that makes people happy. I tend to under charge because of how much I just enjoy the process. I don’t know that I’ll ever be able to be a full-time knife-maker, but that would be my dream job.
Aside from knife-making, I do a lot of creating and crafting. I love to write and have been working on a book for a couple of years now. My wife and I do a lot of resin crafting, and I make leather sheaths for my knives. I would have loved to share more photos of my work, but unfortunately this platform seems to only allow the one. It all boils down to this though, I love to create, and I love to see people enjoy the things I create. If you want to find photos of my process, I upload to facebook @customZblades.
About the Creator
Keep reading
More stories from Zachary Burns and writers in Lifehack and other communities.
West Hell
The sweat dries from my face, my body shaking fast to the beat of my heart. I can barely stand anymore, let alone continue to use this shovel. Not even the wind that kicks up the dust grants me reprieve from this heat. The rest of the dogs have already fallen. I’m the last one today. It feels as though my body has fallen asleep without me. Every time this happens, I wonder if I will ever wake up again.
By Zachary Burns5 years ago in Fiction
The Surprising Way Positive Thinking Can Change Your Life
Let me tell you the story of how I almost didn't win a car. Yup. You've heard it right. A car. But we almost didn't enter the raffles, thinking "Well, out of the thousands that applied, it's impossible to win".
By Anie the Candid Writer Abroad4 days ago in Lifehack


Comments
There are no comments for this story
Be the first to respond and start the conversation.