
Transform Your Van: Easy Heater Installation Steps
thevansmith
Van life offers unparalleled freedom and adventure, but keeping your space warm during colder months is essential for comfort and safety. Installing a heater in your van is the perfect solution for year-round travel, providing consistent warmth no matter the season. This comprehensive guide will help you transform your van into a cozy retreat by walking you through easy heater installation steps.
Why Install a Heater in Your Van?
A heater enhances the van life experience by creating a comfortable living environment, especially during winter. Here’s why a heater is a must-have:
Improved Comfort: Warmth ensures restful nights and a relaxing space to unwind.
Extended Travel Seasons: A heater allows you to explore cold regions without weather limitations.
Enhanced Resale Value: Vans equipped with heating systems are more attractive to potential buyers.
Choosing the Right Heater for Your Van
1. Types of Van Heaters
Understanding the types of heaters will help you choose one that meets your needs:
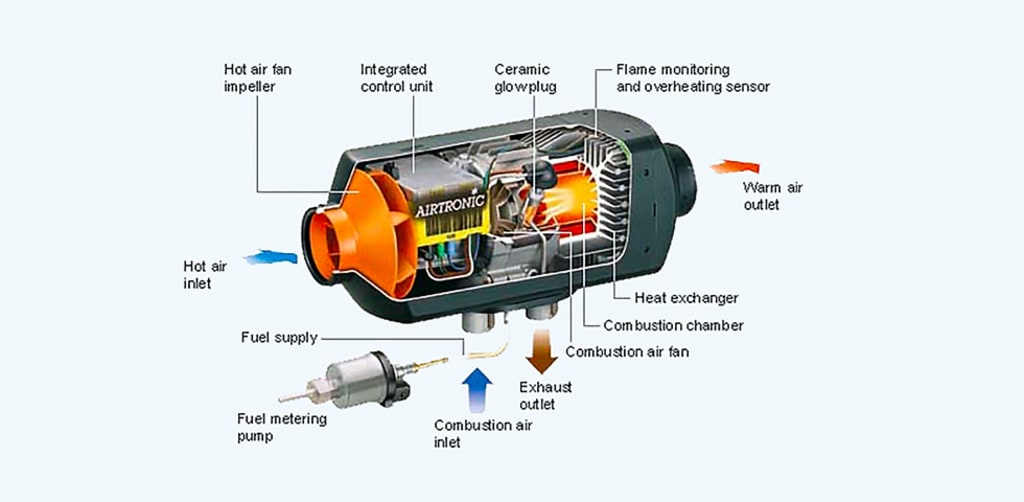
Diesel Heaters: Efficient, cost-effective, and ideal for long-term use. Diesel heaters draw fuel from the van’s tank, making them reliable and low-maintenance.
Propane Heaters: These are portable and effective but require proper ventilation to prevent gas buildup.
Electric Heaters: Best for eco-conscious travelers, they depend on your van’s battery or solar system.
2. Factors to Consider
Van Size: Ensure the heater’s capacity matches your van’s dimensions for optimal performance.
Power Source: Choose a heater compatible with your energy setup, whether it’s diesel, propane, or electric.
Climate Conditions: If you frequently travel to extremely cold regions, opt for a high-capacity heater.
Tools and Materials You’ll Need
Before starting the installation, gather these essential tools and materials:
- Heater unit
- Drill and hole saw
- Ventilation ducts
- Fuel lines and clamps (for diesel or propane heaters)
- Power cables and connectors
- Sealant for waterproofing
- Carbon monoxide detector for safety
Step-by-Step Heater Installation Guide
Step 1: Plan the Installation
Choose the right location for the heater. Most people install it under a seat or in a storage area to save space. Ensure the chosen spot has sufficient room for intake and exhaust vents and allows easy access for maintenance.
Step 2: Mount the Heater Unit
- Secure the heater unit to the designated location using the provided mounting bracket.
- Mark and cut holes for the intake and exhaust pipes, ensuring they lead outside the van.
- Use sealant to waterproof the openings and prevent drafts.
Step 3: Install the Ventilation System
Proper ventilation is critical for safety and efficiency:
- Attach the intake pipe to draw fresh air from outside.
- Connect the exhaust pipe to expel gases safely. Ensure it’s positioned away from windows or doors to avoid carbon monoxide exposure.
- Step 4: Connect the Fuel Lines (for Diesel or Propane Heaters)
- Attach the fuel line to the heater and the fuel source (e.g., your van’s diesel tank or a propane cylinder).
- Use clamps to secure all connections and prevent leaks.
- Route the fuel line carefully, avoiding sharp edges or areas prone to damage.
Step 5: Wire the Heater to Your Power Supply
- Connect the heater to your van’s battery or electrical system. Most heaters include a control panel that allows you to adjust settings.
- Secure all wiring and use cable ties to keep them organized.
- Test the electrical connections to ensure everything functions properly.
Step 6: Test the System
- Before sealing everything, perform a thorough test:
- Turn on the heater and check for proper airflow and heat output.
- Inspect all connections for leaks or loose fittings.
- Listen for unusual noises that might indicate installation errors.
Step 7: Finalize the Installation
- Once satisfied with the test results, seal any remaining gaps with waterproof sealant.
- Install any additional features like thermal curtains or insulated flooring to maximize warmth.
- Mount a carbon monoxide detector inside the van for safety.
Additional Tips for a Successful Installation
Follow Manufacturer Instructions: Always refer to the heater’s manual for specific installation guidelines.
Use Quality Materials: Invest in durable components to ensure long-term performance.
Prioritize Safety: Regularly inspect the heater and ventilation system for wear and tear.
Benefits of a DIY Heater Installation
Cost Savings: Installing the heater yourself can save hundreds of dollars in labor costs.
Customization: You can tailor the installation to suit your van’s layout and your specific needs.
Knowledge and Confidence: Understanding your heater system empowers you to troubleshoot and maintain it effectively.
Common Mistakes to Avoid
Improper Ventilation: Failing to vent exhaust gases properly can lead to dangerous carbon monoxide buildup.
Neglecting Maintenance: Regularly clean and inspect your heater to prevent malfunctions.
Overlooking Insulation: Without proper insulation, your heater will work harder, reducing efficiency.
Conclusion
van heater installation in your van is a game-changer for anyone seeking comfort and adventure during winter travels. By following these easy steps and prioritizing safety, you can create a warm, inviting space that makes van life enjoyable in any season.
Whether you choose a diesel, propane, or electric heater, a well-installed system ensures you’re ready to embrace cold-weather adventures with confidence and ease. So, grab your tools and start transforming your van into a cozy winter haven today!
About the Creator
andy
I am a passionate guest blogger who enjoys exploring and writing about a variety of topics. I aim to provide insightful and engaging content that resonates with readers.


Comments
There are no comments for this story
Be the first to respond and start the conversation.