
The Secrets To Customising Your Microsoft Powerpoint Design Template...
Microsoft Powerpoint


Even though there are rivals, Microsoft Powerpoint is the best presentation tool in the world. It is what I consider to be the most powerful presentation tool on the market. Simply consider how many seminars, lectures, or presentations you attend and how many attendees use Microsoft PowerPoint—in my experience, 95% of them do. But first, allow me to ask you something. How many times have you witnessed the same template being used in presentations?
Far too many, and there is no justification...
In this article, I wanted to explain how to modify the typical Microsoft PowerPoint templates and how to customize your PowerPoint presentations. See, whether you're aware of it or not, any Microsoft PowerPoint template presentation may be changed. The majority of presentation templates that you can discover in Microsoft Powerpoint 2000, XP, or 2003 are just constructed using single drawing objects or shapes that can be found on the Drawing toolbar under the AutoShapes option.
Let's examine how to modify templates provided by Microsoft...
First things first, we need to make a new presentation. I strongly advise you to do this now by opening Microsoft Powerpoint and pressing [Ctrl] + [N]. Next, we want to use one of those popular Microsoft templates. Since I'm writing this tutorial in Microsoft Powerpoint 2003, I'll explain how to modify the Digital Dots template. To use this template, select the Format menu, and then select Slide Design from the drop-down menu. The task pane is open on the right side of the screen. Once you find the slide design labelled Digital Dots, move your mouse pointer over each of the other slide designs to find it. You should now see this design on your slide.
When you first view this template, you might assume that it is too complex and tough to change. Don't fall for it, though. Simple lines and circles from your Drawing toolbar serve as the building blocks for this template. There is nothing more. It's an image and way too hard to edit, many of my students tell me when I am teaching my instructor-led courses, I'm sure of it. Ah, but that's not what it is; instead, it's just a collection of drawing elements that have been expertly coloured to resemble a picture.
How then do we alter it...
Very valid question. The master slide needs to be changed to adapt these templates. You must first activate the master slide before you may change how your presentation looks and feels. Simply select Slide Master from the Master drop-down option on the View menu to accomplish this. Two images should be visible in the left-hand pane at the top of your screen, just before the toolbars. These two images serve as your presentation's title slide master and the slide master that will be utilized for the bulk of your presentation. The Title Slide Master, which we will edit, should be open in front of you. It's important to keep in mind that the guidelines we follow for the Title Slide Master also apply to the other slide masters in your presentation.
Simply click on one of the buttons in the slide that is not near the placeholders to edit the drawing objects on this slide. You should observe that an object select marker in the shape of a square emerges. This indicates that the elements you can see are a group. So, to ungroup these objects, right-click and select Grouping, then Ungroup from the shortcut menu.
Then, you'll see every single item you chose on the slide. Simply click on any object, let's alter one of the buttons, and then click away from the selected objects. After selecting the button, right-click and select Format Auto shape. If you look closely, you'll see that the Format Autoshape dialogue box resembles the Autoshape dialogue box you use for regular drawing objects.
Let's choose green from the Fill Colour drop-down box to change the colour of the item to green. Selecting the OK button will finalize your update. You now have one green button, which you should note. The slide master might now be customized to look as you like by going through and changing every button.
By selecting Backdrop from the Format menu's drop-down menu, you may even go through and modify the Slide master's background. All of the slides in your presentation will update with the new background when you modify them on the Title Slide Master and the Slide Master.
Merely a little side note...
The most straightforward method is to first choose the item from which you wish to replicate the formatting before moving on to the next object. Double-click the Format Painter button on the Standard toolbar, then click on each object you wish to receive this formatting by clicking on it individually. With so many small objects to be altered, this tool is very helpful in this situation.
After customizing your Title Slide Master and Slide Master, click the Close Master View button on the Slide Master View toolbar once to end. Back to your main presentation after this. Now that the modifications you made to the Slide Masters have been incorporated, you should see that your entire presentation has changed.
If you want to learn my 1# way to master the Microsoft PowerPoint templates, Click Here>>>>
#powerpointtemplates #technology #microsoftPowerpoint #template2023 #software
About the Creator
Victoria J. Cruz
I am Victoria J. Cruz. Blogger is who I am. I enjoy writing about the newest technological developments, the hottest technological news, gaming, gadget reviews, technology and Android.💻📱🔌
Keep reading
More stories from Victoria J. Cruz and writers in Futurism and other communities.
The Little-Known Plant That Relieves Pain Naturally
Do you have a history of persistent pain? Are you looking for a natural cure for your body's pain? If so, you might be interested to learn about a plant that can help you manage the pain that grows in your backyard. Herbalists and traditional healers have used this underutilized plant for generations to rapidly and effectively relieve pain. This blog post will go over the benefits of this herb, its applications throughout history, and how you can utilize it to reduce your pain.
By Victoria J. Cruz3 years ago in Families
About Binding Prometheus
I want to start actively advocating on behalf of my own work, and the most valuable part of my canon is, without a doubt, Binding Prometheus, the play I have been working on since 2019 and only finished in 2023 as part of my MA. The play itself is an amalgamation of a million different inspirations. On one end, it evokes the Ancient Greek myth-play, deriving its own title from the earliest extant work of Western drama we have, Aeschylus’s Prometheus Bound. On the other end, it borrows significantly from the sci-fi bulwarks from over the years, namely Mary Shelley’s Frankenstein and Karel Capek’s Rossum’s Universal Robots. The play could be an episode of Black Mirror, I fear. I don’t know. I’ve only ever seen one episode of Black Mirror.
By Steven Christopher McKnight18 days ago in Futurism
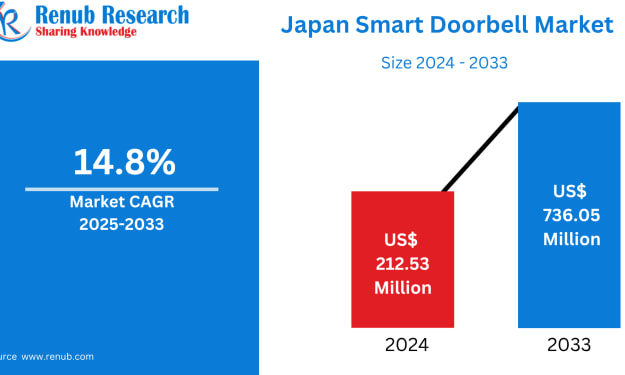
Japan Smart Doorbell Market Size and Forecast 2025–2033
Market Snapshot The Japan Smart Doorbell Market is expected to reach US$ 736.05 million by 2033, up from US$ 212.53 million in 2024, expanding at a robust CAGR of 14.8% from 2025 to 2033. Rapid urbanization, increasing adoption of smart home technologies, and rising demand for home security systems are driving market growth. Advancements in AI, video analytics, and wireless connectivity are further strengthening consumer demand for smart doorbell systems.
By Marthan Sir3 days ago in Futurism
How to Succeed at the Benson Directory®
Congratulations and welcome to the Benson Directory® employee #22391! As our newest call handler, you will have the privilege of speaking with dozens of unique and interesting people on a daily basis as well as the opportunity to earn bonuses for high performance. Contained within this handbook you will find a set of ease to follow instructions designed to help you settle in to your new role and begin paving the way to success.
By S. A. Crawford2 days ago in Fiction


Comments
There are no comments for this story
Be the first to respond and start the conversation.