
How to replace or install an exterior door?
IPSA Mart offers a premium range of architectural hardware products, including smart door locks for main door with doorbell.

Your exterior door plays a critical role in your home’s overall appearance, security, and energy efficiency. Whether you're upgrading to a more secure, energy-efficient option or replacing a damaged door, knowing how to replace or install an exterior door is a valuable skill. Not only does it improve the curb appeal of your home, but it also enhances safety and ensures better insulation.
Moreover, when replacing or installing a door, it's essential to consider the door accessories set stainless steel. These accessories, such as handles, locks, and hinges, add durability and a sleek finish to your entryway. Stainless steel options are ideal for exterior doors due to their resistance to rust, wear, and weather elements, making them a long-lasting and stylish choice for your home.
In this detailed guide, we'll walk you through the entire process of replacing or installing an exterior door.
Why Replace Your Exterior Door?
Before diving into the installation steps, let's explore why you might consider replacing your exterior door:
Enhanced Security: A sturdy exterior door with modern locking mechanisms provides better protection against potential intruders.
Improved Energy Efficiency: Newer exterior doors are better insulated, helping to reduce energy bills by keeping warm air inside during the winter and cool air inside during the summer.
Curb Appeal: The right door can add to the aesthetic of your home, boosting its appearance from the outside.
Reduced Wear and Tear: Over time, weather conditions can cause warping, cracking, or rotting indoors. Replacing a worn-out door will improve durability.
Tools and Materials You Will Need
Make sure you have all the equipment and supplies you'll need before initiating your task:
New exterior door (pre-hung or slab)
Measuring tape
Screwdriver or drill
Hammer and nails
Shims
Utility knife
Level
A caulking gun and weatherproof caulk
Pry bar
Insulation (optional but recommended)
Wood screws
Flashing tape
Wood filler or putty (if necessary)
Steps-By-Step Guide to Replace Exterior Door
Steps involved in replacing the exterior door involve:-
Step 1: Measure Your Door Frame
It is essential to have precise dimensions before installing a new door. If you’re installing a pre-hung door (one that comes already attached to a frame), take the following measurements:
Width: Measure the width of the existing door from jamb to jamb.
Height: Measure the height from the threshold to the top of the door frame.
Depth: Ensure the new door will fit the depth of the frame, accounting for the trim and any additional layers.
If you are replacing just the slab (the door without a frame), measure the width and height of the door itself. Always double-check these measurements to avoid purchasing a door that won’t fit properly.
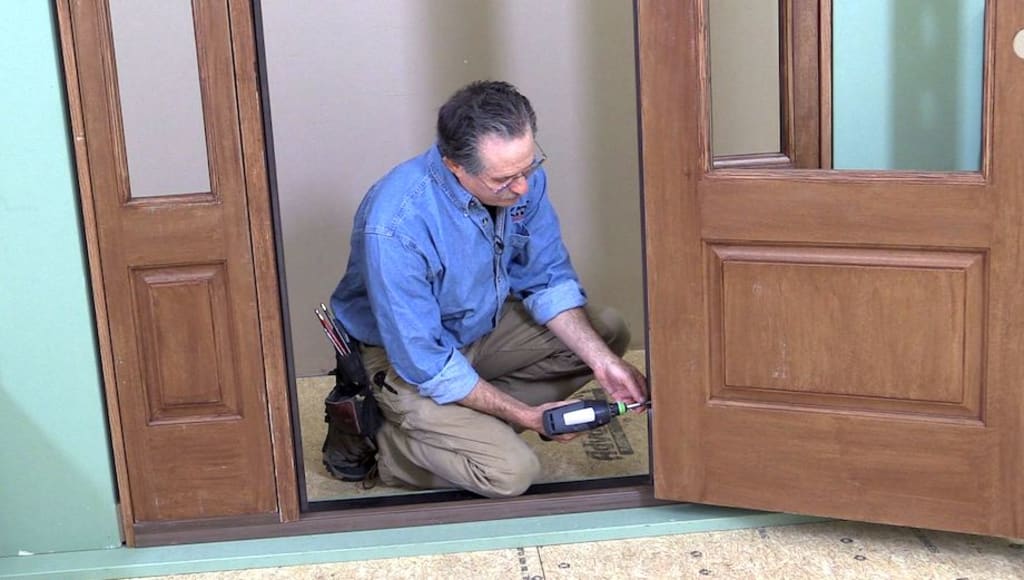
Step 2: Remove the Old Door
The next step is removing the old door and frame. Follow these steps carefully to avoid damaging the door opening:
Unscrew the Hinges: Remove the door from its hinges using a screwdriver or drill, remove the hinge pins if needed, and gently pull it away from the frame.
Remove the Trim: Use a pry bar to carefully remove any trim surrounding the door. Try not to damage it, as you may want to reuse it.
Detach the Old Frame: To install a pre-hung door, remove the existing frame and carefully pry it away from the door opening, ensuring no damage to the surrounding structure.
Inspect the Rough Opening: Remove the door and frame, inspect the rough opening for rot or damage, and repair the damaged wood around the door before installing a new one.
Step 3: Prepare the Opening
To ensure a proper fit, take time to prepare the rough opening:
Check the Level and Square: Use a level to level the door opening ensure square sides, and adjust uneven openings with shims for proper functioning.
Apply Flashing Tape: Flashing tape is crucial for preventing water infiltration by creating a watertight barrier around the bottom of the door frame and opening sides.
Add Insulation: Before installing the new door, consider adding insulation around the edges of the door frame. Draft prevention and energy efficiency will both benefit from this.
Step 4: Install the New Door
Now it's time to place the new door in the opening. If you're installing a pre-hung door, this step will be more straightforward since the door is already attached to its frame.
Insert the Door: Carefully place the door and frame into the opening. Ensure the door is centered, and that the frame fits snugly against the rough opening.
Level the Door: Ensure the door is perfectly vertical and horizontal using a level, and adjust by inserting shims between the door frame and rough opening for smooth opening and closing.
Secure the Frame: Secure the door frame to the door opening using screws, starting from the top hinge side and checking for any additional shimming needed.
Step 5: Install the Trim
Once the door is securely in place, it's time to install the trim:
Reinstall or Replace Trim: Reuse old trim if not damaged, or replace with new style pieces, secure with nails or screws around the door, ensuring it doesn't damage the home.
Apply Caulk: Apply weatherproof caulk around the trim and edges of your door to seal it properly, prevent moisture from seeping into gaps, and improve energy efficiency.
Step 6: Add Finishing Touches
Your door is now installed, but there are a few final steps to ensure it operates smoothly and looks great:
Test the Door: To ensure smooth and secure door operation, repeatedly open and close the door and adjust the hinges or strike plate if necessary.
Install Door Hardware: If your door doesn’t already have hardware (such as a lock or doorknob), install the hardware of your choice following the manufacturer's instructions.
Paint or Stain (Optional): If your door is unfinished, now is the time to paint or stain it. Choose a finish that complements your home’s exterior and enhances the door's durability.
Step 7: Final Checks and Maintenance
With your new door installed, perform a few final checks to ensure everything is in working order:
Check for Air Leaks: Hold a lit candle or tissue near door edges to check for flickering flames or tissue movement, indicating insulation or weatherstripping adjustments may be needed.
Inspect the Threshold: Make sure the threshold is properly sealed and aligned. A poorly installed threshold can cause drafts and reduce energy efficiency.
Regular Maintenance: To keep your door in top condition, inspect it periodically for signs of wear and tear. Reapply caulk or paint as necessary to protect the door from the elements.
To Wrap Up
Replacing or installing an exterior door may seem like a daunting task, but with the right tools, preparation, and guidance, it can be a rewarding DIY project. A new door not only enhances the aesthetic appeal of your home but also improves security and energy efficiency. By following this step-by-step guide, you’ll ensure that your door is installed correctly, providing years of reliable performance.
IPSA Mart offers a premium range of architectural hardware products, including smart door locks for main door with doorbell. Designed for security and convenience, these innovative locks provide advanced features like remote access, keyless entry, and integrated doorbells. IPSA Mart’s durable, high-quality hardware ensures seamless functionality and enhances the aesthetics of modern homes and commercial spaces.
About the Creator
IPSA Mart
Consumer experience is prime to IPSA MART, Being best in architectural hardware solutions and specializing in electronic door locks & many more.
Wise~Guys
— Look Behind what's in Front of You ~ Make Good Choices — Hey, So how you Doin'..! Made~Men — Mobster Movies romanticise a distinctive, elegant appearance, impeccable attire style, along with the 'Families' expressive lingo. Making their 'Bones' gave them Panache — with vintage fedoras, tailored pin-striped suits, mirror-polished wing-tip shoes adorned with tassels; with their 'Gun Moll' gorgeous dates on their arms.
By Jay Kantor20 days ago in Families
Bettijo Hirschi
Introduction Bettijo Hirschi is a multi‑talented creative professional from the United States. She works as a designer, art director, photographer, writer, and event planner. Bettijo has built a long career in creative work and media. People know her for her artistic skills, her work in magazines and television, and her lifestyle blog. She is also known in recent news because of changes in her personal life.
By Farhan Sayed6 days ago in Families
How to Succeed at the Benson Directory®
Congratulations and welcome to the Benson Directory® employee #22391! As our newest call handler, you will have the privilege of speaking with dozens of unique and interesting people on a daily basis as well as the opportunity to earn bonuses for high performance. Contained within this handbook you will find a set of ease to follow instructions designed to help you settle in to your new role and begin paving the way to success.
By S. A. Crawford4 days ago in Fiction


Comments
There are no comments for this story
Be the first to respond and start the conversation.