
Home-Made Bread Step by Step: Easy Baking Guide
A Simple Guide to Homemade Bread
Baking your own bread at home is rewarding and delicious. This guide will help you make tasty, fresh homemade bread. It covers everything from ingredients to techniques for perfect loaves. It's great for beginners or those wanting to improve their skills.
This step-by-step guide will give you the confidence to make delicious homemade bread in your kitchen.
Key Takeaways
•Discover the advantages of baking your own bread at home
•Learn about the essential tools and ingredients needed for successful bread baking
•Understand the different types of flour and their roles in bread making
•Master the techniques for mixing, kneading, and shaping the dough
•Explore the art of proofing and baking to achieve the perfect crust and crumb
•Troubleshoot common bread baking issues and find solutions
•Learn how to store and serve your freshly baked homemade bread
Introduction to Home-Made Bread Baking
Baking your own bread at home is rewarding. You control the ingredients and create something delicious from scratch. The aroma of fresh bread and the joy of a warm, crusty loaf are unmatched.
Advantages of Baking Your Own Bread
When you bake your own bread, you can tailor the flavors and textures. Try different flours and add your favorite herbs and spices. Homemade bread often has fewer preservatives, making it a healthier choice.
Essential Tools and Ingredients
To start with home-made bread baking, you need some key tools and ingredients. A sturdy mixing bowl, reliable bread baking equipment, and quality bread baking supplies are crucial. Don't forget the basics like flour, yeast, water, and salt.
Essential Tools
•Mixing bowl
•Dough hook or wooden spoon
•Bread pan or baking sheet
•Oven
Essential Ingredients
•Flour (all-purpose, whole wheat, or a blend)
•Yeast
•Water
•Salt
•Optional: Honey, butter, herbs, etc.
With the right tools and ingredients, you're set to make delicious, homemade bread. It will impress your friends and family.
Baking: home-made bread step by step
Starting your step-by-step bread baking journey is exciting and rewarding. The bread making process might seem hard at first. But, with the right help, you can easily make delicious loaves at home.
Here's a simple guide to baking your own bread:
1.Gather your ingredients: Flour, yeast, water, salt, and any extra flavors or mix-ins you like.
2.Activate the yeast by mixing it with warm water. Let it get bubbly before moving on.
3.In a big bowl, mix the flour, salt, and yeast mixture. Knead the dough until it's smooth and elastic.
4.Put the dough in a greased bowl, cover it, and let it rise in a warm spot until it's doubled in size, about an hour.
5.Punch down the dough to get rid of air bubbles, then shape it into your preferred loaf or rolls.
6.Put the shaped dough in a greased loaf pan or on a baking sheet. Cover it and let it rise again until it's puffed up, 30-45 minutes.
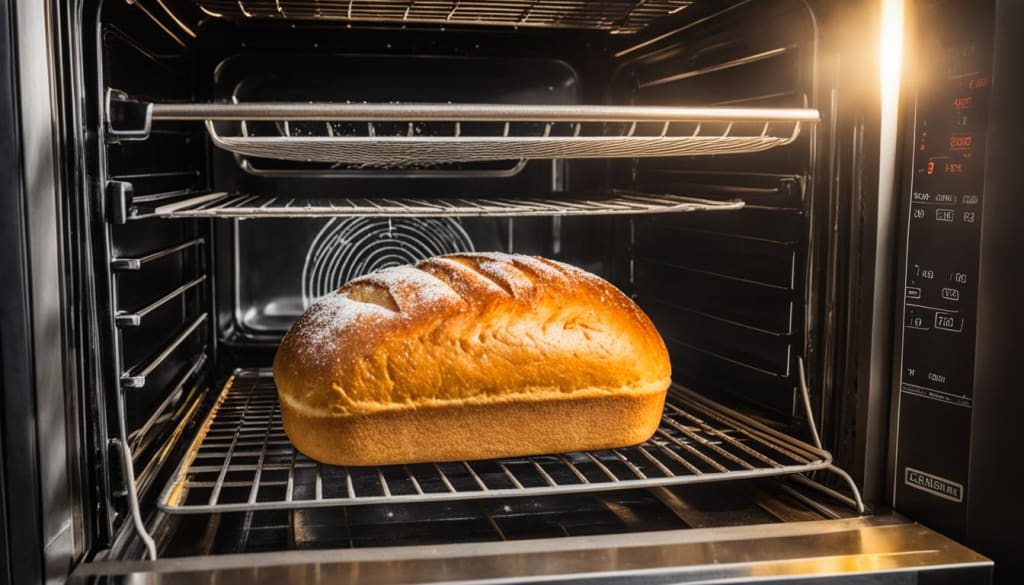
7.Heat your oven to 375°F (190°C).
8.Bake the bread until it's golden brown and sounds hollow when tapped, 30-40 minutes.
9.Take the bread out of the oven and let it cool on a wire rack before you slice and serve.
By following this step-by-step bread baking guide, you'll make delicious, fresh bread. Your home will fill with the amazing smell of homemade bread. Enjoy the feeling of making bread making process and sharing your homemade bread tutorial with others.
https://www.youtube.com/watch?v=wh3cs85ow1A
Step/Description
1 Gather ingredients: flour, yeast, water, salt, and any additional flavors or mix-ins.
2 Activate the yeast by dissolving it in warm water and allowing it to proof.
3 Mix the flour, salt, and proofed yeast mixture, then knead the dough until smooth and elastic.
4 Let the dough rise in a greased bowl until it has doubled in size, usually about an hour.
5 Punch down the dough, shape it into a loaf or rolls, and let it rise again until puffed up.
6 Bake the bread at 375°F (190°C) until golden brown and hollow-sounding, about 30-40 minutes.
7 Allow the bread to cool on a wire rack before slicing and serving.
"Baking bread is one of the most satisfying and rewarding experiences in the kitchen. The aroma of freshly baked bread is simply unbeatable."
Understanding Bread Ingredients
Making homemade bread is rewarding, but it begins with knowing the key ingredients. We'll cover the basics of bread ingredients and the important role of yeast. These basics will help you become a pro at making bread.
Flour Types and Their Roles
The base of great bread is the flour. There are many types of flour, each with its own special qualities:
•All-purpose flour: Great for many bread recipes.
•Bread flour: Has more gluten, making the loaf chewy and structured.
•Whole wheat flour: Gives a nutty taste and more fiber than white flours.
•Rye flour: Adds a tangy flavor and a dense texture to breads like pumpernickel.
Yeast: The Rising Agent
Yeast is key for making bread light and airy. It eats the sugars in the dough, creating bubbles that make the dough rise. Knowing about the different types of yeast for bread baking helps you get the perfect rise.
Mastering the ingredients for bread leads to making tasty, homemade loaves. These loaves will wow your family and friends. Next, we'll look at how to bake bread from scratch.
Preparing the Dough
Making the perfect loaf of bread begins with the dough. It's important to mix and knead the bread dough right. This helps create a light, airy texture. We'll cover the key steps for mixing bread dough and kneading bread dough. This way, your homemade bread will turn out great.
Mixing and Kneading Techniques
Start by mixing dry ingredients like flour, salt, and spices in a big bowl. Make a well in the middle and add wet ingredients like water or oil. Use a spoon or your hands to mix until it forms a shaggy dough.
After that, it's time to knead. Kneading works the dough to make gluten strands. These strands make bread chewy and give it structure. Flour your surface and knead for 5-10 minutes. Use your heel to push the dough away and fold it back. This builds the gluten network.
1.Combine the dry ingredients in a large bowl, creating a well in the center.
2.Pour in the wet ingredients and mix until a shaggy dough forms.
3.Turn the dough out onto a lightly floured surface and knead for 5-10 minutes.
4.Knead the dough using the heel of your hand to push it away, then fold it back over itself.
5.Knead until the dough becomes smooth, elastic, and passes the "windowpane test".
While kneading, the dough should get smooth and elastic. It should also pass the "windowpane test". This means stretching a dough piece thin enough to see through without tears. This shows the gluten is fully developed, ready for a delicious homemade loaf.
Proofing and Shaping the Dough
Learning to bake bread means understanding proofing and shaping. This step lets the dough rise and get its special flavor and texture. It shapes your homemade loaves.
The bread proofing stage lets the dough ferment and grow. This makes the bread light and tasty. You need a warm, draft-free spot and enough time for proofing.
After proofing, it's time to shape the bread dough into what you want. You can make everything from classic loaves to fancy boules. Try different ways like rolling, folding, and tucking to make your bread look great and taste amazing.
The dough rising process is key for perfect bread. By getting good at proofing and shaping, you'll make bread that looks and tastes great.
Oven Baking: Temperature and Timing
Baking bread in the oven is key to making great homemade bread. Getting the oven temperature and timing right is crucial for a golden, crispy crust. Let's explore how to do this well.
Achieving the Perfect Crust
For a crispy crust, you need to know about oven temperature and how long to bake. The best bread baking temperature is between 400°F to 450°F (200°C to 230°C). This heat makes the crust crunchy and delicious.
The time to bake varies with the loaf's size and type. Smaller loaves bake in 20-30 minutes, while big, dense ones take 40-50 minutes. Always check your bread with a digital thermometer. It should be at 205°F to 210°F (96°C to 99°C) when done.
To get a crispy crust, spray the oven walls with water at the start. This steam helps the crust become shiny and golden.
Getting the perfect crust is all about the right oven temperature and time. With practice, you'll make loaves that taste like they came from a bakery.
Troubleshooting Common Bread Baking Issues
Even if you're skilled at baking bread, you might face problems that leave you confused. Don't worry! This guide will help you fix bread baking problems. It covers troubleshooting bread recipes and fixing common bread baking mistakes. This way, you can make delicious bread every time.
Undercooked or Dense Loaves
If your bread is dense and not fully cooked, it might be due to proofing or baking issues. Make sure the dough has risen enough. Also, check your oven temperature and baking time to get it right.
Dry or Crumbly Texture
Bread that's dry and crumbly often has too little liquid. Add more water or milk to your recipe. Also, keep an eye on the humidity around you, as it can affect the dough's moisture.
Uneven or Lopsided Rises
Uneven rises can come from bad yeast, not kneading well, or an uneven oven. Use fresh yeast, knead the dough well, and make sure your oven heats evenly.
Common Bread Baking Issue Possible Causes Solutions
Tough or Chewy Crust Overbaking, high oven temperature Reduce oven temperature and baking time
Gummy or Sticky Interior Underbaking, too much liquid Increase baking time, reduce liquid in the recipe
Excessive Browning High oven temperature, too much sugar in the recipe Lower oven temperature, reduce sugar in the recipe
Remember, every loaf of bread is different. Fixing these bread baking problems takes time and practice. By tackling these issues, you'll get better at making homemade bread recipes. Enjoy baking!
Storing and Serving Homemade Bread
Freshly baked homemade bread is a true delight. It's important to store it right to keep it fresh. Use a paper bag or a bread box for storage. These allow air to flow while keeping the bread from drying out. Don't store bread in plastic bags, as it can make the crust soggy.
Freezing Bread for Later Use
If you've baked more bread than you can eat right away, don't worry. You can freeze it for later. Wrap the loaf or slices in plastic wrap or foil, then put it in the freezer. This keeps the bread fresh and tasty. When you want to eat it, thaw it at room temperature or in the microwave, and it's ready to go.
Serving homemade bread is a simple way to make any meal special. Enjoy it with a hearty soup, use it for sandwiches, or just eat it with butter. The smell and taste of fresh bread will make your meal unforgettable.
FAQ
What are the key ingredients for making homemade bread?
Making homemade bread needs flour, yeast, water, and salt. The flour type, yeast amount, and other optional ingredients change with each recipe.
How long does the bread baking process take?
Making bread from start to finish takes 2-4 hours. This includes time for the dough to rise, which is key for flavor and texture.
What type of flour is best for baking homemade bread?
All-purpose flour works well for most bread recipes. But, you can try other flours like bread flour, whole wheat flour, or mixes for different tastes and textures.
How do I know when the bread dough has been kneaded enough?
The dough is ready when it's smooth, elastic, and passes the "windowpane test." This means you can stretch a small piece thin enough to see light through it without it tearing.
How can I achieve a crispy crust on my homemade bread?
For a crispy crust, bake at a high temperature (around 425°F) and use a baking stone or Dutch oven for steam. Brushing the dough with water or egg wash before baking also helps.
How long can I store homemade bread, and how should I store it?
Eat homemade bread within 2-3 days for best taste. Store it at room temperature, wrapped in a clean towel or bag. Freezing it keeps it fresh for up to 3 months.
What are some common issues that can arise when baking bread at home?
Issues like dense loaves, dough that's not proofed right, or uneven baking can happen. These might be due to wrong ingredient ratios, poor kneading, or oven issues. Check your recipe's troubleshooting section for help.
About the Creator
Keep reading
More stories from Mike Smith and writers in Families and other communities.
Wise~Guys
— Look Behind what's in Front of You ~ Make Good Choices — Hey, So how you Doin'..! Made~Men — Mobster Movies romanticise a distinctive, elegant appearance, impeccable attire style, along with the 'Families' expressive lingo. Making their 'Bones' gave them Panache — with vintage fedoras, tailored pin-striped suits, mirror-polished wing-tip shoes adorned with tassels; with their 'Gun Moll' gorgeous dates on their arms.
By Jay Kantor29 days ago in Families
The Donald Trump Family: From Business Power to Political Legacy
Introduction The Trump family is one of the most talked-about families in modern American history. What began as a real-estate business empire eventually transformed into a powerful political brand that reshaped U.S. politics. From towering skyscrapers to the White House, the Trump family’s journey reflects ambition, controversy, influence, and lasting impact.
By shaoor afridi6 days ago in Families


Comments (1)
I like how this held our hand every step of the way, with all this detailed explanation of each step, we will be able to make a perfect loaf of bread in the comfort of our home; and in the end we will give ourselves a pat on the back. Well written.