
Quick and Easy Guide to start Facebook Ads
Basic things you should know before you start!


As technology advances many companies, businesses owners, entrepreneurs, and students, turn to digital marketing to grow their businesses through the online world. It is not a secret that Facebook allows people to run ads and simply market their products to be able to reach the right audience, be it in your town, city, country, or overseas.
Here I put together a quick and easy guide for people who need a clear path to step up and achieve those goals.
The first step, as obvious as it seems, is to have a personal Facebook account. I would recommend having an account that has your real name and that you have been using for some time now. Facebook has strict policy guidelines, so to be able to run ads on Facebook you will need to try and follow these policies. Facebook has been shutting down fake accounts and many new accounts have also been blocked, for this reason, whether you are running ads for yourself or someone else I advise you to use your personal account to run ads. Don’t worry you can always link and remove your personal account to and from Facebook pages, Facebook Business Manager, or Ad accounts. We will elaborate more on this later.
These are the main Facebook interfaces that you need to know to run ads:
1. Personal Facebook Profile
2. Facebook Pages
3. Meta Business Suite
4. Ads Manager
5. Business Manager
1. Personal Facebook Profile Interface
After you have set up your personal account one of the most important steps is to head up to settings & privacy. On settings go to ‘’General Account Settings’’ and make sure to add an Ad account contact such as an e-mail. This e-mail will be used to notify you and receive updates on your ads, invoices, and general notifications about your ad account connected to your personal account. At the same time, this e-mail is the one you should provide when someone wants to add you to a Business Manager account or any other Ad Account.


Additionally, this is optional for starters but you can also go through the ‘’Identity Confirmation’’ to make sure you will not have problems in the future. Here Facebook will ask you to upload a valid ID. You can click here to know what type of ID Facebook accepts. At this point you may be asking why you need to do this; in my experience when you start running ads on Facebook they will want to verify your identity in the future, this step might prevent your Ad account from being blocked and can also be useful to regain access to your account in case something happens.
Tip: You can also activate the ‘’Two-factor authentication’’ on the security and login settings. This is useful to protect your account. Facebook will ask you for a code every time you log in from a different device or location. It is better if you activate this because there have been some cases in which new accounts that haven’t set this up don’t have access to some functions once they start running ads or managing Facebook Pages.
2. Facebook Pages
Once you have created a personal profile now you can move and create a Facebook Page or if someone wants to add you to their Facebook Page they can easily do it from their page settings. They just need to go to page — settings — page roles— assign a new page role. Here they can either use your name if you are already friends on Facebook or you can give them your personal profile link. They can add you as an admin which means you will have full control of the page, or as an editor or moderator.

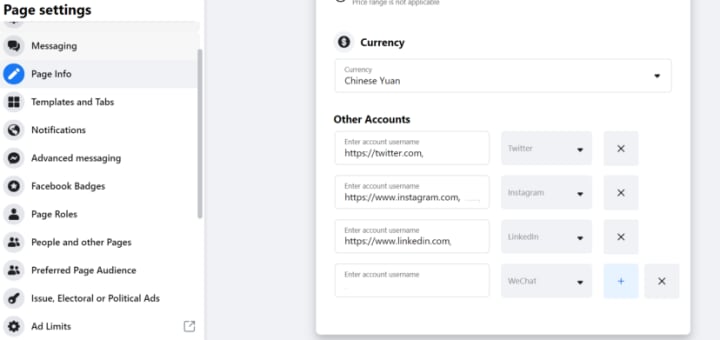
After you have set up your page, there are many options on this interface that you can make use of. Something that I often put into practice is to link all the other social media accounts that are related to that page on Facebook (if you have them). You can go to page settings — page info — other accounts. There you can add your other social media accounts such as Instagram, Twitter, LinkedIn, etc.
Bonus: If you want to run ads on Instagram you have to do it directly from the Facebook platform, for this, you will need to link an Instagram account to your Facebook page as stated above.
Facebook pages allow you to do many things. You can directly publish content from the pages, such as videos, images, carousels, etc. Here we will mention the most basic and most common practices to give you a glance at which Facebook interfaces you need to familiarize yourself with before running ads.
Once you create some content for your page you can use those creatives to run ads. On the Facebook pages, there is an option which is called ‘’boost post’’. This means you will be using that post content to run your ads. Once you click boost post there are many other settings you need to go through, it is worth mentioning you can only boost a post once you have an ad account and payment method set up. For now, we will only focus on the Facebook interfaces and the basic things you need to know to manage the platform to run ads in the future. For this, I will create a new article where I explain how to create ads on Facebook step by step.
Note: One of the reasons why Facebook Pages are useful is because they allow you to get on the radar of your possible customers, and build up communities, for people to find out about you or your business. Having a social media presence can be a great way to start up, expand, or even start from ‘’0'’ on your business or entrepreneurship.
If you want to know more in detail only about Facebook pages click here.
3. Meta Business Suite
Meta Business Suite is another Facebook interface, you can access this place directly from your Facebook Page on the left upper side. This free tool allows you to manage all your Facebook page activities to a deeper level, as well as more detailed insights on your posts or ads. One thing that the meta business suite allows you to do is post across platforms. Here you can manage, schedule, and save drafts of all the content you want to post depending on your plan on Facebook and Instagram at the same time. You can also post stories and you don’t need to switch accounts whiles doing this.

Moreover, once you start running ads, this place is great to track insights and trends. With this tool, you can create insights for future campaigns before launching them and it allows you to create goals such as growing your audience or reach. You can track and see which posts or ads are performing better and see demographics such as which countries or places your audience come from. You can also have access to insights such as age or gender. Depending on who your target persona is you can set all this up once you start running ads.
Apart from all of these, Business Suite is a great place to check your notifications from Facebook or Instagram, messages, posts, comments, etc. Here you can also have a look at the expenditure on your ads. One of the things I make use of in this part and that I think is worth mentioning is that this is the place where you can create instant forms for your ads. If you want to run ‘’lead ads’’ in the future and want your target audience to fill up a form with their contact or information that you need you first need to create a form in this section and use it later in your Ads Manager interface.

Note: Some Facebook pages do not have access to the Meta Business Suite. In this case, if you want to create a Lead form you can do it from your Facebook page directly. Look for publishing tools — lead ad forms — forms library — create. Some Facebook pages are not eligible for this interface, once you are eligible the option to go to meta business suite should appear automatically on your Facebook page.
In case you do not have this interface you can also access ‘’creator studio’’ which has more or less the same functionality as meta business suite. You can access this from your page on the left side publishing tools — tools — creator studio.
If you want to know more in detail about Meta Business Suite click here.
4. Ads Manager
You can access your Ads Manager account from your personal Home tab on your Facebook page on the left menu, or from Meta Business Suite. Ads Manager interface is where you will start creating your ads, creating audiences, tracking the performance of your campaigns, managing your budgets and schedules, etc. In Ads Manager, you will have by default a personal Ad Account with a number assigned. I recommend you not to use this account to run ads directly if you are running ads for a business or if you are going to run multiple types of campaigns.
The best way is to create new Ad accounts for the specific business or Facebook Pages that you want to promote. To create an Ad account you will have to do this in the Business Manager Interface. We will talk about this later on. For now, let’s focus on what we can do on this interface once we have a Facebook Ad Account.
In Ads Manager you can run ads on Facebook, Instagram, Messenger, or Audience Network. Create ads choosing your desired objective. Whether you want to reach more people or want people to engage with your content, generate more leads or sales for your business; all of this can be achieved on this interface. To do this, you must already have a Facebook Page or a linked Instagram page as stated above.

Ads Manager is divided into three main tabs, Campaigns — Ad Sets — Ads. One campaign can contain multiple ad sets and ads, and one ad set can contain multiple ads. In the ad campaign, you can choose which is your objective, in the ad set you can choose your desired audience, who and how many people you want to reach, etc., and in the ads, you will have the creatives which is what you will show to people. With ads manager, you can do all of this and more, with several options of how and where you want your ads to be displayed.
If you want to know more about the type of ads you can create with Facebook click here.
In Ads Manager you can also have a look at all of your campaigns at the same time, see your spending, number of leads, number of impressions, reach, cost per result, etc. All of these analytics can be filtered out according to your needs.
At the same time, you can also track insights from the Ads manager and extract ads reports from the Ads Reporting section which you can find on the left side of the menu All tools — Analyze and report — Ads Reporting. Here you can filter the different types of metrics and check your ad accounts, and campaigns, and you can also filter what you need to know about your campaign performance.
Important: Before running ads you might need to head to the Payment settings to add a payment method in Ads Manager. There have been cases in which Facebook detects you are trying to run ads but there is no payment method added, so they can block or restrict your ad account. This can be a big issue so is better to be prepared in advance.
On the other hand, one feature that is also important to mention is Account quality which is located on the left side of the menu in Ads Manager All tools — Account quality. If your ad accounts, Facebook pages, or personal ad accounts have a problem you might see it on this page. Usually, you can request a review or submit any documentation that Facebook might need from you to reinstate your account. Maintaining all of your accounts in good health is very important because once you have an ad account that is disabled this can affect your overall business manager, which means if one of your accounts is disabled you are no longer able to create a new ad account in the same business manager. As you can see now, all of these interfaces are connected and they are made up to manage different things on different levels.

If you want to know more about Ads Manager click here.
5. Business Manager
Facebook Business Manager is the place where you will be able to manage all of the other interfaces at a greater level. You can create different business manager accounts if you manage a lot of clients and if you will be running ads for people, you can use them for your business, it all depends on the scope of the things that you want to do. To create a business manager account all you have to do is head to this link after you have logged in to your personal account. For this, you will need a name for your business, your name, and a work email address.
Once you have an account there are many things you can do in your business manager. For starters, you can add existing Ad Accounts to the Business Manager or create new Ad Accounts. The number of ad accounts you can create will vary, if it’s a new account you will more likely be granted only one ad account, as time goes by and you start running ads and using the account Facebook will increase the number of ad accounts that you can create. Usually, it goes like 1–3–5–10. You can check this in business settings — business info — business details.
Now let’s talk about the most basic practices that you can implement once you have a new Business Manager account.

You can:
1. Enable Two-factor authentication
2. Add another person to the account besides you (Facebook encourages you to do this in case you don’t have access to your account for some reason )
3. Add a payment method (you can use this same payment method in all your ad accounts if you want)
4. Create an Ad Account and add a payment method for it
5. Add your Facebook Pages to your Business Manager to claim ownership
6. Add people and assign roles
7. Add Instagram Accounts
8. Verify your business manager account (if possible)
Note: Not every business needs to be verified, only if you are eligible your business can be verified by Facebook, this is for people who need to access certain Facebook products and developer features. You can check this in the ‘’business info’’ section. If a button to verify your account is available this means you are eligible. In my experience, once you have some ad accounts and you are running ads for a period of time this will automatically be enabled and you will be able to verify your business.
If you want to know more about verifying your business account click here.
Hope all of this information was useful if you are on the path of starting to familiarize yourself with Facebook and want to run ads in the future.
Thank you for reading
About the Creator
Savrina
Extremely into inner exploration- excited to see what I'll become
Keep reading
More stories from writers in Education and other communities.
5 Effective Digital Marketing Channels Brands Actually Use Today (A Practical Guide for Marketers)
Digital marketing channels define how brands reach, engage, and convert audiences online. In practice, most companies do not experiment endlessly. They focus on a small set of channels that reliably support growth goals such as visibility, demand generation, and retention.
By Iryna Podliesnaabout 2 hours ago in Education
The Summer I Was Chosen by a Northern Mockingbird
During the long, suspended days of the pandemic, a wild mockingbird began visiting my driveway and chose me, again and again. What started as a strange encounter became a brief, meaningful connection that I still carry with me.
By Erica Roberts 6 days ago in Petlife
Living in a hemp house
Hemp, a multi-purpose crop that delivers fibres, shivs, seeds, and pharmaceuticals is currently used in insulation materials and bio-composites for a more sustainable construction industry. Russ Martin and his wife Karon Korp tell their story as owners of the first hemp house in the U.S.
By Susan Fourtané about 8 hours ago in Interview


Comments
There are no comments for this story
Be the first to respond and start the conversation.