
How to make text-to-speech software with Chatgpt?
How is Ai dominating the world right now


As more and more individuals explore methods to make their information available to a larger audience, text-to-speech technology has risen in popularity in recent years. Although several pre-existing text-to-speech programs exist, building your own using HTML and JavaScript is also feasible.
The Voice Synthesis API is supported by all major browsers and may be used to create a text-to-speech application in HTML. With this application programming interface (API), you may transform the text into voice with customizable features like language, pitch, and loudness. You can create an easy-to-use interface for typing in text and hearing it read aloud by combining HTML and JavaScript.
Building an HTML page with only a text box and a button is an excellent place to begin. The Speech Synthesis API will be prompted to provide the relevant speech when the button is pressed. The voice settings, language and pace may be adjusted through JavaScript to meet your specific requirements.
Several websites provide guides and samples for developing an HTML/JavaScript-based text-to-speech application. Since some of these tools are free, anybody may experiment with text-to-speech systems.
Writing your text-to-speech software using HTML codes may be fun and gratifying, giving you complete control over the speaker’s tone, pace, and other characteristics. Making your text-to-speech app is easy with the Speech Synthesis API and some familiarity with HTML and JavaScript.
To make simple text-to-speech software, we are using Chatgpt + Blogger.com. Follow the steps below to make your first text-to-speech software.
Go to the Chatgpt and type “How to make text-to-speech software with HTML codes. Then you will get this code which I mention below.

Let me explain all the code that Chatgpt write.

This is a typical HTML document structure. The <!DOCTYPE html> declaration tells the browser this is an HTML5 document. The <html> element is the root element of the document, and all other elements are contained within it. The <head> element contains metadata about the document, such as the page's title (displayed in the browser’s title bar). The <body> element contains the visible content of the page.
Content within the <body> element
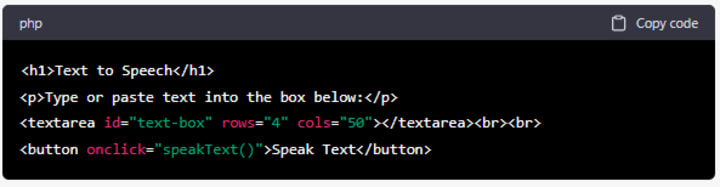
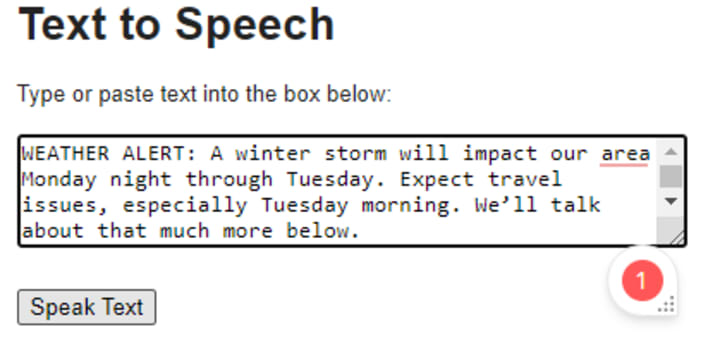
Here, we have a heading (<h1>) that displays the title of the page (“Text to Speech”) and a paragraph (<p>) that provides instructions to the user. The text box is created using the <textarea> element, with the id attribute set to “text-box”. The rows and cols attributes set the number of rows and columns in the text box. Finally, there is a button (<button>) with the text “Speak Text”, and the onclick attribute is set to call the speakText() function when the button is clicked.
JavaScript code that is included within the HTML document

This code specifies the speakText() method, which is invoked when the button is pressed. We obtain the text from the text box inside the function using the getElementById() method, which returns the element with the given id property. Then, the language and text attributes of a new SpeechSynthesisUtterance object, which represents a speech request, are set. Finally, the text is spoken using the speech synthesis object's talk() function.
The speech synthesis object is part of the Speech Synthesis API, supported by most web browsers. It enables web developers to include text-to-speech features in online sites.
Now we need to run this HTML code. For that, we are using blogger.com. blogger.com free blog posting platform. If you have WordPress or any other, you can use it.
- Go to the Blogger.com website.
- Click on the “Create Your Blog” button.
- Sign in with your Google account, or create a new one if you don’t already have one.
- Choose a display name and click on “Continue to Blogger”.
- Click on “Create a New Blog”.
- Please enter a title for your blog and choose a URL for it. You can also select a template for your blog and customize it later.
- Click on “Create Blog”.
- To create a new post, click on “New Post” on the left side of the screen.
- In the “Compose” tab, you can write your blog post using the visual editor. In addition, you can format text, add images and videos, and more using the toolbar at the top of the editor.
- If you prefer to use HTML, you can click on the “HTML” tab to switch to the HTML editor. Here, you can write your post using HTML code. Select HTML view.
11. Please copy and paste the above HTML code that I mentioned.
12. Once you have written your post, you can add labels and choose a publish date and time if you want to schedule your post for a later date.
13. When you are ready to publish your post, click the “Publish” button.
Now you can click the view mode and go to the blog post we are publishing. There you can see our text-to-speech software.

After that, you can type, copy and paste some text in the text box. after clicking the speak button. You will hear software packing all the words you type, copy, and paste into the text box.

If you develop this, You can earn extra money online with your text-to-speech software. Please let me know in the comment section if you face any difficulties with the HTML codes that we explain above.
About the Creator
Prasanga Weerasuriya
As a writer, I am fascinated by the exciting realms of technology, travel, artificial intelligence, and programming languagues, food and menues, baby articles.
Keep reading
More stories from Prasanga Weerasuriya and writers in Education and other communities.
Avoid losing and damaging your hair by following the seven golden steps.
Hair loss may have several causes, including heredity, illness, and bad habits. In addition, losing one's hair may be upsetting and devastate one's sense of self-worth and confidence. Ten common causes of hair thinning are explored here.
By Prasanga Weerasuriya3 years ago in Education
The Edwardian Era
“I shall go on. I shall work to the end” (Edward VII) During this period in history, everyday items that we take for granted today were just being invented and medicine improved tremendously. Fashion changed, mainly for women, as did ‘women’s role’ in society. The horse and carriage started to disappear in favour of the motor car and the telephone became the modern means of communication. The new invention called the “Photograph” took sepia pictures of daily life in the Edwardian Era. Also, electricity and indoor plumbing started to become the norm.
By Ruth Elizabeth Stiff6 days ago in Education
Augmented and Virtual Reality in Education Market to Reach Nearly USD 75 Billion by 2033
Augmented and Virtual Reality in Education Market Overview The augmented and virtual reality in education market covers the use of AR and VR hardware, software, and content to deliver immersive learning experiences in schools, universities, and workforce training. This market is being used for simulation-based teaching, virtual labs, skills practice, and guided lessons that are difficult to deliver through traditional formats. The global market size is expected to reach USD 75 billion by 2033, rising from USD 17.2 billion in 2025. Growth is expected at a CAGR of 20.26% from 2024 to 2033.
By Roberto Crum6 days ago in Education


Comments
There are no comments for this story
Be the first to respond and start the conversation.