
How To Clean A Laptop Keyboard Without Removing Keys?
Discover safe and effective methods to clean your laptop keyboard without removing the keys, using tools you likely already have at home.


One of your laptop's most used parts, the keyboard is often soiled by spills, dust, crumbs, and filth. Over time, these elements can build up and cause typing to become slow, sticky keys to emerge, and an overall ugly look.
Frequent cleaning of your laptop keyboard is necessary to provide both hygienic conditions and best performance.
Here in this blog post, we'll demonstrate how to clean a laptop keyboard without removing the keys.
Just why Should You Clean Your Laptop's Keyboard?
Cleaning your laptop keyboard not only improves its appearance but also ensures greater functions.
Even while frequent usage of the keys can cause problems and the buildup of dust and debris, the germs and bacteria are dangerous to health.
Cleaning your keyboard will help you type more comfortably and reduce the risk of illness.
Products You Need
Get the following materials and equipment before starting to ensure a thorough cleaning without endangering your laptop:
A soft cloth called microfiber won't scratch surfaces while being cleaned.
Compressed air: For dust and debris clearance between keys.
Isopropyl alcohol at least 70% is used to clean and disinfect sticky leftovers.
When entering cramped spaces, cotton wipes come handy.
Dust and other debris with a soft brush or toothbrush.
Vacuum cleaner with brush attachment is optional for further debris removal.
Simple Guide for Cleaning Laptop Keyboards
Turn off and unplug the computer
Before you start, make sure your laptop is off and unplugged from any power sources. This prevents inadvertent damage while you clean.
Get Rid of Any Extra Debris
Shake the laptop lightly upside down to start to get rid of any loose debris, such as crumbs or dust.
You could also softly tap the laptop's bottom to help with the process. In this stage, bigger debris is eliminated, getting the surface ready for a deeper cleaning.
Dust using compressed air
When the laptop is upright, blow out any dust or debris from between the keys with compressed air.
Holding the canister at an angle, give it brief air pressure bursts to avoid overpressurizing the keyboard. Moving from top to bottom and left to right, be sure you cover every significant region.
Pulling this action allows dirt to be cleared from hard-to-reach places without pulling the keys out.
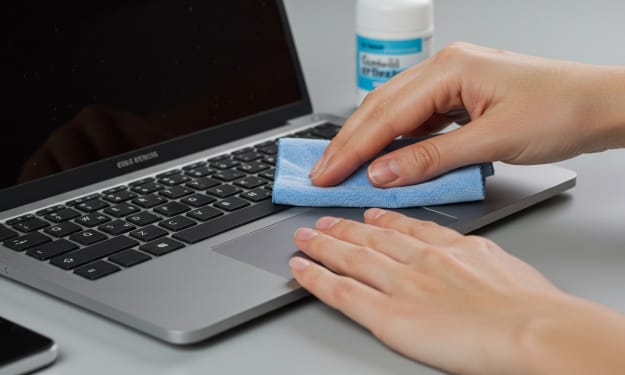
Wipe the keyboard with a microfiber cloth.
Gently dab a tiny quantity of isopropyl alcohol onto a microfiber cloth's corner.
Check that the material is just barely damp, not drenched. Wipe the keyboard gently, being sure to get at any obvious smudges or dirt.
Move in circular motions and watch out to keep moisture from getting to the keyboard to guarantee an even cleaning.
To clean between the keys, use cotton swabs
To get even deeper cleaning in between the keys, use a cotton swab dipped in isopropyl alcohol. Tough dirt and sticky residue come out well with this method. The important edges and any other small places should have a gentle smoothing of the swabb. Applying too much pressure can cause injury.
Use a toothbrush or gentle brush to go into cracks.
Use a toothbrush, or a soft brush, to get rid of any last bits of debris from between keys.
Gently scrub the keys, being very careful to get at any areas where dirt appears to gather. Smaller particles that compressed air could have missed are removed in part by this stage.
The keyboard can be vacuumed
If you'd like, use a vacuum with a brush attachment to get even more dust and debris off the computer.
This stage can be really useful if you have pets or haven't cleaned the keyboard in a while. Put the setting down low to avoid breaking the keys.
Give the keyboard some air time
Before using your laptop, ensure the keyboard has had time to fully dry after cleaning.
Every moisture that remains after the cleaning process will evaporate at this point. If necessary, wipe away any excess moisture with a dry microfiber towel.
Start your laptop and keyboard test.
When your laptop's keyboard has dried, test the keys. Check that the keys react to pressure and are not stuck or unresponsive. Should everything work as it should, your cleaning process was successful.
Tips for Cleaning the Keyboard of Your Laptop
Consider the subsequent suggestions to keep your laptop keyboard clean and in good working order:
If you use your keyboard a lot, clean it more than once a month.
Eat away from your computer as food crumbs often wind up on the keyboard.
Clean hands will move less dirt and oil to the keyboard.
Don a keyboard cover: Spills and dust can be contained with a silicone cover.
To keep dust off of your laptop, store it in a case or somewhere clean when not in use.
Following this advice will help you maintain a clean, responsive, and in excellent condition laptop keyboard. Regarding cleaning laptop keyboards, please feel free to add any more tips or observations in the space provided for comments below. Joyfully type!
About the Creator
Laptopflora
Welcome to Laptopflora, where laptops meet expertise and your tech decisions are made easier. Our journey began with a single mission: to create a trusted platform that provides clear, actionable, and insightful information about laptop.
Keep reading
More stories from Laptopflora and writers in Education and other communities.
How To Clean Laptop Touchpad?
Because they allow you to operate your computer without a separate mouse, laptop touchpads are a daily necessity. Touchpads can, however, become filthy with time from oils, dust, crumbs, and other debris from your hands and the surrounding area.
By Laptopflora10 months ago in Education
Essential Drills for Travel Baseball Teams: Game-Ready Training Ideas for Success on the Go
Travel baseball teams spend many weekends away from home. Players ride buses, stay in hotels, and compete in new places. Practice time can feel short during busy tournaments. That is why essential travel baseball drills are so important. These drills help players stay sharp no matter where they are. Teams do not always have full fields or batting cages. They must adjust and stay focused. Smart coaches plan simple drills that fit small spaces. Players improve when they train with purpose. Even short sessions can build strong habits. Travel days can become training days with the right mindset.
By Joe Sottolano7 days ago in Education


Comments
There are no comments for this story
Be the first to respond and start the conversation.