
Handling Events in React.js: An overview and examples with code examples
Learn to Handle Events in React.js with Code Examples: A Comprehensive Guide


React is a powerful front-end JavaScript library used for building user interfaces. One of the core features of React is the ability to handle events, which are user interactions such as clicks, hover, and input. In this article, we will provide an overview of handling events in React and examples of how to use them in your applications.
Event Handling in React In React, event handling is very similar to handling events in traditional HTML. The main difference is that React events are named using camelCase, rather than all lowercase. For example, the HTML onclick event becomes onClick in React.
To handle an event in React, you can pass a function as a prop to the component that will trigger the event. When the event occurs, React will call the function with an event object as a parameter. The function can then access the event data and update the state of the component, which will trigger a re-render of the UI.
Here’s an example of how to handle a click event in React:
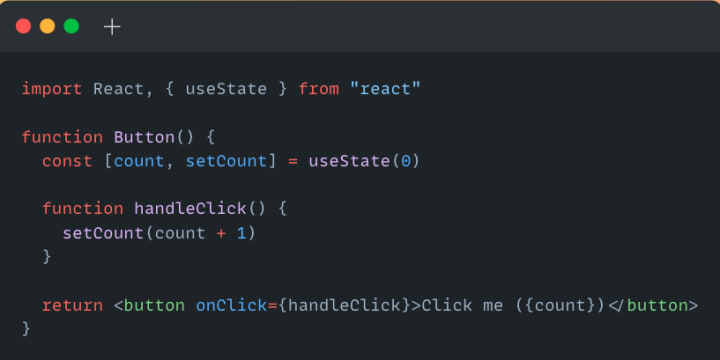
In the example above, we define a Button component that has a count state and a handleClick function that updates the state when the button is clicked. We pass the handleClick function as a prop to the button element using the onClick attribute. The button’s label displays the current count value.
Event Objects in React When an event is triggered in React, it generates an event object that contains information about the event. The event object is passed as a parameter to the event handler function. Here are some of the most commonly used properties of the event object:
- target: the DOM element that triggered the event
- type: the type of the event, such as click or keydown
- currentTarget: the element that the event listener is attached to
- preventDefault: a function that can be called to prevent the default behavior of the event, such as a link opening or a form submitting
- stopPropagation: a function that can be called to stop the event from propagating to parent elements
Here’s an example of how to use the preventDefault function to prevent a form from submitting:

In the example above, we define a Form component that has an input field and a submit button. We use the onSubmit attribute to pass a function that will be called when the form is submitted. In the handleSubmit function, we call the preventDefault function to prevent the form from submitting and display an alert message with the input value.
Event Bubbling and Capturing in React Event bubbling and capturing are two ways in which events propagate through the DOM. Bubbling means that the event starts at the innermost element and bubbles up to the outermost element, while capturing means that the event starts at the outermost element and captures all the way down to the innermost element.
In React, event handling uses a combination of both bubbling and capturing. When an event is triggered in a React component, it first triggers the event on the innermost component and then bubbles up to the outermost component.
To capture an event in React, you can use the capture attribute when adding an event listener. This attribute specifies whether the event should be captured during the capturing phase or during the bubbling phase. By default, the capture attribute is set to false, which means that the event will be captured during the bubbling phase.
Here’s an example of how to use the capture attribute to capture a click event:

In the example above, we define a Parent component that has a child component, Child. We use the onClickCapture attribute on the parent div element to add a click event listener that will capture the event during the capturing phase. We also add a click event listener on the child div element that will handle the event during the bubbling phase.
When you click on the child element, React first captures the event on the parent element and then handles the event on the child element. This means that the console will log “Clicked on parent” first, followed by “Clicked on child”.
Conclusion
In this article, we provided an overview of handling events in React and demonstrated how to use events in your applications. We covered the basics of event handling in React, including how to pass event handler functions as props to components, how to access the event object, and how to use event bubbling and capturing. By using events in your React components, you can create dynamic and interactive user interfaces that respond to user actions.
About the Creator
FARDA KARIMOV
I'm a front-end engineer creating visually appealing and user-friendly web experiences. On Vocal Media, I share insights and advice on front-end development and design trends. Join me to explore the world of front-end development.
Keep reading
More stories from FARDA KARIMOV and writers in Education and other communities.
Understanding Execution Context and Execution Stack in JavaScript: The Core Concepts for Efficient and Error-Free Code
The popular programming language JavaScript is frequently used to create web apps. One of the core concepts of JavaScript is the concept of execution context and execution stack. Understanding these concepts is essential for writing efficient and error-free JavaScript code. In this article, we will dive into the details of execution context and execution stack in JavaScript with code examples.
By FARDA KARIMOV3 years ago in Education
Connected Wealth: Why Strong Networks Are Essential to Smarter Financial Planning
Financial planning is often associated with spreadsheets, forecasts, and long-term projections. While these technical elements are essential, they represent only one side of the process. Relationships, shared knowledge, and access to broader communities strengthen a truly effective financial plan. Networks—both personal and professional—play a critical role in shaping smarter, more resilient financial strategies.
By Lee Generous2 days ago in Education
Ensuring Service Quality Amidst Business Expansion
Business expansion is often seen as a milestone of success. It reflects growth, profitability, and a wider reach. However, with this growth comes a critical challenge that can define a company's long-term sustainability—maintaining service quality. As operations stretch across new markets, larger customer bases, and more complex systems, the risk of service decline increases. Customers today expect consistent, high-quality experiences regardless of where or how they interact with a brand. This makes service quality not just a priority, but a cornerstone of growth strategy.
By Devin Doyle of Newport Beach7 days ago in Education


Comments
There are no comments for this story
Be the first to respond and start the conversation.