
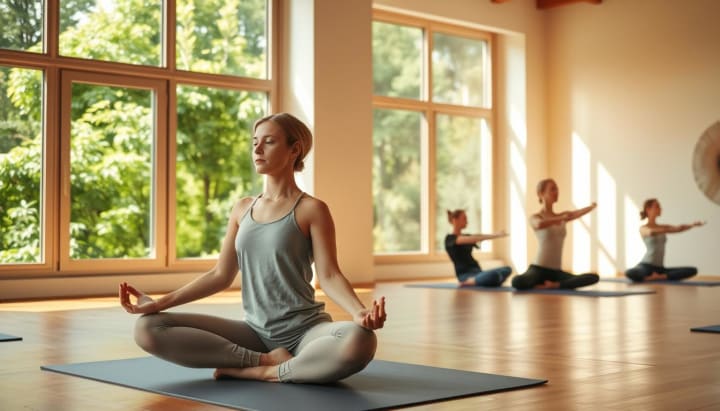
Effective Yoga Techniques for Joint Pain Management
Understanding Joint Pain: Common Causes and Symptoms

Did you know 54.4 million American adults deal with joint pain? It’s a big health problem in the U.S. Joint pain can make everyday tasks hard. It’s caused by many things, like illness, bad posture, or getting older.
Yoga is a great way to fight joint pain. It uses special poses to boost flexibility, strength, and movement. This guide will show you yoga moves that help with joint pain.
It’s important to know why joint pain happens. Things like sitting too much or having inflammatory diseases play a part. Yoga helps with both the physical and mental sides of joint health. It can help you feel better and move more easily.
Key Takeaways
Joint pain affects over 54 million Americans
Yoga can provide natural relief for joint discomfort
Specific poses target flexibility and mobility
Understanding joint pain’s root causes is essential
A holistic approach combines physical and mental healing
Understanding Joint Pain: Common Causes and Symptoms
Joint pain is a common issue that affects many people every day. It can come from different sources, like arthritis, past injuries, and weak muscles. Knowing what causes your pain is key to managing it.
Several key factors contribute to joint discomfort:
Arthritis: A chronic condition causing inflammation in joint tissues
Previous injuries that didn’t heal properly
Lack of mobility and a sedentary lifestyle
Muscle weakness surrounding joint areas
Your body’s joint health relies on many systems working together. Weak muscles can make joints unstable, leading to pain and damage. Without strong muscles, joints bear more stress, harming ligaments and cartilage.
“Joint pain is not just about aging—it’s about understanding your body’s unique needs and limitations.” – Dr. Rachel Stevens, Orthopedic Specialist
Old injuries can make joints stiff and painful for a long time. Scar tissue, less flexibility, and changed movements can cause ongoing pain. Knowing these issues helps you find better ways to care for your joints.
By figuring out why you have joint pain, you can start improving your mobility and feeling less pain.
How Yoga Can Transform Your Joint Health
Yoga is a powerful way to manage joint pain and boost mobility. It combines gentle movements with mindful practices. This unlocks a natural path to healing and restoring joints.
Yoga offers a holistic approach to joint discomfort. It uses techniques to strengthen muscles and improve alignment. Your body can regain mobility, reduce pain, and increase flexibility.
The Science Behind Yoga and Joint Pain Relief
Scientific studies show how yoga helps joint health:
Reduces inflammatory markers in the body
Increases synovial fluid circulation in joints
Promotes muscle balance and symmetrical movement
Enhances overall body awareness
Physical and Mental Benefits of Yoga Practice
Yoga practice offers many benefits beyond physical healing:
Physical Benefits Mental Benefits
Improved joint flexibility Stress reduction
Enhanced muscle strength Better emotional regulation
Increased range of motion Increased mindfulness
Building a Foundation for Joint-Friendly Movement
Starting a yoga practice takes patience and consistent effort. Begin with gentle stretches and move to more challenging poses as you get stronger. Listen to your body and focus on proper alignment for the best results.
Every yoga journey is unique. Your dedication to gentle, intentional movement can greatly improve your joint health and overall life quality.
A yoga teacher recommends these five poses if you struggle with joint pain
Joint pain can make everyday life tough. A yoga teacher suggests a special set of poses to help. These five poses are designed for those with joint pain. They offer a gentle way to support your body’s healing.
“Yoga isn’t about perfection, it’s about finding what works for your body and creating space for healing,” says professional yoga instructor Sarah Matthews.
Knowing the right poses can change how you handle joint pain. This sequence is made to:
Gently move your joints
Make your body more flexible
Lessen inflammation
Help you feel more aware of your body
Each pose in this sequence targets different areas of joint tension. Regular practice is essential to see real benefits.
Pose Focus Primary Benefit Difficulty Level
Cat-Cow Spinal Mobility Beginner
Low Lunge Hip Flexibility Intermediate
Supine Figure Four Hip Opening Beginner
Bridge Pose Lower Body Strength Intermediate
Reclined Spinal Twist Spinal Decompression Beginner
Are you ready to try these poses? The next sections will guide you through each pose. They’ll help you practice safely and get the most out of your yoga.
Cat-Cow Pose: The Perfect Warm-Up for Joint Mobility
The cat-cow pose is a key yoga move that boosts joint health and spine flexibility. It gently lubricates your joints and makes your spine move smoothly.
Start on your hands and knees for cat-cow. Make sure your wrists are under your shoulders and knees under hips. This setup helps you get the most benefits without straining.
Proper Alignment and Form
To do cat-cow right, follow these steps:
Begin on hands and knees with a straight spine
Place your wrists right under your shoulders
Put your knees directly under your hips
Breathe deeply and keep a steady rhythm
Modifications for Different Ability Levels
Everyone’s flexibility and strength are different. Here are ways to make cat-cow easier:
Put a folded blanket under your knees for comfort
Practice near a wall for extra support
Shorten your movements if you feel pain
Common Mistakes to Avoid
Avoid these common mistakes to stay safe:
Mistake Correction
Rushing through movements Move slowly and mindfully
Dropping head without control Keep your neck in line with your spine
Collapsing shoulders Keep your arm muscles active
Practice makes perfect. With regular practice, you’ll master a smooth, pain-free cat-cow pose. This will help your joint mobility and overall health.
Low Lunge with Side Stretch: Opening Hip Flexors
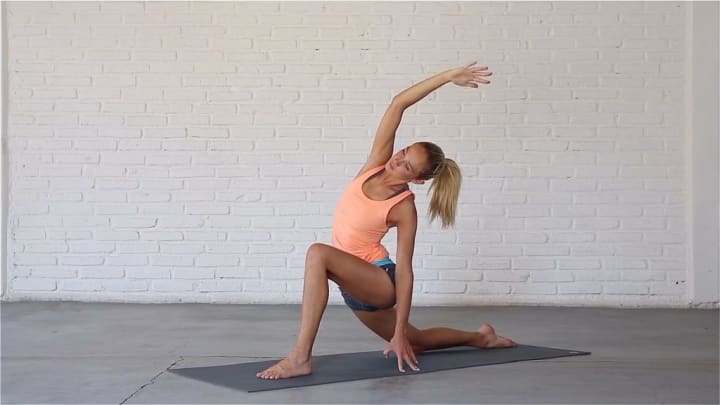
Discover the power of the low lunge with side stretch to boost your joint mobility and flexibility. This pose targets key muscles, easing tight hip flexors and quadriceps. Adding it to your routine can enhance your range of motion and lessen joint pain.
To perform the low lunge with side stretch, start by kneeling on your yoga mat. Then, step one foot forward into a low lunge. Next, lower your hips to engage your hip flexors. Raise the arm opposite your forward leg. Finally, lean towards your forward leg’s side for a gentle stretch.
Getting the pose right is key to its benefits. Ensure your front knee is directly over your ankle, forming a 90-degree angle. Keep your back knee soft for support during the stretch.
The low lunge with side stretch offers several advantages:
It increases flexibility in the hip flexors.
It stretches the quadriceps muscles.
It improves your posture and balance.
It reduces tension in the lower back.
“A consistent yoga practice can dramatically improve joint health and overall mobility.” – Yoga Wellness Institute
Always listen to your body and adjust the pose if needed. If you feel sharp pain, stop and seek advice from a healthcare professional.
Supine Figure Four: Releasing Hip and Lower Back Tension
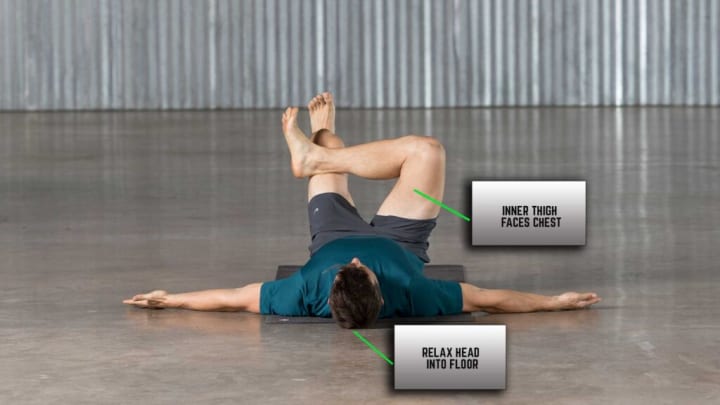
The supine figure four stretch is a great way to loosen up your hips and glutes. It’s a gentle yet effective yoga pose that targets deep muscles. This can help those with lower back pain or tight muscles.
This stretch is good for your body. By positioning yourself correctly, you can improve your lower body’s mobility. It also helps reduce muscle stress.
Step-by-Step Guide to Perfect Form:
Lie flat on your back with knees bent
Cross one ankle over the opposite knee
Gently pull the uncrossed leg towards your chest
Maintain a relaxed upper body
Hold the position for 30-60 seconds
Variations for Different Flexibility Levels
Everyone’s flexibility is different. Here are some ways to adjust the supine figure four stretch:
Flexibility Level Modification
Beginner Use a yoga strap to assist with leg pull
Intermediate Deeper stretch without strap support
Advanced Add subtle rotational movements
Always breathe deeply and pay attention to your body while stretching. The aim is to release tension, not cause more strain in your hips or glutes.
Bridge Pose: Strengthening Your Lower Body Support System
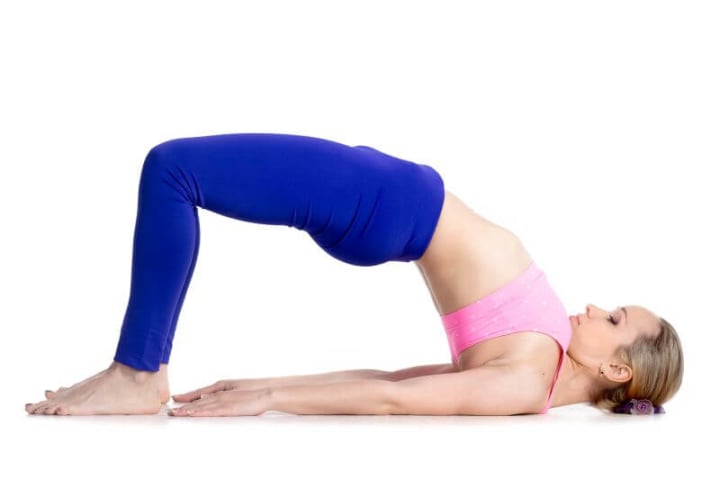
The bridge pose is a strong yoga technique that boosts your lower body strength and joint health. It’s a great way to make your glutes and hamstrings stronger. It also helps stabilize your pelvis.
To do the bridge pose right, start by lying on your yoga mat with knees bent and feet apart. Your arms should be by your sides, palms down. Breathe deeply and push your feet into the ground. Then, lift your hips up towards the ceiling.
Engage your core muscles
Squeeze your glutes at the top of the movement
Keep your knees aligned with your ankles
Breathe steadily throughout the pose
Practicing the bridge pose regularly will build important lower-body strength. It also helps keep your pelvis stable, easing pressure on your knees and hips. Focus on controlled, mindful movements to maximize benefits.
“A strong foundation begins with understanding your body’s potential for healing and growth.” – Yoga Wellness Expert
If you have joint pain or want to boost your mobility, the bridge pose is a gentle yet effective choice. It helps build strength and flexibility.
Reclined Spinal Twist: Gentle Joint Decompression
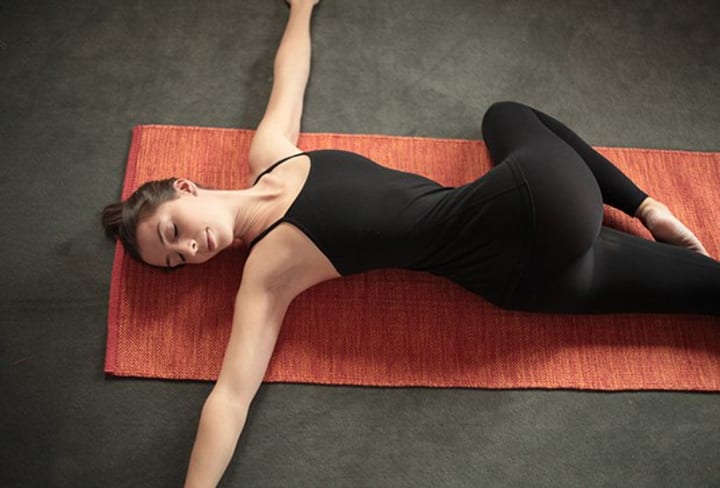
The reclined spinal twist is a powerful yoga pose that offers tremendous relief for individuals struggling with joint discomfort. This gentle yet effective movement helps decompress joints and improve overall spinal mobility with minimal physical strain.
When practiced correctly, the reclined spinal twist can be a game-changer for your body’s flexibility and comfort. The pose involves lying on your back and systematically rotating your spine while keeping your shoulders grounded.
Key Benefits for Spinal Health
Reduces stiffness in the back and hips
Enhances spinal flexibility
Promotes better joint alignment
Releases tension in surrounding muscle groups
Safety Considerations for Practice
Before attempting the reclined spinal twist, consider these important safety guidelines:
Move slowly and mindfully
Stop if you experience sharp pain
Use props like bolsters for support if needed
Breathe deeply throughout the pose
Always consult with a healthcare professional before starting any new exercise routine, especially if you have existing joint or spinal conditions.
Creating a Daily Joint Pain Relief Routine
Joint Pain Relief Yoga Routine
Creating a daily routine for joint pain relief can greatly improve your health. You don’t need to spend hours on yoga to see results. By mixing the right poses, you can make a simple yet effective routine for busy days.
Begin by setting aside 15-20 minutes each day for your joints. The goal is to be consistent and move with care. Here’s a simple sequence to follow:
Start with the Cat-Cow pose to warm up and loosen your spine
Then, do the Low Lunge with Side Stretch for your hips
Next, try the Supine Figure Four to ease hip and lower back tension
Follow with the Bridge Pose for strength in your lower body
End with Reclined Spinal Twist for a gentle stretch
Always listen to your body when you practice yoga. Adjust poses as needed and never ignore pain. Yoga should be a gentle dialogue with your joints, not a fight.
Regular yoga practice does more than just ease pain. It boosts flexibility, cuts down stiffness, and improves how well you move. Just a few minutes each day can make a big difference in your joint health and life quality.
Essential Tips for Safe Practice
Yoga with joint pain needs careful attention and mindful movement. It’s not about ignoring pain but making your practice healing and supportive.
Your yoga journey should focus on your well-being and respect your body’s limits. Knowing how to adjust poses and listen to your body can make your practice safe and healing.
Recognizing When to Modify Poses
Not every yoga pose is right for everyone, especially with joint pain. It’s important to learn how to adjust poses. Here are some tips to adapt your practice:
Use props like blocks, straps, and bolsters for extra support
Reduce how far you move if it hurts
Choose softer versions that still offer the pose’s benefits
Listening to Your Body’s Signals
Your body talks to you through feelings. Sharp pain is different from gentle stretching and means you need to change or skip poses. Paying attention to these signals is key:
Pain Signal Recommended Action
Sharp, stabbing pain Stop right away and start over
Mild stretching sensation Keep going, but be careful
Burning or tingling Change or skip the pose
Remember, a safe practice respects your body’s limits. If pain keeps happening, talk to a yoga teacher or doctor.
Conclusion
Exploring gentle yoga movements can change how you manage joint pain. These poses are chosen for their ability to improve mobility and reduce stiffness. They do this without putting too much strain on your body.
By adding yoga to your daily routine, you can take care of your joints in a lasting way. Each pose we’ve talked about has its own benefits for easing joint pain. From the Cat-Cow stretch to the Reclined Spinal Twist, they work together to help your body heal.
Regular practice builds strength, boosts flexibility, and lessens pain in important areas like the hips and lower back. Remember, your yoga journey is unique and should be taken at your own pace. Start slow, pay attention to your body, and adjust poses as needed.
With regular practice, you’ll see big improvements in how well your joints move. Yoga is more than just exercise. It’s a way to care for your joints and improve your life overall.
Your dedication to gentle yoga can lead to amazing results in managing pain and staying physically strong. See yoga as a kind way to heal, and watch your body become more comfortable and free.
About the Creator
Keep reading
More stories from Charles Betts and writers in Education and other communities.
Bounce Back from Cheat Day: 4 Fat-Burning Tips
Did you know that nearly 73% of fitness enthusiasts struggle with weight management after a cheat day? Knowing how to have a successful cheat day without gaining weight can change your fitness journey. These 4 fat-burning tips will help you bounce back and keep your metabolism going.
By Charles Betts3 months ago in Education
Are Australian Homes Losing Solar Power at Night? The Real Role of Battery Energy Storage Systems
Australia is one of the world’s leaders in rooftop solar adoption, yet many households still face high electricity bills after sunset. Solar panels generate plenty of power during the day, but without storage, much of that energy is sent back to the grid for minimal returns. Later, homes buy electricity back at higher prices.
By bluematrix2 days ago in Education


Comments
There are no comments for this story
Be the first to respond and start the conversation.