
2025 Walkthrough on Figma — Introduction
From Zero to Design: Kickstart Your Figma Journey

Figma is a popular, easy to use, UI/UX Design & Prototype Application. It is a cloud-based application, meaning all your design will live in Figma itself and you can access them anytime, share them with others and even collaborate in real time with your colleagues.
In This Guide, we’ll go through the basics of Figma — from navigating the interface to using Frames, Layouts & we’ll also dive into components and a build some interesting projects. This guide will not be a single post as it is impossible to introduce all the basics in a single post. That said, this particular post will Introduce you to Figma Interface—
Why Figma & Why Is It So Popular?
You might be wondering why to use Figma, there are already a lot of Design software available in market like Adobe XD, Sketch etc. Well, the short answer is — It’s Super Easy!
Before Figma, UI/UX Designers needed to download the software to their machines with various licenses. The design landscape at the time was very different compared to today. Designer had to use multiple tools like photoshop for image editing, Illustrator for creating Vector based graphic like logos, Adobe XD for building the UI Design, InVision for Design Prototyping. etc., there was a lot of back and forth involved.
But With Figma, it all changed. Figma provides vector-based shape creation, basic image editing, resizing, UI Designing, Design Prototyping and even real time collaboration with your peers.

Setting Up an Account
Setting up a Figma account is very easy, and we’ll be using the Free Plan. It has all the tool that we need to learn Figma. So quickly, head over to Figma.com and click the “Get Started for Free”, signup by filling the form or through Google. I personally like to sign in using Google, pretty quick and Easy. Once you are logged in you will see the Figma Overview Interface.
On the left Panel, you will see Account Handle, where you can switch between the dark or white theme, and access other setting. etc. For now, we’ll keep it as is. Now on the Main Panel, you’ll see the 4 Card —
New Design File, New FigJam Board, Slide Deck and Import. For This Guide we are only concerned with New Design File, so we’ll create a new Figma project by clicking the New Design File.
Figma Interface Overview
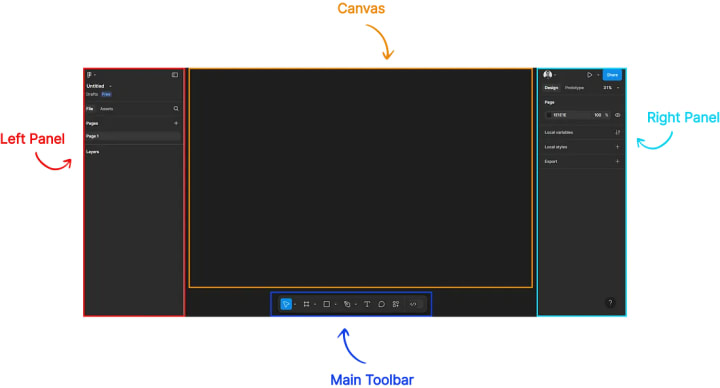
Once you create a new design file, you’ll see the Figma Interface —
Left Panel
On the left Panel, at the top you’ll see the Figma logo which is a Menu dropdown and has a whole set of operation, we’ll go through them later as we proceed further.
Next to it you’ll notice a window icon, which allows you to expand or collapse the Left and Right Panels for a cleaner workspace.
Below that you’ll see “Untitled”, this is basically the name of your project, you can rename it by clicking on it and entering a suitable name.
Below that, we have a horizontal tab menu with ‘Files’ and ‘Assets'. Files tab is preselected, and it shows the Selected Page under Pages. By default, it is named as “Page 1”, and you can rename it by clicking on it. Pages are like workspaces which help to organize your design work efficiently.
Below Pages, you’ll find the Layers Panel. Since nothing is selected on the Canvas by default, the Layers section is empty. We’ll explore how layers work as we proceed.
Canvas
Moving forward, at the center of the interface you’ll see a grey area this is the Canvas — this is the place where the actual designing takes place. It’s your main workspace for creating and arranging elements, from wireframes to final UI designs.
Right Panel
On the Right Panel — we have several other options, like your profile, a play icon, share button, we’ll come to that later as well. But right now, we are only interested in the Design tab, which is selected by Default.
Under the Design tab, you’ll see a section labeled Page, along with a hex color code., this represents the background color of the canvas area, you can click on it and change the background color (Play around with it :D).
Next to the hex color, there’s an eye icon, which allows you to switch between a colored background and a transparent canvas
We have few more options below, but we can leave them for now. We’ll talk about them later.
Main Toolbar —
Right Below on your Canvas, you’ll see a floating Toolbar, which contains essential tools for designing in Figma:
- Move Tool (V) — Allows you to select, move, and arrange elements on the canvas.
- Frame Tool (F) — Creates frames (artboards) for designing screens or layouts.
- Shape Tools (R, O, etc.) — Includes Rectangle, Line, Ellipse, and other shape options for designing.
- Pen & Pencil Tools (P, Shift+P) — Used for drawing custom vector shapes and freehand sketches.
- Text Tool (T) — Lets you add and style text elements.
- Comment Tool (C) — Allows you to leave feedback directly on the design. Click anywhere on the canvas to drop a comment.
- Actions Tool (Ctrl+K) — Opens a popup that displays Assets, Plugins, and Widgets, allowing you to quickly access and manage resources for your design.
- Dev Mode (Shift+D) — Primarily for developer, allows them to inspect designs, access code snippets, and export assets for development.
Conclusion
Now that you have a basic understanding of Figma’s interface, you’re ready to start designing! In the next post, we’ll dive deeper into Frames and Layouts helping you build structured and scalable designs. Stay tuned!
About the Creator
Ashish Garg
Following my Dreams & Passion 😊
Keep reading
More stories from Ashish Garg and writers in Education and other communities.
4 Key Micro-Interactions to remember in UX Design
Have you ever wondered, how you discern that a button is pressed? or you have liked a post? or even how you receive confirmation of a successfully completed task? Well, these are what’s known as micro-interactions. Micro-interactions are subtle and often overlooked design elements that play a very crucial role in designing user-centric designs.
By Ashish Garg12 months ago in Journal
Alone but Empowered: A Beginner’s Journey Into Solo Travel
Solo travel is more than just a trip; it is an opportunity to explore the world on your own terms. For beginners, traveling alone can feel both thrilling and a little intimidating. Without a companion, every choice—from where to stay to what activities to try—is yours alone. While that level of independence can be intimidating at first, it also makes solo travel deeply rewarding. It allows for self-discovery, flexibility, and a freedom that group travel cannot always provide. With proper preparation, anyone can enjoy a safe and unforgettable solo adventure.
By Evan Weiss St Louis4 days ago in Education
The Growth Trap: How Self-Improvement Can Derail Your Success
The growth mindset has become a symbol of ambition and resilience. It promotes the belief that anyone can improve their skills and intelligence through effort, learning, and perseverance. While this concept has inspired many to push past their limits and embrace challenges, it also has a lesser-known side. When taken too far or misunderstood, the pursuit of self-improvement can actually backfire. What begins as a healthy desire to grow can spiral into stress, burnout, and self-doubt, quietly sabotaging the very success it aims to create.
By Jeb Kratzig4 days ago in Education


Comments
There are no comments for this story
Be the first to respond and start the conversation.