
RAID Data Recovery – What it is & How it works?
What is RAID Data Recovery?
RAID is a widely-accepted storage device that can store a great amount of data across multiple hard drives. It addresses the three most crucial challenges, i.e., storage capacity, performance, and fault tolerance (protecting data even if one disk fails). However, there are times when RAID drives become inaccessible or corrupted due to many possible reasons. Further, only a few RAID levels offer fault tolerance, leaving us worried about our data. Fortunately, Raid recovery is possible. In this guide, we’ll learn what RAID data recovery means and how it works.
What is RAID Data Recovery?
RAID stands for Redundant Array of Independent Disks. When we talk about RAID data recovery, it refers to retrieving files, folders, and other data from formatted, broken, corrupted, or inaccessible RAID volumes. It consists of manual and automated ways to recover data from one or more RAID drives. The process can be implemented on both hardware and software-based RAID.
There may be many incidents where you may lose data from RAID drives. The common reasons for data loss from these drives are accidental deletion, disk corruption, disk errors, controller malfunction, malware attack, etc. No matter the cause behind a data loss, you can perform RAID data recovery.
How does RAID Data Recovery work?
It is different and more complex from the usual data recovery process as RAID data storage architecture consists of multiple hard disk drives, which combine and work as one volume. Hence, extracting data from the Redundant Array of Independent Disks (volumes) is also not straightforward.
Generally, RAID recovery requires rebuilding or reconstructing RAID volumes to their original or old settings/configuration. In addition, identifying the correct RAID level is a significant part of the process. Therefore, a user is required to have a bit of technical expertise to perform RAID data recovery. If not, one can also get help from a RAID expert.
As discussed, the process contains manual and software-based ways to retrieve data from RAID. The manual process needs you to open the RAID array and remove all hard drives. However, using reliable RAID data recovery software, you can virtually rebuild RAID and perform data recovery quite easily.
How to Recover Data with RAID Data Recovery Software?
When you attempt to perform RAID recovery, you’d need dedicated and powerful data recovery software, such as Stellar Data Recovery Technician. The software has an easy-to-navigate user interface that lets you explore all the options and functionalities to recover RAID data effectively. You can use this software to recover all types of data, such as photos, videos, documents, emails, and more. In addition, you can retrieve data from logically failed (formatted, corrupted, inaccessible, or crashed) RAID drives. The software can efficiently restore data from RAID 0, 5, and 6 drives. It supports RAID arrays with NTFS & FAT and exFAT file systems and is compatible with Windows 11, 10, 8 & 7 versions.
To perform RAID Data Recovery with Stellar Data Recovery Technician, follow the given steps:
• Connect the RAID with which you’re having issues.
• Download, install, and run Stellar Data Recovery Technician on your system.
<Download Button>
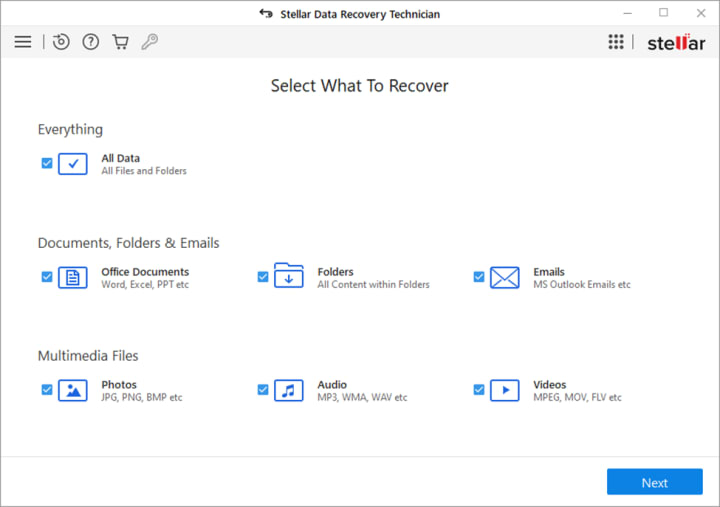
• You’ll see the dashboard of the software. On the Select What to Recover screen, click All Data. You can also choose a specific data type to restore. Click Next to proceed.
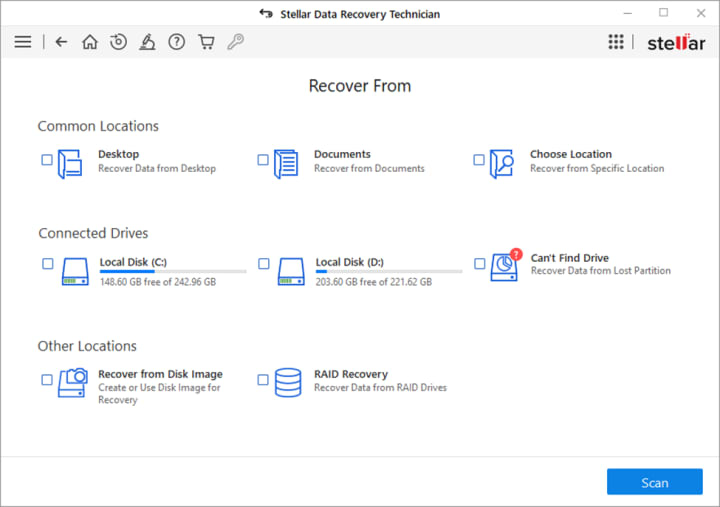
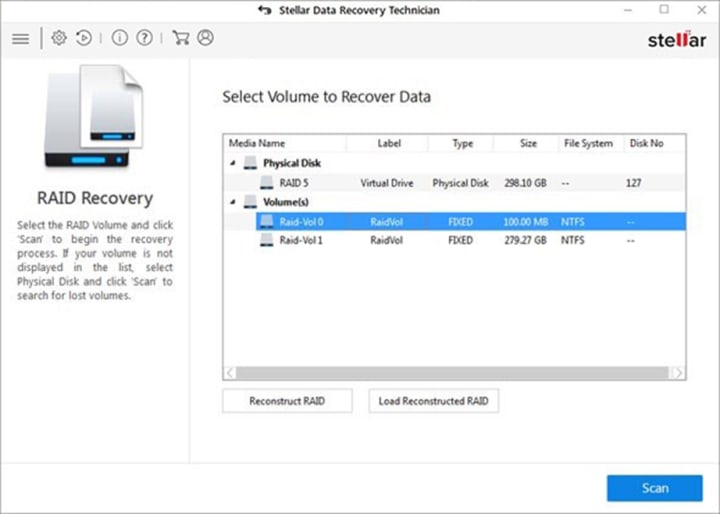
• On the next prompt, the ‘Recover from’ window will appear. There, select RAID Recovery and click Scan.
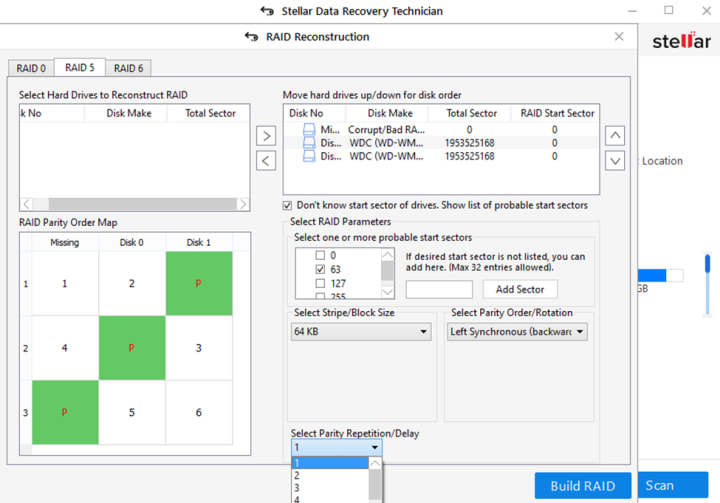
• Select the RAID level from which you want to restore data and use the arrow button to add or remove RAID drives from the ‘Select hard drive to reconstruct RAID’ to ‘Move hard drives up/down for disk order’ list.
• Arrange the hard disks in sequence (starting from Disk 0) as they were in the RAID stack.
• Check ‘Don’t know start sector of drives. Show a list of portable start sectors.’ (Do it only if you’re not aware of the start sector of the drive).
• Select RAID parameters on the next prompt and choose Parity Order and Parity Repetition/Delay, respectively.
• After selecting RAID parameters, click Build RAID.
• Let the process complete. Once done, click Show Volume List on the Select Constructed RAID window.
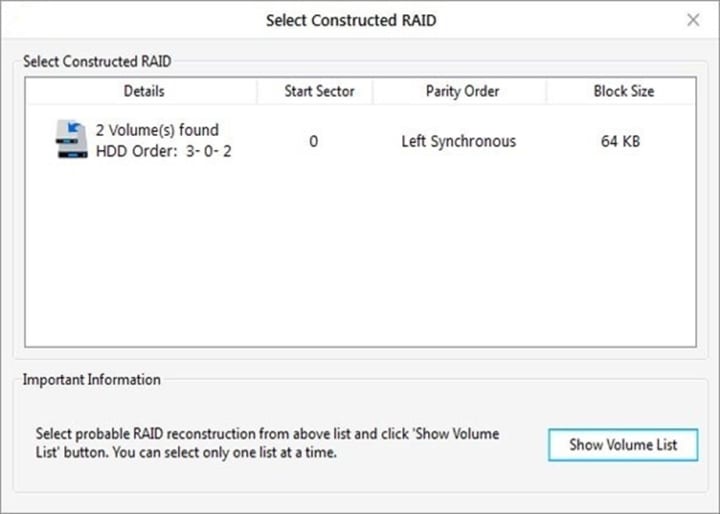
• Select the RAID volume from which you want to restore data and click Scan.
• Select the files you want to retrieve and click the ‘Recover’ button.
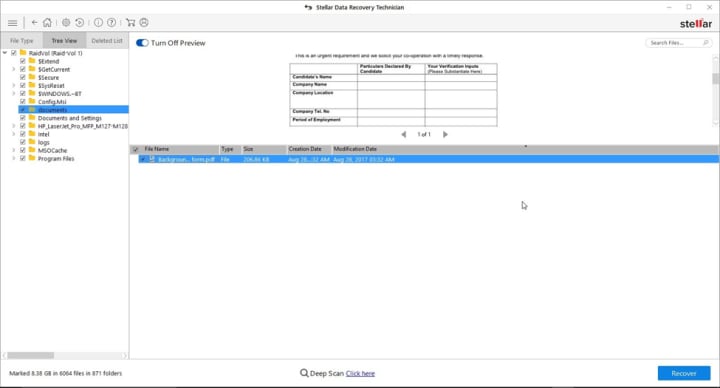
• Next, click Browse to choose the desired location for storing the recovered data. (Always choose a different storage drive or drive partition to save the retrieved files to prevent data overwriting.)
• Finally, click Start-Saving. Your recovered data will be saved at the chosen location.
Conclusion
Now that you understand the complete process of RAID data recovery, it is important to keep dedicated RAID recovery software handy. RAID recovery software such as Stellar Data Recovery Technician equips you with quick action against data loss. This software can also check the RAID hard disk health status. Doing so will help you calculate the risks of disk failure. You can also back up your RAID drive data and replace it with a healthier one to prevent further damage.
About the Creator
Keep reading
More stories from writers in 01 and other communities.
Mobile App Development Seattle: Best Practices for Startups
It usually happens during the first real sprint review. The app exists now. Screens load. Buttons respond. Yet something feels fragile. A small change breaks another flow. Performance dips when more users log in than expected. A founder leans back and realizes the uncomfortable truth.
By Mike Pichai6 days ago in 01


Comments
There are no comments for this story
Be the first to respond and start the conversation.