
Pseudo-Elements: Adding Content Before or After Elements with ::before and ::after
This article is part of a free full CSS Course: Beginner to Expert


When it comes to CSS, there's a lot you can do beyond just setting colors, fonts, and spacing. One of the coolest tricks in your styling toolkit is using pseudo-elements - special selectors that allow you to add content or styling without actually modifying your HTML. It's like a magic trick for your website's presentation. Two of the most widely used pseudo-elements are ::before and ::after.
In this post, we'll take a deep dive into how you can use these pseudo-elements to add content before or after an element, without ever touching the actual HTML. Whether you're looking to add decorative icons, extra text, or simple shapes, these pseudo-elements can help you do it all.
1. What Are Pseudo-Elements?
A pseudo-element is a keyword in CSS that allows you to style specific parts of an element that can't be targeted directly with regular selectors. These are not actual elements in the DOM, but they act like virtual elements that you can style.
The two most popular pseudo-elements are ::before and ::after, which allow you to insert content before or after an element's actual content. These pseudo-elements are particularly useful for adding visual enhancements or decorative content, like icons, quotes, or even little flourishes that don't require any extra HTML code.
Basic Syntax of Pseudo-Elements
Here's the general syntax for pseudo-elements:
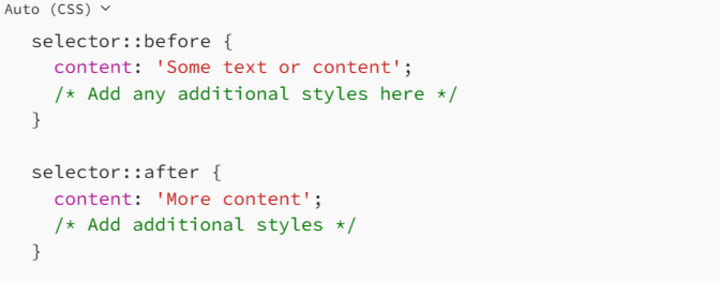
The key here is the content property, which tells the browser what to display inside the pseudo-element. If you don't specify content, the pseudo-element won't display anything. So, keep in mind that without content, these pseudo-elements are like invisible placeholders.
2. Using ::before to Insert Content Before an Element
The ::before pseudo-element allows you to insert content before an element's actual content. This is great when you want to add decorative icons, quotes, or even extra text before an element without cluttering your HTML.
Here's a simple example of how to use ::before:
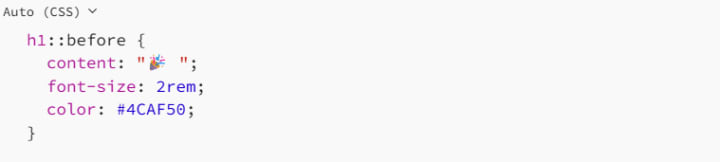
In this example, we're adding a little party emoji before each h1 element on the page. We're also styling the emoji to make it bigger and change its color to green. When the page is rendered, every <h1> will have this party emoji before its text.
Why Use ::before?
Adding Decorative Icons: Use ::before to add small decorative icons before elements, such as a checkmark before list items, or a star before headings.
Extra Text: If you want to add some additional text to elements without cluttering your HTML, ::before is your friend.
Improving Readability: By adding symbols or extra context before elements, you can make your content more engaging and easier to read.
Example: Adding a Bullet Point Icon Before List Items

In this case, we're adding a tomato-colored bullet point before every list item in an unordered list, creating a visually distinctive look.
3. Using ::after to Insert Content After an Element
Just like ::before, the ::after pseudo-element allows you to insert content. But instead of adding it before the element, ::after places the content after the element's actual content. This is perfect for adding footnotes, decorative elements, or even visual cues like checkmarks or crosses after specific content.
Here's an example of how to use ::after:

In this case, we're appending the text " [Read more]" after every paragraph (<p>), making it look like a clickable link without having to modify the HTML. We also style the text with a blue color and bold font weight to make it stand out.
Why Use ::after?
- Adding Footnotes or Citations: You can add citations or footnotes after elements, perfect for academic or research-based websites.
- Visual Cues: If you want to add symbols or icons after content to indicate something (like a success checkmark or an error icon), ::after is a great option.
- Improving Layouts: Use ::after to create visually appealing layouts by inserting decorative content like lines, arrows, or boxes.
Example: Adding a Quote Icon After Each Blockquote

Here, we're adding a decorative quote mark after every <blockquote>. The large orange quote icon helps visually highlight the quoted text, making it stand out on the page.
4. Combining ::before and ::after
One of the most powerful aspects of pseudo-elements is that you can use both ::before and ::after together to create interesting and dynamic effects. By combining these two pseudo-elements, you can add content both before and after your elements to achieve more complex designs.
Example: Adding Decorative Elements to Links
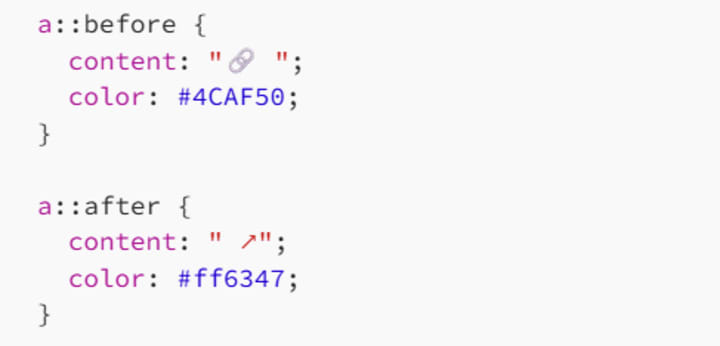
In this example, we're using both ::before and ::after to add a link icon before and an external link symbol after each anchor (<a>) tag. The result is a visually appealing link that indicates it's both clickable and external.
Why Combine ::before and ::after?
- Creating Visual Interest: By adding content both before and after elements, you can create more visually interesting effects, like arrows or custom separators.
- Highlighting Interactive Elements: Use both pseudo-elements to visually enhance links, buttons, or other interactive elements, making them stand out more on the page.
- Perfecting Layouts: Combining both pseudo-elements allows you to fine-tune the positioning of elements and decorations, creating complex layouts with minimal code.
- 5. Styling Pseudo-Elements
While the content you add with ::before and ::after is quite versatile, you can also style these pseudo-elements just like regular HTML elements. You can apply properties like color, font-size, background, borders, padding, and even animations to your pseudo-elements.
Example: Adding a Decorative Box Around Text
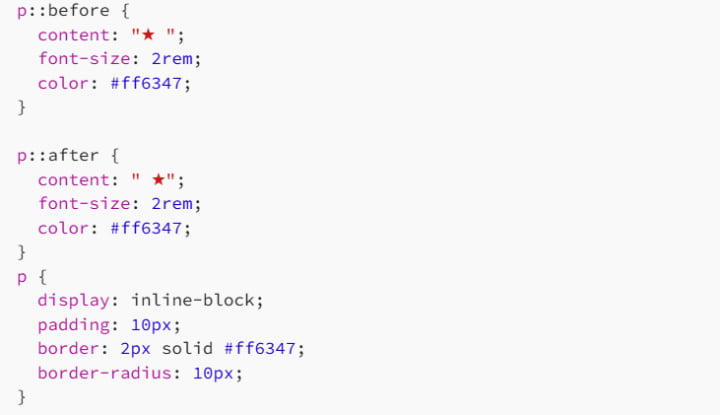
In this case, we're using ::before and ::after to add decorative stars around the text in a paragraph. We also style the paragraph itself with padding, a border, and rounded corners to create a box around the text. The result is a stylish, starry box that adds emphasis to the content.
Animation with ::before and ::after
Both ::before and ::after are also great for animations. For instance, you can use them to create hover effects, loading spinners, and more. Here's a simple example of animating a box using ::before and ::after:

In this example, we use ::before and ::after to create two bouncing squares at the top-left and bottom-right corners of a .box element. The animation makes the squares bounce up and down, creating a fun and dynamic effect.
6. Best Practices for Using Pseudo-Elements
While ::before and ::after are incredibly useful, here are some best practices to ensure you're using them effectively:
6.1 Don't Overuse Them
Pseudo-elements can be a great way to add visual interest, but overusing them can clutter your design and make your CSS harder to maintain. Use them when they add real value, but don't go overboard.
6.2 Keep Accessibility in Mind
Since pseudo-elements are not part of the actual DOM, they aren't accessible to screen readers by default. Use them for decorative content only, and avoid relying on them for essential information.
6.3 Always Specify content
If you're using ::before or ::after, don't forget to include the content property. Without it, nothing will show up, and your pseudo-element will be invisible.
6.4 Test Across Browsers
Pseudo-elements are supported in all modern browsers, but it's always a good idea to test your designs across multiple browsers to make sure everything renders as expected.
7. Conclusion: Elevate Your Designs with ::before and ::after
The ::before and ::after pseudo-elements give you a whole new level of control over how content is displayed on your website. Whether you're adding small icons, decorative text, or creating complex layouts, these pseudo-elements allow you to enhance your design without touching your HTML.
With just a few lines of CSS, you can create stylish and engaging effects that improve both the appearance and user experience of your website. So next time you're looking to add something extra to your content - without creating a whole new element - consider using ::before and ::after. Your designs will thank you.
Happy coding, and don't forget: with great power comes great responsibility… especially when it comes to pseudo-elements!
About the Creator
MariosDev
Hi, I’m Marios! I’ve been a developer for over 9 years, crafting cool stuff and solving tricky tech puzzles. I’m a total tech enthusiast and love sharing my thoughts and tips through blogging. Also, in love with my bike!
How to Hire a Mobile App Developer in St. Louis 2026
The regional tech landscape has shifted significantly. The decision to hire a mobile app developer in St. Louis 2026 is now a strategic choice. St. Louis has evolved from a traditional manufacturing hub. It is now a center for agtech and geospatial technology. Financial services also drive the local economy forward.
By Del Rosario6 days ago in 01
Thief In The Night
To the thief in the night that took and replicated what once was mine: Honestly, I feel kind of bad for you. It’s funny, because we hardly know each other. I only know of you through the magazines you’ve written and the broadcasts you have televised in the past — as well as through the public mentions of you from your show business connections there.
By Snarky Lisa7 days ago in Humans


Comments
There are no comments for this story
Be the first to respond and start the conversation.