
How to make your first voice project using Arduino?
Learn to Turn on/off 💡 LED's using your voice commands

Learn to Turn on/off 💡 LED's using your voice commands.
What you'll learn:
Before we get started into the following tutorial, let me share with you the moment when this project worked. I was working on this project for a week or so. Finally, that exciting moment came when I gave a voice command “Light ON” and the built-in red led on Arduino Uno board 👉 turned ON 😆
In the beginning, I wasn’t believing that it worked but then I gave another voice command “Light OFF” and this time the built-in red led on the Arduino Uno board 👉 turned OFF. EUREKA 🎉
I thought this project needs to be shared with students, makers, hobbyists, and programmers like you. So that you can also experience that feeling and make cool stuff out of this!
Now let’s get started into the ocean of creativity using Arduino
What is Arduino?
Arduino is an open-source electronics platform. It was aimed at students without background knowledge in electronics or programming for making useful and interesting projects. Simply based on your project requirement there are a bunch of sensors that connect with the Arduino board and you give a set of instructions to it using Arduino Programming language.
There are many other platforms available for this kind of work but I think because of Arduino’s simple and easy to use interface, open-source, it is growing through the contribution of students, hobbyists, makers, … worldwide.
You can learn more about Arduino by Clicking Here

Short Story: Why I made this project?
All credit goes to my University Professor and Online community!
One day my Prof demonstrated windows form application made using the C# programming language. In that project, sir was controlling the virtual bulb using voice commands. There was no Arduino or any hardware component used in it but still, that was amazing stuff 👏
As a beginner, you start making projects using Arduino like turning ON/OFF led’s,… but I thought how about controlling LEDs using voice commands? During that time I had no idea how I would accomplish that and I started searching over the internet. Luckily after approximately a week or so I was able to figure it out.
Project Description
In this project, we will turn on/off LEDs by using our commands. It is very simple and easy, just a little bit of programming knowledge is required that’s all!
On starting just to make things simpler I have used LEDs. You can use other sensors as well.
Things required to make this project
The good thing about this project is that you don't need any extra stuff.
Hardware components
1. Arduino Uno board
2. Resistors 221 ohms (Quantity 👉3)
You can use any resistance value of a resistor just make sure you don't use too little resistance value.

3. LEDs ( Quantity 👉 3 )
I have used Red, Green, Blue color led.

4. Breadboard (Quantity 👉 1) and Jumper Wires


5. Earphones
These are just simple earphones you use with smartphones. You can also use your builtin computer microphone as well.

Software Components
- Arduino IDE
- Microsoft Visual Studio 2010
You can use any other versions of Microsoft visual studio just make sure that it contains a .Net framework to create windows form application. You can find more details in the project demonstration video.
Now let’s get hands dirty
I am assuming that you have gathered all the components required to make this project.
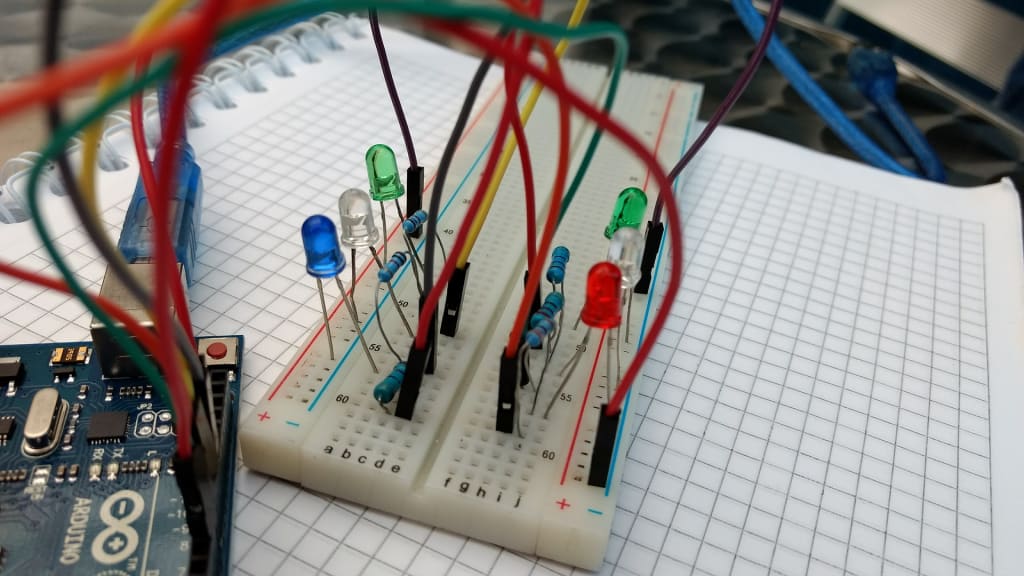
First of all, let’s design a circuit. For that, we need a breadboard, a couple of jumper wires, resistors, Arduino boards, and LEDs.
Follow the below Circuit diagram 👇

Instructions:
1. First, connect all the LEDs and resistors as shown in the above diagram.
2. Then start one by one and connect the +ive terminal of led (longer leg) with a resistor as shown in the diagram. Along with resistors, +ive terminal of LEDs are connected to digital pins on the Arduino board.
Green Led: Connected with digital pin #8
Red Led: Connected with digital pin #9
Blue Led: Connected with digital pin #10
3. At last, connect ground on Arduino board with -ive terminal of led (shorter leg) with the help of jumper wires
Great job now we need to tackle the code part!
Source Code and Additional software guide
As we are not using any external module in our project. So we will accomplish our objective by using a library (using.system.speech) that’s why we need Microsoft visual studio.
You can learn to download and install Microsoft visual studio by watching this tutorial on youtube.
Now connect your Arduino board with a computer by USB cable.
Open Arduino IDE and paste the Arduino code below 👇
Following is c# code 👇
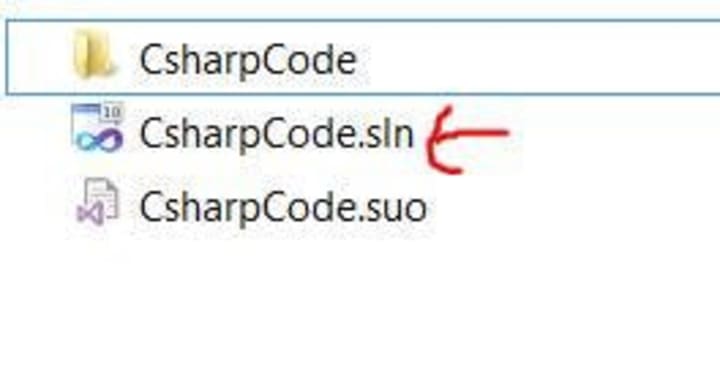
I am assuming that now you have installed a visual studio. So download the c# windows form application files by Clicking Github Repository.
There you will see 2 files and 1 folder. You need to click CsharpCode.sln file.
Before we run our application the last step is to make sure that you added using.system.speech library in visual studio code. For that follow below instruction 👇
Go to above toolbar Project->Add Reference->.Net ->Search using.system.speech and click OK that's all!

Till now you have Arduino code in Arduino IDE and CSharp code in the visual studio.
Now upload your Arduino sketch and then run c# application by clicking the green arrow as shown below 👇

Note: Make sure your COM Port you selected in your Arduino IDE is the Same as in visual studio c# code.
You can see below mine COM Port is COM5 Same in Arduino and C# code 👇

Project Demonstration
If you are facing any problem, then you can also follow along with video version of this tutorial uploaded on my youtube channel 👇
Pardon me for my mic disturbance.
Congratulation on making your first voice-controlled project using Arduino and C#

Thank you very much for your time.

Conclusion
I hope you enjoyed this tutorial :)
Tell me in the comment below how did you felt after making this project?
Contact
Feel free to contact and ask via 👇
Gmail: [email protected]
Github: https://github.com/jalalmansoori19
Twitter: https://twitter.com/JalalMansoori19
References
The following link helped me a lot in making this project 👇
https://www.c-sharpcorner.com/article/turning-led-off-and-on-through-voice-recognition/
About the Creator
Jalal Mansoori
I am not a regular writer but whenever I learn about interesting and useful stuff related to tech tutorials/personal development something inside says to me now share it with an online community.
BS Computer Science | Learn, Create and Share
Keep reading
More stories from Jalal Mansoori and writers in 01 and other communities.
Why Businesses Are Investing in AI Agent Development in 2026
In late 2025, a mid-sized SaaS CEO noticed something unusual in the weekly performance dashboard. One “employee” was closing support tickets overnight, optimizing marketing spend before morning standups, and flagging revenue risks days before finance meetings. It didn’t take lunch breaks, didn’t burn out, and didn’t wait for instructions. That employee wasn’t human it was an AI agent.
By Nishant Bijani7 days ago in 01
Building Brands That Shape Culture: The Nathan Allen Pirtle Approach
Brands don’t shape culture by accident. They do it through intention, clarity, and a deep understanding of the people they serve. In an era where consumers are more informed, more connected, and more values-driven than ever before, the most influential brands are no longer those with the biggest budgets, but those with the strongest point of view.
By Jeffrey D. Gross MD6 days ago in 01


Comments
There are no comments for this story
Be the first to respond and start the conversation.