
How to burn a DVD with the Best & Free Software
Learn how to burn DVD Movies using the best tools for video and data discs.

If you have home-recorded videos capturing unforgettable moments, burning them onto DVDs is a wonderful way to organize and preserve these memories for the long run. Burning a DVD involves writing data onto a physical disk, which provides a reliable storage medium with a longer shelf life than many digital-only solutions. Whether you want to archive cherished family videos or create shareable discs, DVDs remain a convenient and durable choice.
In this guide, I will share several effective methods to burn a DVD, either as a video DVD playable on any DVD player or as a data DVD for storing files. Additionally, I'll share my personal experiences testing each software to help you find the best fit.
How to Burn Movies to DVD with DVDFab DVD Creator?
DVDFab DVD Creator is a professional-grade tool that excels in transforming various video formats into high-quality DVDs, ISO images, or folders. One standout feature I appreciated during my trials was the fast burning speed—faster than many competitors thanks to robust hardware acceleration. This is a real time-saver when handling multiple videos in batches.
Key Features:
- Burn DVDs without quality loss, supporting formats such as DVD-9 and DVD-5
- Hardware acceleration ensures efficient processing, even when burning multiple discs
- Extensive customization options including professional DVD menus, templates, and video editors
- Available for both Windows PC and Mac users, with a free trial available
Steps to burn a DVD using DVDFab DVD Creator
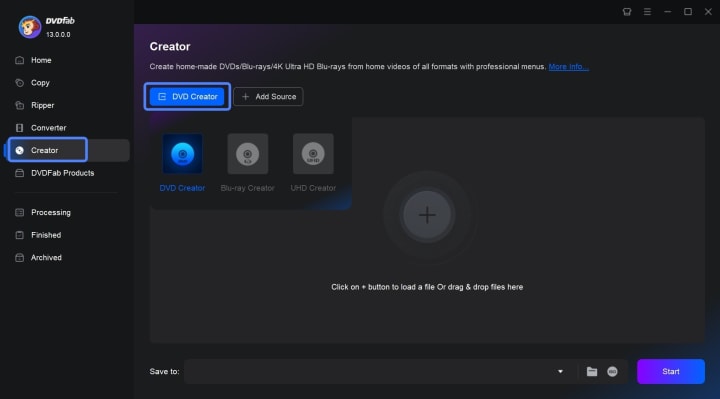
Step 1: Download and launch DVDFab DVD Creator. Load your video by clicking the + button or dragging it into the interface for DVD creation.
Step 2: After loading your video, the main interface displays input and output details. You can select audio track(s) and subtitle(s) or add external subtitles.
Use Advanced Settings and Video Editors to adjust output parameters. In the Menu Settings, choose a template and personalize it with gadgets and other options to suit your preferences.
Step 3: Set the file directory and click Start to burn DVD movies quickly and free.
How to Burn DVDs with DVD Flick
DVD Flick is a free DVD authoring tool designed for Windows users who want to turn video files into playable DVDs without paying for commercial software. During my testing, what stood out most was its straightforward workflow. It does not try to overwhelm you with too many advanced controls, which makes it a practical option for users who simply want to burn movies to DVD with menus and subtitles.
Key Features:
- Supports a wide range of video formats, including AVI, MP4, MOV, WMV, FLV, and MKV
- Allows users to add subtitles, audio tracks, and simple DVD menus
- Can create DVD-Video discs, ISO images, or VIDEO_TS folders
- Suitable for creating DVDs that can play on most standalone DVD players
- Completely free to use on Windows
Limitations:
- Available only for Windows
- The interface looks old compared with newer software
- Burning speed is not as fast as some commercial alternatives
- Menu customization is more limited than in premium DVD creator programs
Steps to Burn DVDs using DVD Flick
Step 1: Download and install DVD Flick on your Windows computer. Launch the program and click Add title to import the video files you want to burn to DVD.
Step 2: After adding your videos, use the Project settings option to adjust the disc format, video settings, and burning preferences. If needed, you can also add subtitles, additional audio tracks, or configure chapter settings.
Step 3: Open the Menu settings section and choose a DVD menu template. This will help make the final disc easier to navigate when played on a DVD player.
Step 4: Insert a blank DVD into your disc drive. Then choose whether you want to burn directly to disc or create an ISO image or VIDEO_TS folder first.
Step 5: Click Create DVD to begin the process. DVD Flick will encode the video and prepare the DVD structure. Once the burning is complete, your disc should be ready for playback on most DVD players.
How to Burn DVD Movies Free with DVD Styler
DVD Styler is an open-source, and cross-platform DVD authoring tool with a focus on custom menus and scripting flexibility. It supports burning video files to play on any standalone DVD player, and allows you to create multi-chapter DVDs with interactive navigation and chapter menus.
Key Features:
- Enables creation of professional DVDs with fully customizable menus
- Provides DVD scripting capabilities for users who want to customize navigation
- Supports a wide variety of video formats, enabling flexible input options
Limitations:
- The interface, while functional, is somewhat dated
- The software frequently crashes when processing large video files
- DVDStyler’s supports are limited compared to commercial alternatives
Detailed steps to Burn a DVD using DVD Styler
Step 1: Launch DVDStyler and set the Video Format to NTSC on the New project screen. Click OK to proceed.
Step 2: Choose a menu template, title your project, and select Chapter selection before clicking OK again.
Then, drag and drop your MP4 video file into the timeline. You can also right-click in the timeline to browse and add your video from your computer or storage device.
Step 3: Connect an external CD/DVD drive via USB to burn your movie. Load a blank DVD into the drive and close it. Then, click the orange burn icon to start the burning process.
Step 4: Click the burn icon and then Start. The Generate DVD screen will show progress. After completion, Burning was successful will appear, and the DVD will eject.
Conclusion
Burning DVDs has always been a crucial method for backing up data, preserving precious videos, and ensuring offline access to your media. In this article, we've explored several reliable programs catering to different user needs and expertise levels.
DVDFab DVD Creator stands out for its speed, advanced customization features, and high-quality output. DVD Flick offers a simple, free option suitable for beginners. And DVDStyler offers cross-platform customization for those who prefer a hands-on approach.
About the Creator
Diana
I’m a passionate Blu-ray collector who loves preserving the magic of physical media. Every now and then, I enjoy burning precious family videos onto discs, keeping memories alive in a tangible way.
Exploring AI InsMelo: Revolutionizing Music Composition
Abstract AI InsMelo is an innovative artificial intelligence tool designed to transform the landscape of music composition. By leveraging advanced algorithms and machine learning techniques, InsMelo enables musicians, composers, and creators to generate unique melodies and harmonies, enhancing their creative processes. This article delves into the features, benefits, and implications of AI InsMelo in the music industry, highlighting its potential to democratize music creation and inspire new artistic expressions.
By Arslan Khan6 days ago in 01


Comments
There are no comments for this story
Be the first to respond and start the conversation.