
Dockerizing a Django Project | Easiest guide
What | Why | How
Before starting, all the code is present on my GitHub. Click Har1s-Akbar to see the code
The Big What:
In this section we will go through
- Docker
- Docker Image
- Docker Container
Docker:
Docker is a platform that provides services in shipping the software in form of packages that are container.
Docker follows the philosophy of Virtual Machines but instead of virtualizing whole OS Docker virtualizes only the necessary part. All the containers run on the same OS.
Docker consists of
- Docker Engine — Docker Engine is core software that runs and manages Containers and images(more on images and containers in a sec). Docker Engine used to be monolithic but thanks to continuous development and betterment it is modular in nature.
- Docker client — Docker client is the command line tool from which we interact with docker engine.
Docker Image:
“A Docker Image is a blue print for the development of a container”
Imagine you think of making a designer cloth. First you sketch out the cloth how it would look where would be the buttons, where would be the cuts and all that, the sketch you made is an Image.
Images are made up of several layers stacked on top of each other and presented as a single object. Images are build time construct
Inside Dokcer image is:
- Cut down OS System.
- Dependencies required to run a certain program.
Docker images are created by Dockerfile and docker-compose.yml.(more on these in How section).
Docker images can be published and pulled from Docker Hub
Docker Container:
“Docker Container is the running instance of the docker image.”
resuming our designer cloth example the sketch that tells how cloth should be stitched and designed is the blueprint thus the Image and the final product we get by implementing the blue print is our container.
Docker containers are run time construct. They are super fast and light-weight. Docker container is analogous to VM but a Docker container is not a full blown OS rather all the containers on a machine share same Kernel. It is possible to run as many containers as you like with a single Kernel.
Once a Docker container is started both container and Docker image become dependent on each other. Image the containers created on can not be deleted until the container is terminated.
The Big Why:
A big question still arises why should we use Docker? Why should we go through all the trouble and learn about some platform that containerize our application?
You may be asking these kind of questions.
let me answer them:
- Docker allows scalability of your application. As your application grow in size docker is designed to handle it. There is a dedicated Swarm mode in Docker. That allows you to run thousands of containers
- One of the biggest problems the Docker solves that it ensures the code consistency docker promises consistency that your code will work no matter on which machine it is being run. It will run smoothly as long as the Dockerfile and docker-compose.yml are unchanged.
- Docker makes the development, staging and deployment fast. Docker speeds up the stages of app development. It allows working in teams.
- Docker has great community support and is ever growing
The Big How:
Now the Big how.
For the tutorial I suppose you already have Docker, Django, pipenv installed.
Install django using pipenv in your directory. Activate the virtual environment.
Start a django-project in the directory through pipenv using Git/ command prompt. (I’ll be using Git Bash).
Code:
- pipenv install django
- pipenv shell
- django-admin startproject main.
After that create 2 more files
- Dokcerfile — Dockerfile contains information, command and data to build docker Image
- docker-compose.yml - it is a yaml file that tells docker which services to run in it’s conatiner. we can have as many services we want in a container, but it has a downgrade. Containers are made to be light weight and fast if we keep adding on services it’ll make container slow. So adding too many services is avoided.
create files using Git bash.
Code:
- touch Dockerfile
- touch docker-compose.yml
These are all the files we’ll need.
Head over to your code editor and open the django-project.(I am using VS Code)
You should have a folder structure like this.

Now I’ll explain Dockerfile & docker-compose.yml thoroughly.
Dockerfile:
Now we will study Dockerfile thoroughly
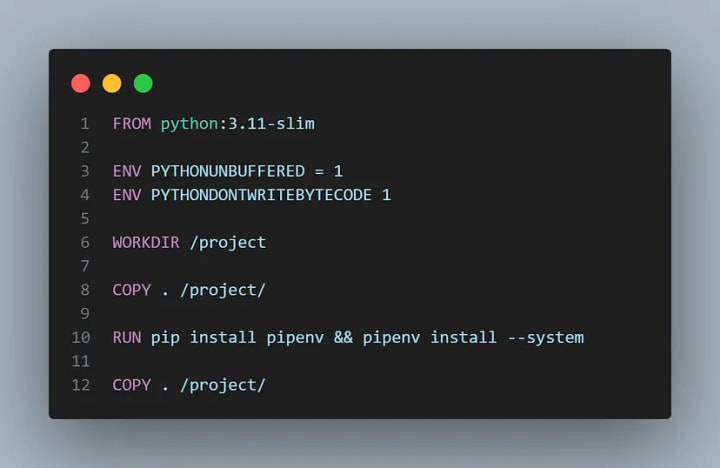
- On line 1st we are pulling python image with tag ‘3.11-slim’ from the Docker hub.
- On line 3 & 4 we defined some environmental variables “PYTHONUNBUFFERED” ensures our console output looks familiar and is not buffered by Docker. “PYTHONDONTWRITEBYTECODE” will not try to write .pyc file.
- “WORKDIR” command specifies the directory in the container where our current code will be copied.
- “COPY” command allows us to copy our current code in the directory we set above by using “WORKDIR”.
- “ . ” means our current directory and “/project/” specify the directory in docker container.
- “RUN” command is used to download the required dependencies and libraries. This command will create another layer on top of of our previous layer “python:3.11-slim”. “ — system” tag at the end of 10th line specifies and tells Docker to download any dependency in our “Pipfile”.
- At the end “COPY” command again copy our whole code in the docker container’s “/project/” directory.
docker-compose.yml:
Now we will go through “docker-compose.yml” file:
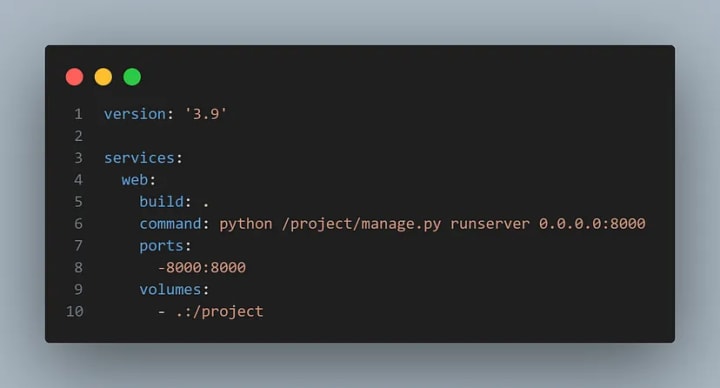
- At the top we specified the “docker-compose.yml” files current version.
- Next at 3rd line we specified the services we will be using.
Note: This file should be indented correctly otherwise it won’t run
- Since we will be using web service we specified it.
- Next “build” tells docker to build the image “ . ” build the image of current service.
- “command” specifies the command we want to run as soon as the container is initialized. We want to spin the server, since our code is in the “project” directory inside the container we use “/project/manage.py”.
- “ports” next we specifies the ports we want Docker to use. which are “8000” (localhost).
- At last we specify the “volume”, where our containers volume should be mounted.
This is all the code we require to Dockerize our django-prroject.
Dockerizing the Project:
The final step to Dockerize is to run few commands through the command prompt/ Git Bash.
Make sure you are in the correct directory and that docker server is running before running any docker commands.
From the root of your project run
- docker run build .
This will probably take some time. You can rest for a while.
After the successful build your bash will look like this.
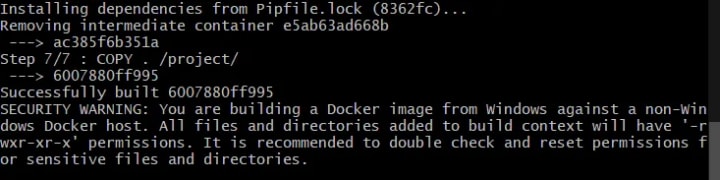
security warning is because I am using Linux containers on windows.
after this run another Bash command.
- docker-compose up -d

Bash will output this type of response.
This will build the container from the image and django app is started on Localhost.
This is how you Dockerize your django application.
Thank You for reading the tutorial.
It would mean a lot if you can follow me.
About the Creator
Keep reading
More stories from writers in 01 and other communities.
Twitter Down
Twitter Down When a major social media platform like Twitter experiences technical problems, millions of users immediately search for answers. Twitter, also known as X, plays a central role in news sharing, public discussion, and real time updates, so even short disruptions can feel significant. Recently, many users have reported difficulties accessing Twitter, loading timelines, posting content, or using certain features. This has led to widespread questions about whether Twitter is down, why it happens, and what users should expect. This article answers the most common questions people search for and explains the situation clearly.
By America today 5 days ago in 01
Navigating Cryptocurrency Asset Recovery
The challenging environment of digital asset theft and loss has given rise to a specialized sector focused on recovery. This field consists of companies with distinct operational models, from direct investigation to technical support and foundational analytics. The following outlines five notable entities often referenced in this space, categorized by their primary function.
By Milan Robertsabout 6 hours ago in 01
Ludacris and Nelly draw backlash over bookings at MAGA-coded music festival
Ludacris and Nelly headlining a mostly right-wing event is good for them. It’s also great for the genre of hip hop. The two rap veterans have showcased their talents on other stages. Why can’t they perform for mostly MAGA folks and grab that bag?
By Skyler Saunders6 days ago in Beat


Comments
There are no comments for this story
Be the first to respond and start the conversation.