
DIY Tips for Making Your Own Extra Long Kick Down Door Stop
Extra Long Kick Down Door Stop

A kick down door stop is a small yet crucial component in any home or office. It prevents doors from slamming shut due to drafts, protects walls from damage, and keeps doors open when needed. But what if you need an extra-long kick down door stop? Standard door stops might not be sufficient for certain situations, such as uneven floors, thick carpets, or larger doors. Creating your own extra-long kick down door stop can be a cost-effective and customizable solution, ensuring your doors stay exactly where you want them.
Consideration: Choosing the Right Materials for Your Kick Down Door Stop
Before diving into the DIY project, it’s essential to select the right materials. The durability of your kick down door stop depends on the quality of materials used. Typically, metal or wood is used for the main body, while rubber is ideal for the stopper at the end to prevent slipping. Consider the weight and size of your door, as well as the surface it will rest on. Strong, sturdy materials will ensure that your door stop is effective and long-lasting, even with frequent use.
Tools You’ll Need for Making a Kick Down Door Stop
To create a durable and functional kick down door stop, you’ll need a few essential tools. A saw will be necessary for cutting wood or metal to the desired length. Sandpaper or a metal file will smooth out any rough edges. You’ll also need a drill for creating holes for screws and bolts, and a screwdriver or wrench for assembly. A measuring tape ensures accurate dimensions, and a pencil for marking cuts. Gathering these tools beforehand will make the process smoother and more efficient.
Measuring and Cutting the Main Body of Your Door Stop
Accurate measurements are crucial for the success of your DIY kick down door stop project. Start by measuring the height from the door’s bottom edge to the floor. Add a few extra inches if you need a longer reach. Once you have the correct measurement, transfer it to your material—whether wood or metal—and mark the cutting line. Carefully cut along this line using your saw. Take your time to ensure a clean, straight cut. After cutting, smooth the edges with sandpaper or a metal file to avoid any roughness that could cause damage or injury.
Assembling the Kick Down Mechanism
The kick down mechanism is the heart of your kick down door stop. This mechanism allows the door stop to stay in place when kicked down and retract when not in use. Start by attaching a hinge to the top part of your cut piece, which will allow it to pivot. Next, attach a spring-loaded pin or bolt that can lock the door stop in the down position when engaged. Ensure all parts are securely fastened and test the mechanism multiple times to make sure it operates smoothly. The assembly should be sturdy and reliable, providing ease of use and durability.
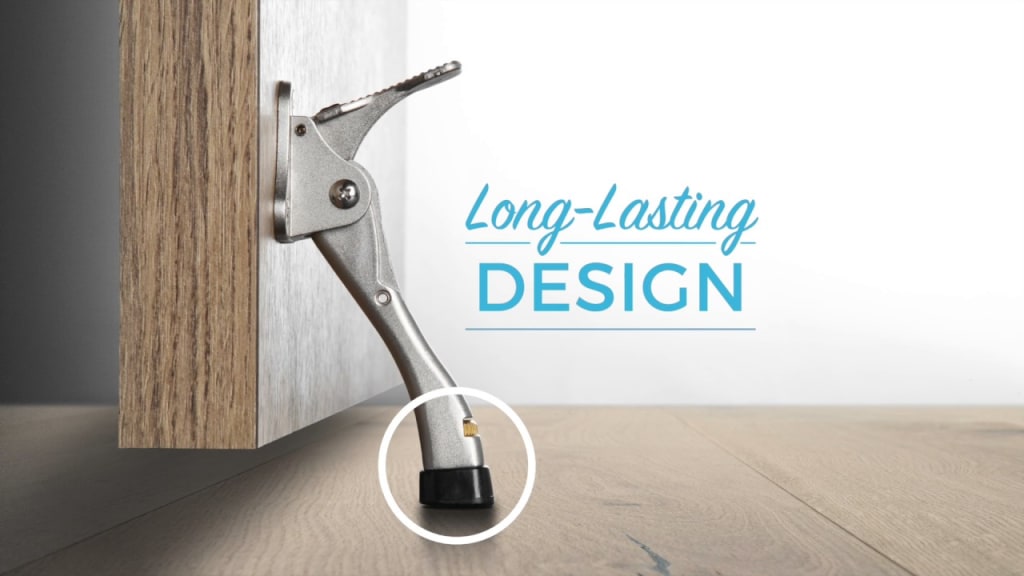
Adding the Rubber Stopper for Enhanced Grip
The rubber stopper at the end of your kick down door stop is essential for providing a strong grip on the floor surface. This prevents the door stop from slipping and ensures it holds the door firmly in place. You can purchase a pre-made rubber stopper or create one by cutting a piece from an old rubber mat or tire. Attach the stopper to the end of your door stop with strong adhesive or screws, making sure it’s firmly in place. The rubber should cover the entire bottom surface to maximize contact with the floor and prevent any unwanted movement.
Painting and Finishing Your Door Stop
Once your kick down door stop is fully assembled, you may want to paint or finish it to match your home’s décor or to protect it from wear and tear. Choose a paint or finish that is suitable for the material you used—metal, wood, or both. Before painting, make sure the surface is clean and smooth. Apply a primer if necessary, followed by the paint or finish of your choice. Multiple coats may be needed for a durable finish. Allow sufficient drying time between coats. This final step will give your door stop a polished, professional look while also adding an extra layer of protection.
Installing Your DIY Kick Down Door Stop
Installing your newly crafted kick down door stop is the final step in the process. Begin by determining the best position on the door for installation. Typically, the door stop is placed near the bottom edge, centered, and in a spot where it will make full contact with the floor when engaged. Mark the position with a pencil. Drill pilot holes for the screws, then attach the door stop using screws or bolts, making sure it’s securely fastened. Test the installation by kicking the door stop down and ensuring it stays in place and retracts smoothly when released.
Testing the Functionality of Your Door Stop
After installation, it’s crucial to test the functionality of your kick down door stop thoroughly. Open the door and engage the stop to see if it holds the door securely in place. Ensure that it works effectively on different floor surfaces, whether carpet, tile, or wood. Try applying pressure to the door to check if the stop remains firm. Also, test the retraction mechanism to ensure it operates smoothly and retracts completely when not in use. If any issues arise, make adjustments as needed to improve the functionality and reliability of the door stop.
Troubleshooting Common Issues with Kick Down Door Stops
Even with careful construction and installation, you may encounter some issues with your kick down door stop. Common problems include the door stop not staying in place, difficulty retracting, or slipping on the floor. These issues can often be resolved with minor adjustments. If the door stop doesn’t stay down, check the spring-loaded pin or bolt for proper engagement. Slipping can usually be fixed by replacing or repositioning the rubber stopper. If the mechanism is stiff, applying a lubricant like WD-40 can help. Addressing these problems early will ensure your door stop remains functional and effective.
Maintenance Tips for Longevity
To ensure the longevity of your DIY kick down door stop, regular maintenance is key. Periodically check all screws and bolts to ensure they remain tight. Inspect the rubber stopper for wear and replace it if it becomes damaged or loses its grip. Keep the mechanism clean and free from debris that could hinder its operation. If your door stop is painted or finished, touch up any areas where the finish has worn away to prevent rust or other damage. With proper care, your homemade door stop will serve you well for years to come.
Customizing Your Door Stop for Unique Needs
One of the advantages of making your own kick down door stop is the ability to customize it to fit your unique needs. For instance, if you have a particularly heavy door, you might want to use thicker, stronger materials. If aesthetics are important, you can choose colors and finishes that match your home’s décor. You can also experiment with different designs for the stopper mechanism, such as incorporating a magnet to help keep the stop in place. Customizing your door stop allows you to create a functional and stylish addition to your home that perfectly suits your requirements.
Comparing DIY to Store-Bought Door Stops
While store bought kick down door stops are readily available, they may not always meet your specific needs, especially if you require an extra-long version. DIY door stops offer the advantage of customization and can be made to the exact specifications you need. They also provide a sense of accomplishment and the opportunity to use higher-quality materials than those found in mass-produced options. On the other hand, store-bought stops are convenient and often come with warranties. Weighing the pros and cons of each option can help you decide whether a DIY or store-bought door stop is the best choice for your situation.
Safety Considerations for DIY Door Stops
Safety is paramount when undertaking any DIY project, including making a kick down door stop. Always wear appropriate safety gear, such as gloves and goggles, when cutting or drilling materials. Use tools according to the manufacturer’s instructions and take your time to avoid accidents. Ensure that your work area is well-lit and free from distractions. When installing the door stop, double-check that all components are securely fastened to prevent them from coming loose and causing injury. Following these safety tips will help you complete your project without incident and result in a reliable, safe door stop.
Budgeting for Your DIY Project
Creating a DIY kick down door stop is not only a practical project but also a cost-effective one. The materials and tools needed are relatively inexpensive, especially if you already own basic tools like a saw and drill. However, it’s important to budget for any additional items you may need, such as paint, rubber stoppers, or specific screws. By planning your budget ahead of time, you can avoid any unexpected costs and ensure that your project stays within your financial means. This makes DIY a great option for those looking to enhance their home on a budget.
Eco-Friendly Options for DIY Door Stops
If you’re environmentally conscious, making your own kick down door stop can be an opportunity to use eco-friendly materials. Consider using reclaimed wood or repurposing metal from old furniture or appliances. You can also look for non-toxic paints and finishes to reduce your environmental impact. Using recycled or upcycled materials not only helps the environment but also adds a unique, rustic charm to your finished project. An eco-friendly approach to your DIY project aligns with sustainable living practices and can inspire others to take similar steps in their own homes.
Conclusion: The Satisfaction of Creating Your Own Kick Down Door Stop
Crafting your own kick down door stop offers a rewarding blend of creativity, practicality, and satisfaction. By following these DIY tips, you can create a door stop that not only meets your specific needs but also reflects your personal style. Whether you’re motivated by the desire to save money, the need for a custom solution, or simply the joy of making something with your hands, this project provides a tangible result that will serve you well for years. Plus, the skills and knowledge gained from this project can be applied to future DIY endeavors, making it a valuable learning experience.
About the Creator
shiffler equip
If you're looking for school furniture and safety equipment in your area, don't look further. We have a wide rang of high-quality products at medium prices.
https://www.shifflerequip.com
Keep reading
More stories from shiffler equip and writers in 01 and other communities.
Lift Chairs Revolutionizing Comfort and Accessibility in Your Home
In today's busy globe, maintaining a comfy and available living environment is more critical than ever. Raise chairs have become a transformative option for individuals looking for enhanced convenience and independence within their homes. These cutting-edge chairs are not just about benefit; they stand for a substantial advancement in home mobility remedies. In this detailed guide, we will certainly check out just how lift chairs are changing home comfort and availability, delving into their features, advantages, and why they are an essential enhancement to any type of home.
By shiffler equip2 years ago in Art


Comments
There are no comments for this story
Be the first to respond and start the conversation.